
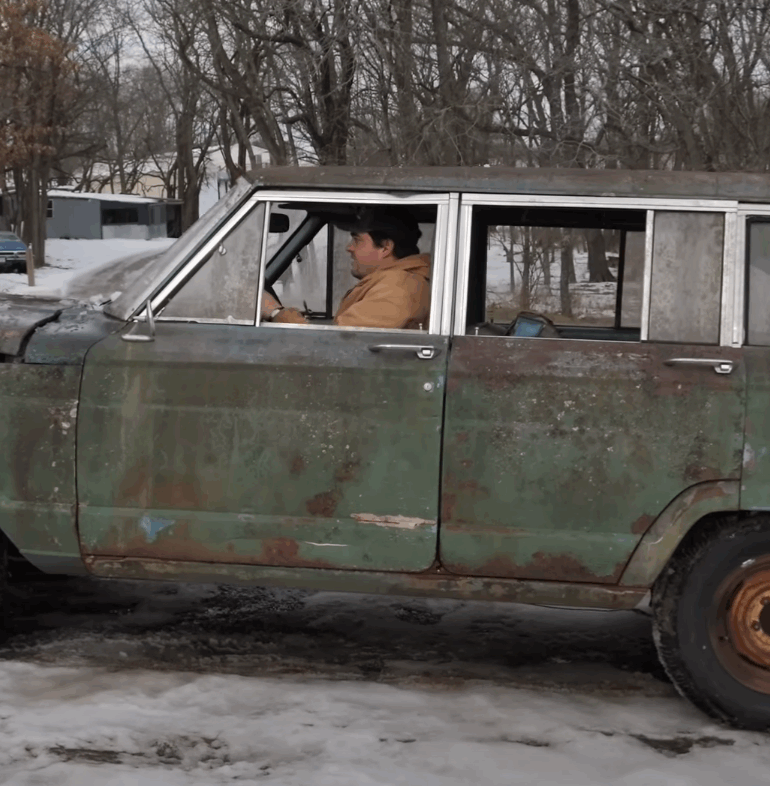
Taking on the restoration of a 1968 Jeep Wagoneer can be quite a challenge, especially when facing years of wear and plenty of unknown issues. This particular Jeep came in rough condition, missing much of its floor and showing heavy signs of aging, but its 350 Buick V8 engine stood out as a highlight and sparked fresh interest in the project.
Work began by assessing the vehicle’s condition, moving quickly to address the brakes and check the fuel system. Along the way, there were discoveries of old rodent damage and hardware problems, but attention to detail and steady problem-solving kept things moving forward. Now, with some key issues fixed and a plan forming for what comes next, there is hope the Wagoneer will soon be on the road again.
Key Takeaways
- The 1968 Jeep Wagoneer needed significant repairs and cleanup.
- Major focus was placed on the engine, brakes, and interior damage.
- Ongoing work aims to restore driving condition and address remaining issues.
1968 Jeep Wagoneer: Background and Details
Main Attributes and Standout Elements
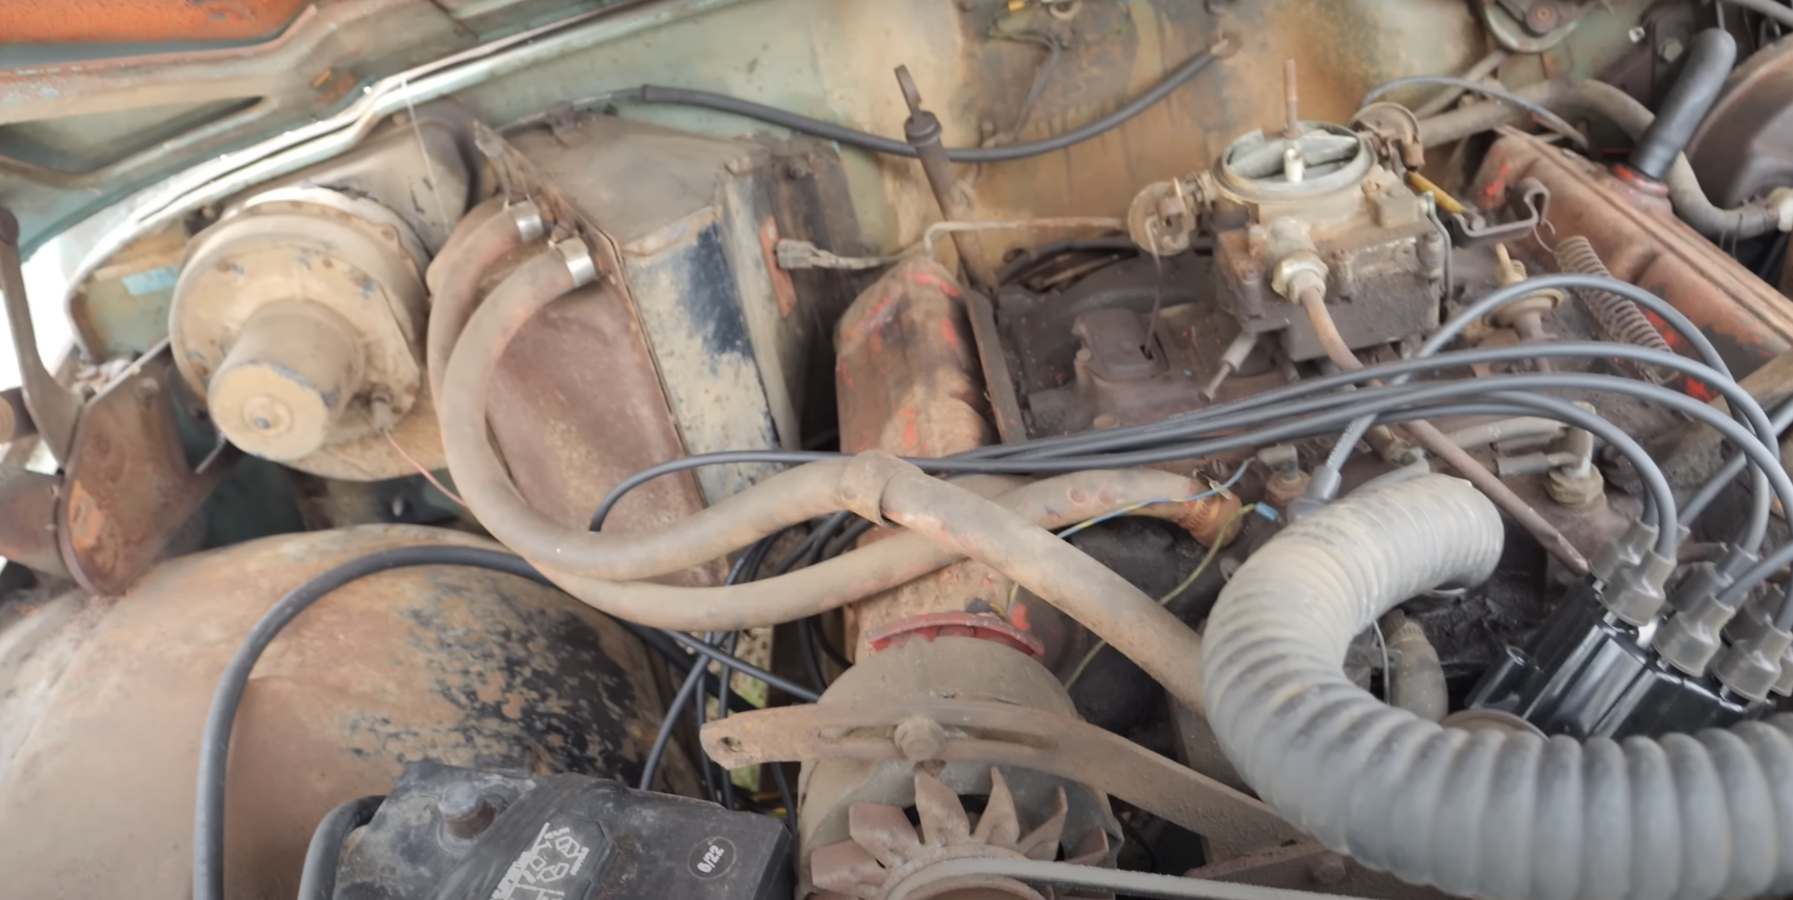
The 1968 Jeep Wagoneer featured a Buick 350 V8 engine, often called the Dauntless 350. This powerplant made the Jeep stand out from many other SUVs of its day. The 4×4 system was functional and important for off-road use.
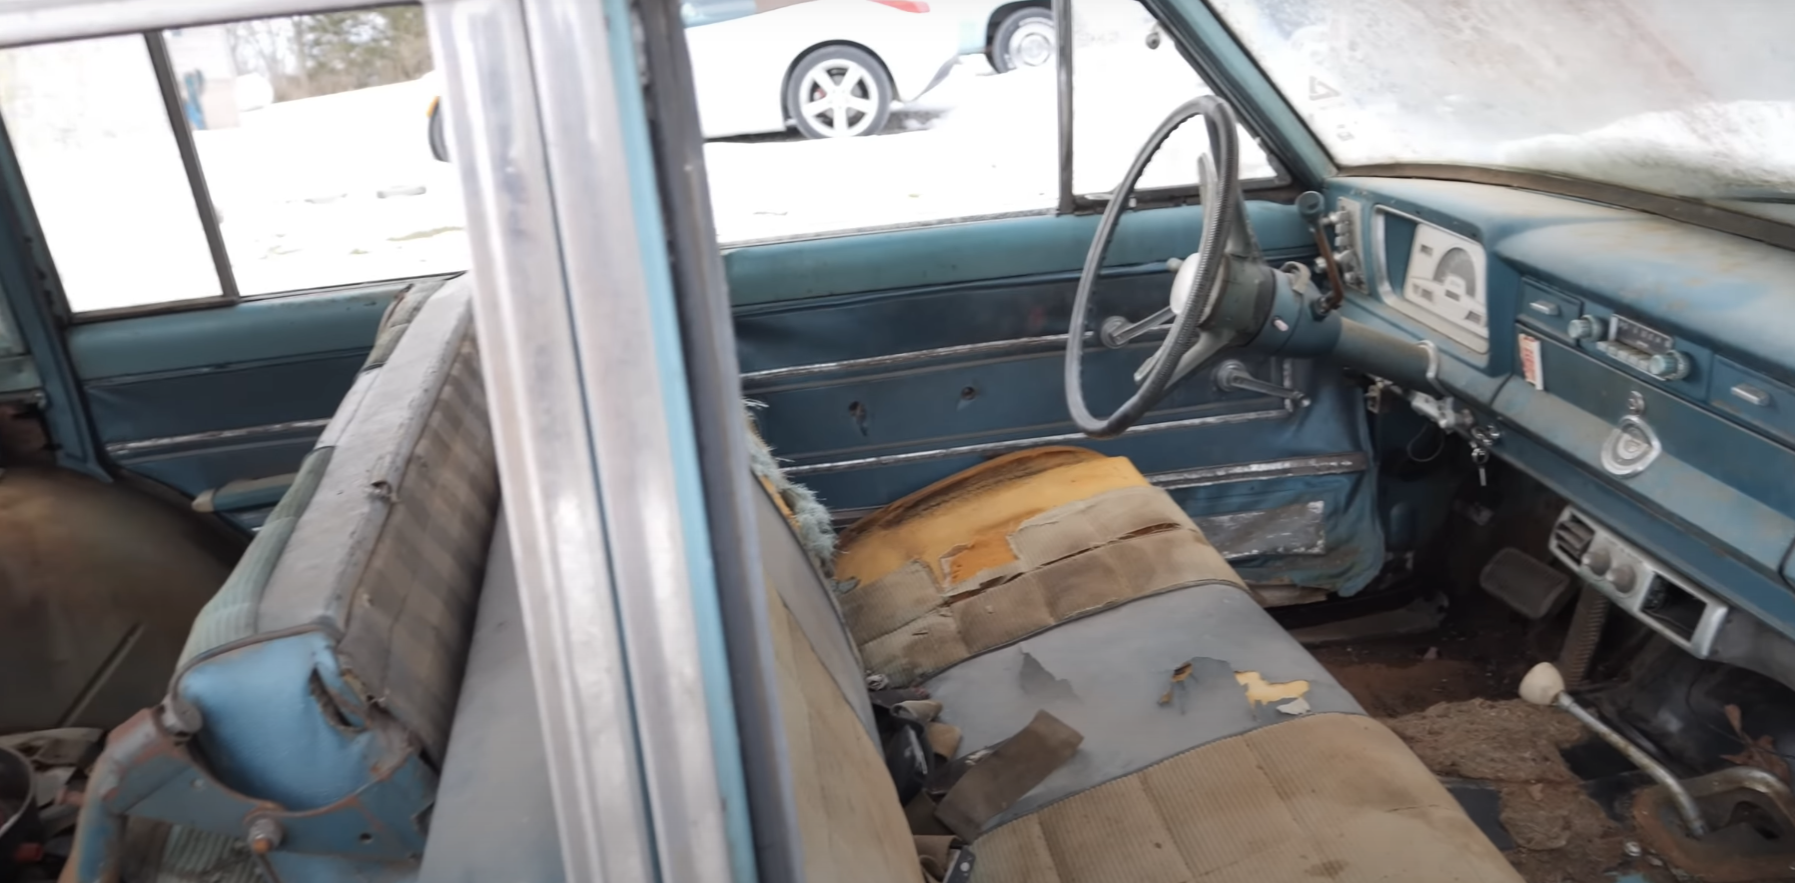
Inside, not much was left. There was very little floor, missing interior parts, and many signs of age, like moss and old foil from cigarette packs found in the headliner. The dashboard remained in good condition, but the back window would not roll down due to old keys that did not fit.
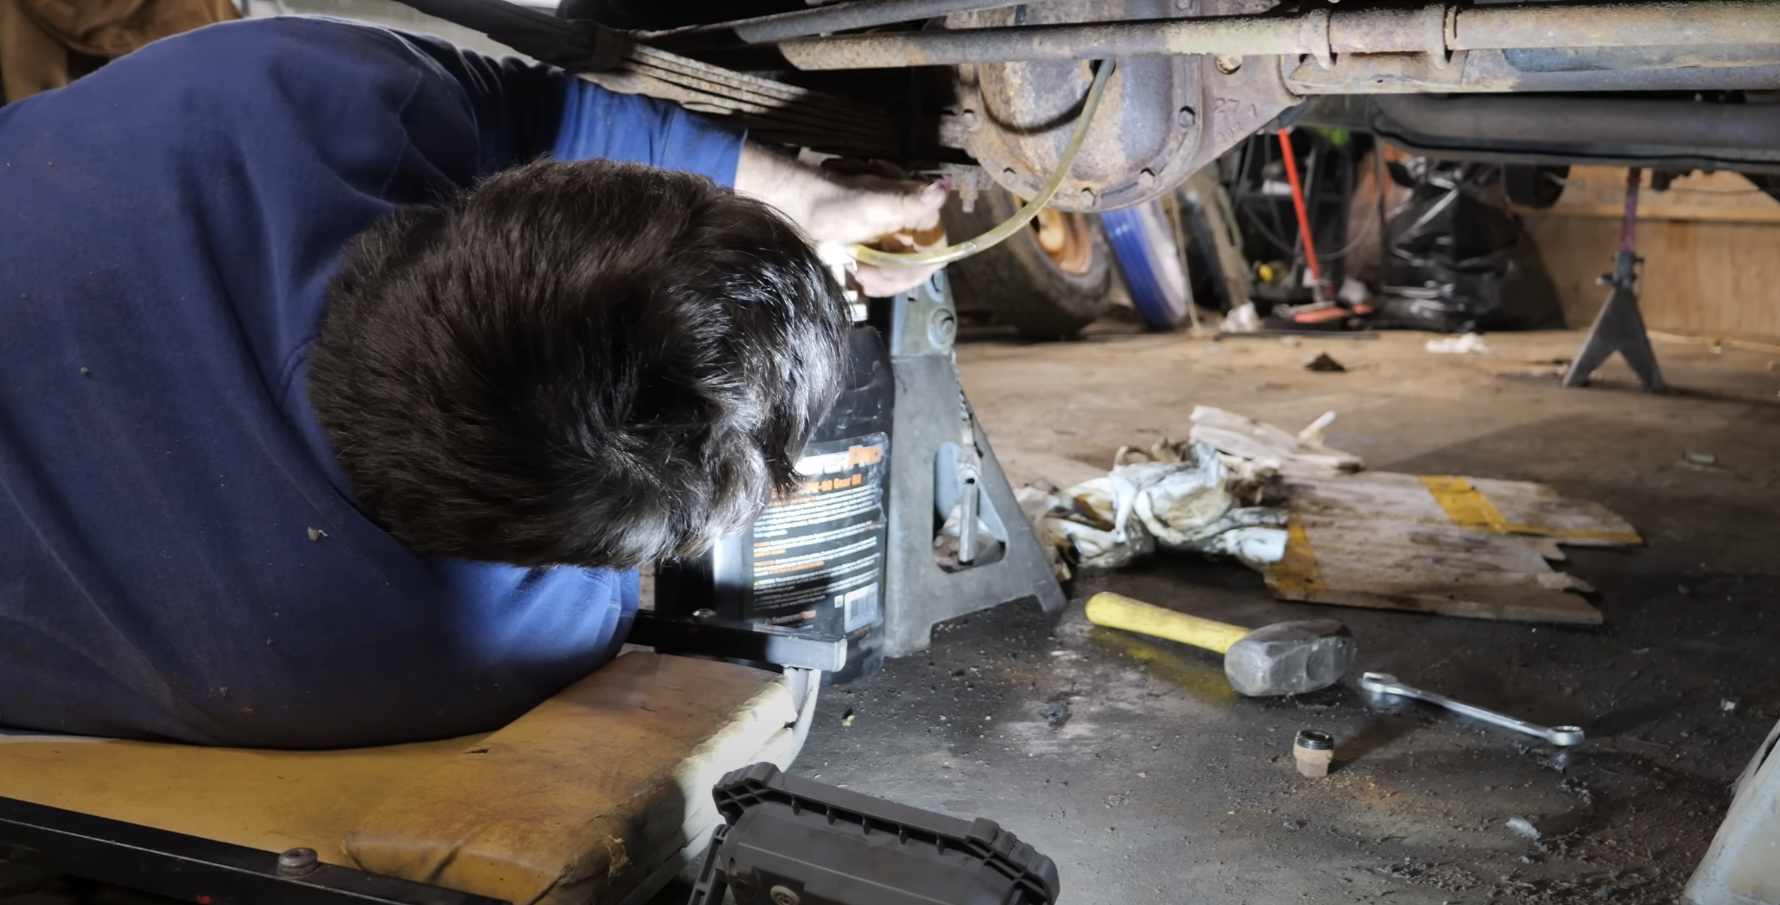
There were drum brakes all around, using Ford-style brake hardware that was common for decades. Most of the wheels needed attention, such as new wheel studs and brake shoes. Some brake parts had been installed backward, and there was a leaky axle seal, likely from years of sitting unused.
A summary table of notable features:
| Feature | Details |
|---|---|
| Engine | Buick Dauntless 350 V8 |
| Drivetrain | 4×4 |
| Brakes | Drum, Ford Hardware |
| Interior Condition | Poor |
| Dashboard | Good Condition |
| Special Issues | Leaky axle seal, missing floor panels |
| Modifications | New tires added for transport |
| Other Notes | Covered in Georgia moss |
Prior Ownership and How It Was Acquired
This Jeep Wagoneer came from another YouTube creator, who had previously made a video about it. The previous owner managed to get the Jeep running, but it was running off a fuel jug and still needed a lot of work. The vehicle was moved to the current owner with new tires installed just for transport.
The battery that came with it turned out to be in good shape. Although the Jeep was very rough, the previous owner helped by making it a little easier to move and start. The Jeep had been sitting unused for decades before being brought in for repairs.
First Look at Vehicle Condition
Outside Appearance and Body Shape
- The Jeep shows heavy moss growth from Georgia.
- There is clear wear and age visible across the body, with missing sections and exposed areas.
- New tires have been added for safer movement.
- Battery and oil filter have been recently replaced.
- Table: Exterior Features
Part Condition Moss Thick coverage Body panels Many missing/damaged Tires New Glass/windows Mixed; rear window stuck Battery Functional
Cabin Check and Observations
- Interior is mostly gutted; dashboard is in good shape, but the floor is almost gone.
- The drive shaft is visible due to the lack of floor.
- Cigarette foil found in the headliner, likely from rodents.
- Back window and new keys do not operate correctly.
- The vehicle has been sitting for a long time, possibly decades, leading to significant interior decay.
- Large rat and other debris were discovered inside.
Engine and Brake System Status
- The 350 Buick V8 engine starts and runs, possibly due to recent points, cap, wires, and a working battery.
- The brake system is non-functional and is a priority for repair.
- New oil filter and signs of maintenance on the fuel system are visible.
- Brake Details:
- All drum brakes present, some parts are stuck but can move with effort.
- Several loose or worn wheel studs are noted.
- Brake shoes on some wheels are partly missing or installed backward.
- One axle bearing is exposed for inspection.
- One brake shoe is covered in oil from a leaking axle seal; the leak appears old.
- The fuel tank is not in use; a temporary fuel source is being used instead.
- Four-wheel drive appears to engage correctly.
- Valve cover gaskets may need replacement.
Key points:
- Major repairs center on brakes and fuel, as the motor seems solid.
- Several small mechanical issues need attention, including wheel studs and seals.
Under the Hood and Engine Details
Buick 350 V8 Capabilities
The 1968 Jeep Wagoneer is equipped with a 350 cubic inch Buick V8 engine. This engine drew attention because of its unique placement in the vehicle. The 350 V8 comes with recently replaced cap, points, wires, and a new oil filter, which help its performance. The belts still appear usable and the battery holds a charge.
- 350 cubic inch displacement
- New oil filter and battery
- Updated ignition components
- Operates with a temporary fuel jug
Service Work and Core Parts
Several mechanical systems received attention. New tires were installed for easier transport. The brake system is made up of drum brakes at each wheel, which are fairly standard. Some brake shoes were found worn or installed incorrectly and are being fixed. Loose wheel studs were found on multiple wheels and will need replacement.
Recent Maintenance List:
- New tires
- New oil filter
- Brake system checks (cleaned, freed up, and shoes inspected)
- Replacement and tightening of wheel studs
- Changed rubber brake hoses
- Inspected and replaced wheel cylinders as needed
A table showing service points:
| Area | Service/Inspection |
|---|---|
| Engine | New oil filter, battery check |
| Brakes | Shoe, drum, and hose service |
| Tires | New tires installed |
| Drivetrain | Visual drive shaft check |
Startup Steps and First Run
The Jeep started up after a few basic tasks. The fuel system was rigged using a jug since the original tank is out of commission. The battery proved reliable, and the engine fired up after some effort.
Startup Procedure:
- Check and connect battery.
- Supply fuel with jug system.
- Press gas pedal and crank engine.
- The engine starts, but the pedal needed reattachment.
- 4×4 system confirmed working.
After getting the engine running, the focus moved to the braking system and checking for leaks such as a valve cover gasket. Despite sitting for decades, the key components held together enough for a successful start.
Fuel System Evaluation and Updates
Checking the Tank and Supplying Fuel
The Jeep Wagoneer’s fuel system needed some close attention. The tank appeared to have been replaced or fixed up by the previous owner, making it less of a concern right now. For a while, the vehicle was running using a fuel jug instead of the standard tank, which points to past issues with fuel delivery.
Here’s what was done:
- Inspection: The condition of the fuel tank was checked to confirm there were no leaks or major damage.
- Fuel Source: Since it had been running off a jug, the team noted the need to hook things back up to the main tank for proper fuel delivery.
A simple table highlights the process:
| Task | Status |
|---|---|
| Tank Inspected | Completed |
| Checked for Leaks | No Major Issues |
| Main Tank in Use | In Progress |
Testing Battery and Wiring for Power
The battery that came with the Jeep turned out to be a good one, surprisingly holding a solid charge. This meant less work was needed in this area. All electrical connections for the fuel system were also checked so power would be reliable during repairs and upgrades.
Steps included:
- Checking the battery’s charge.
- Inspecting the connections for corrosion.
- Making sure the electrical system supplies power to fuel system parts.
List of Checks:
- Battery held charge on first try.
- No obvious corrosion on terminals.
- Wiring for fuel system appeared connected and usable.
The basics were there, and with the battery working, the focus could move on to other mechanical systems.
Restoring the Brake System
Taking Apart and Checking the Front Drum Brakes
When working on the 1968 Jeep Wagoneer, the first step is to lift the vehicle and remove the wheels. The front drum brakes use pretty standard drum brake parts. Be sure to check each part for any rust, missing pieces, or wear. Sometimes the brake shoes can look fine, but the top section might be missing or thin from use. All wheel studs should be checked, as loose or missing studs are common on these Jeeps.
Checklist:
- Inspect drum brake shoes for wear
- Look for stuck or locked hubs
- Clean out any debris or animal nests
- Make sure all wheel studs are tight
It’s not unusual to find items like cigarette foil or signs of rodents, so always clean things up before going further.
Replacing Wheel Cylinders and Brake Hoses
To replace a brake hose, the metal line might be stuck after long years of sitting. Cut the old hose if needed and use a socket to remove it. It’s important to hold the metal line steady to avoid bending or breaking it. Install the new rubber hose by threading it into the metal line and tightening it down. Next, remove the wheel cylinder by taking out the bolts; sometimes, the hose needs to come off the back to reach the bolts with a wrench.
If the hose or wheel cylinder is stuck, patience and the right-size wrench help avoid damage. Once the new hose and cylinder are on, check for any leaks.
Replacement Steps:
- Cut and remove old brake hose
- Unscrew and take out the wheel cylinder
- Thread new rubber hose into place
- Bolt on the new wheel cylinder
- Tighten everything securely
How to Reassemble and Check Your Work
When putting everything back together, use the correct placement for the brake shoes. The longer shoe (primary shoe) goes in the back and does most of the braking. Make sure the brake adjuster cable wraps around the shoe correctly. If the brake adjuster is stuck, free it up before finishing.
Installation Tips:
- Double-check shoe placement (long shoe in back)
- Keep the adjuster with the shoes when possible
- Reuse the adjuster if in good shape
- Only reinstall the drum once both sides are done, in case you need to check something
- Inspect for oil or grease, especially if you see signs of a leaking axle seal
A visual inspection for leaks or strange bends in hoses is always a good idea. Tighten all bolts securely but do not force them. The steps for the rear brakes are nearly the same as the front, so repeat the process for all wheels.
Axle, Wheel, and Hardware Problems
Problems with Wheel Studs and Replacing Them
Several wheel studs were discovered to be loose during the inspection. This issue was present on more than one wheel, raising concerns about safety and the difficulty in finding replacement parts for this specific model. The hardware for these wheels is not readily available, so sourcing the correct pieces may require extra effort.
Key Points:
- Loose wheel studs on multiple wheels.
- Finding correct replacements may be challenging.
- Immediate attention is recommended for safe operation.
| Problem | Effect | Solution |
|---|---|---|
| Loose wheel studs | Unsafe to drive | Replace studs |
| Hard to source parts | Delay in repairs | Search specialty sellers |
Checking Axle Bearings and Seals
While working on the rear axle, signs of an old axle seal leak were found. This was seen through a coating on the brake shoe. Although the axle bearing itself felt smooth with no noises or roughness, the presence of the leak could point to a need for seal replacement.
- Observation: Old axle seal leak noted but not currently active.
- Axle bearing: Moves smoothly, no immediate signs of failure.
- Action: Recommend keeping an eye on the seal in the future for further leaks.
- Brake shoes: Contaminated by old fluid, may need cleaning or replacement.
Checklist:
- Inspect axle bearing for roughness
- Replace axle seal if leak becomes active
- Clean or replace contaminated brake shoes
Cleaning the Inside and Signs of Rodents
Clearing Out Trash and Unexpected Finds
When the team started working on the Jeep’s inside, it was clear there was a lot to remove. Cigarette pack foil was crammed up in the headliner, likely used by rats or maybe squirrels making themselves at home. Some of the foil was really stuck up there and needed to be pulled out to avoid a mess on the shop floor.
While cleaning, they also found plenty of leaves and even had a close call with what turned out to be a big rat, not just a regular mouse. Finding creatures and their mess in the car was a reminder of how long the Jeep had been sitting unused. Here’s a quick list of what was hauled out:
- Old cigarette pack foils
- Leaves and nature debris
- Remnants of rodent nests
- Trash and loose junk
Checking the Condition of Ceiling and Floor
The team took a closer look at what was left of the inside. The dashboard looked good, but the floors were mostly gone. In some spots, the driveshaft was clearly visible right through the missing floor. The state of the floor made it clear the Jeep needed a lot of work before it was safe or comfortable to use.
The headliner had more than its fair share of wear with all the foil and rodent activity. Any hope of saving it was lost with what was discovered packed in by animals. Based on what could be seen, the interior would need a full gutting before any repair or driving could be done.
| Part | Condition | Notes |
|---|---|---|
| Dashboard | Good | Few signs of damage |
| Headliner | Heavy rodent use | Packed with cigarette foils |
| Floor | Mostly missing | Large holes, needs replacing |
| Back window | Not working | Needs work, no key fit |
Project Reflections and Next Steps
Working on the 1968 Jeep Wagoneer brought some surprises and challenges. The vehicle was rough, with missing floor panels, lots of moss, and an interior that left a lot to be desired. However, the 350 Buick V8 engine caught their interest, especially since it could still run.
Check out our other article on Jeep Wagoneer WEEKEND MAKE-OVER! HERE!
A few key findings during the project:
- Engine condition: Despite its appearance, the engine ran well with a new battery, cap, points, wires, and an oil filter already installed.
- Brakes system: Drum brakes all around needed attention, including stuck hubs, loose wheel studs, and worn brake shoes.
- Interior issues: The inside was stripped, and traces of rats and cigarette foil were found in the headliner.
- Parts replacement: Several components, like brake lines and wheel cylinders, required replacement or repair.
Project tasks completed:
| Area | Action Taken |
|---|---|
| Engine | Checked and started successfully |
| Brakes | Inspected, cleaned, and repaired |
| Wheels | Identified and addressed loose studs |
| Interior | Gutted and cleaned out debris |
| Fuel System | Confirmed operation with a temporary jug |
Next Steps:
- Order and install valve cover gaskets.
- Replace missing or loose wheel studs.
- Address the leaky axle seal at the rear.
- Continue cleaning the interior and see what can be saved.
- Check rear window and locks for function.
- Take care of any remaining brake or fuel system concerns.
Work will continue focusing on mechanical reliability before shifting attention to cosmetic or comfort details.