
Welcome to the JeepSpecs.com in-depth page of WJ Generation Jeep Grand Cherokee interior light bulb removal. Did we mis anything? Please get in touch with us and tell us about it!
Interior bulb removal
Ashtray (# 161)
The center bezel assembly is held in place by strong snap clips near each corner which can be gently pried out with a hard plastic putty knife. Once loose the assembly will slide straight out. The ash tray light socket is attached to the top of the tray with a spring clip which is unhooked by squeezing and tilting it out at the base.
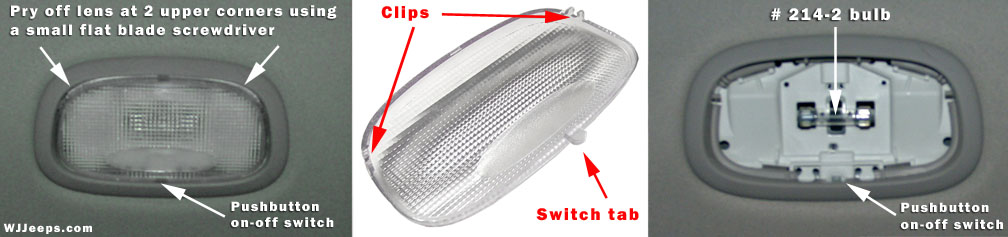
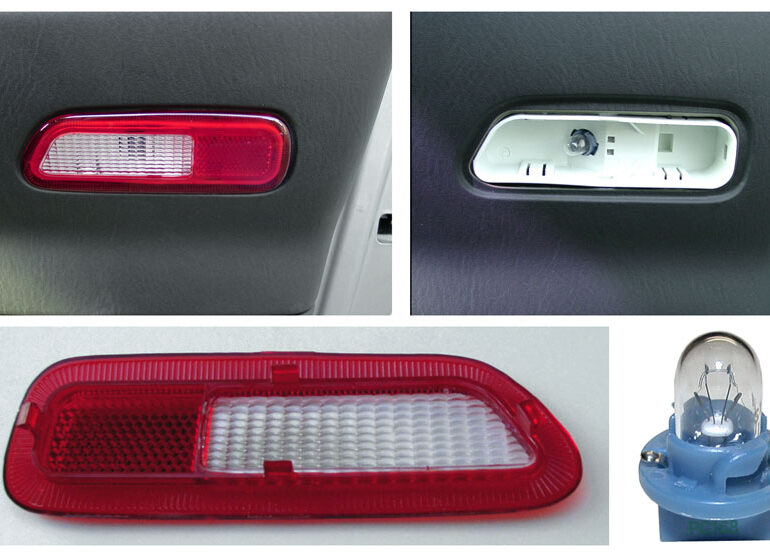
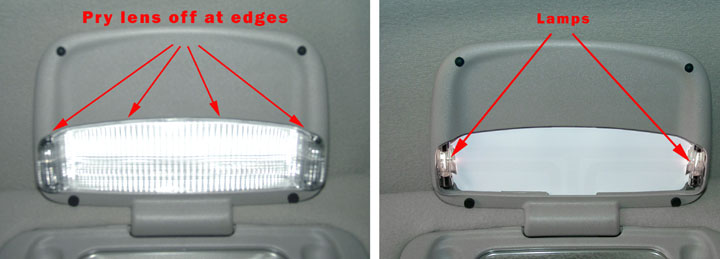
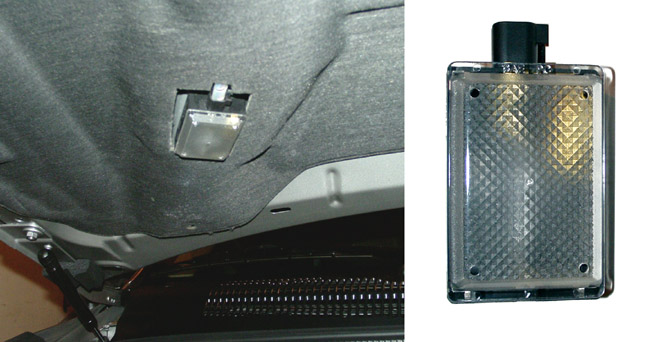
Cargo area (# 214-2)
Using a very small flat blade screwdriver, pry the lens away from the corners as shown in the left photo. When replacing the lens cover, align the push-button switch tab into its slot first and then snap into place the two lock clips.
Climate control, Automatic (# 74)
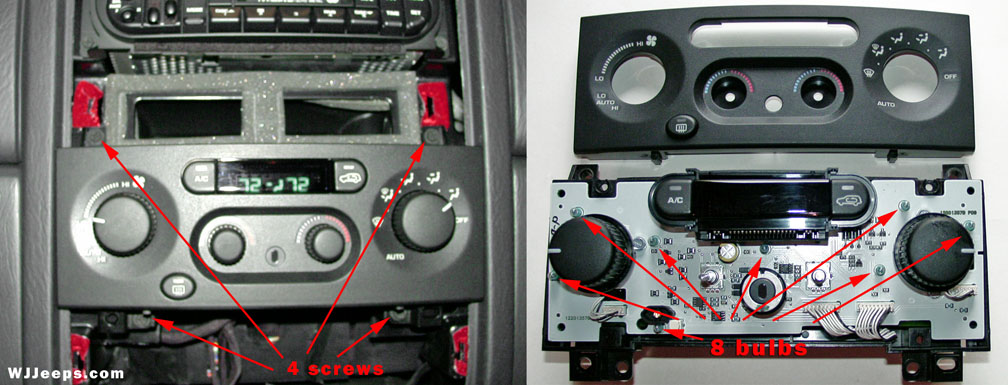
Eight climate control lamps are soldered onto the internal circuit board of the Automatic Zone Control assembly. These are unlikely to burn out for many years, but some owners have wanted to color the bulbs. To remove the AZC unit, the radio bezel and the lower bezel assembly must be removed. Both bezels are pried out using a flat hard plastic blade tool (see ashtray lamp section above). The AZC unit is held in place by 4 Phillips screws. After removing the screws slide the unit out and unplug the two wiring harnesses in the rear. To open the unit, remove the two smaller knobs in front by pulling them straight out. Then remove the 4 rear screws with a Torx T-20 screwdriver to separate the front plate.

Cluster illumination (# 103)
The gauge cluster can be easily removed. First, remove the cluster bezel trim piece that is above the steering wheel. It is held in place by 4 spring clips, one at each corner, and pulls straight out. On the left side, you can reach your thumb behind the bezel rubber at the tilt wheel lever cut-out and pull forward. If so equipped, you’ll need to unhook the power pedal harness on the back of the switch.
Next, remove the 4 phillips screws on the cluster assembly, two along the top and two on the bottom. At the two upper screw holes there are tabs that must be slightly pried down to release the cluster, which you can then pull outward and away. There is plenty of slack allowed to conveniently unhook the single 9-wire/12-pin harness.
Note: The amount of replaceable bulbs and their locations may vary somewhat by year, model and options. In addition, some of the bulbs may be of a different voltage and must be replaced to match the original factory specifications.
WARNING: On vehicles equipped with the premium instrument cluster, the cluster circuitry provides an alternating current to supply power to the electroluminescent illumination lamp through a pigtail wire and connector that is accessible at the back of the cluster housing. Use proper precautions when handling this unit during diagnosis or service to avoid electrical shock and possible personal injury.
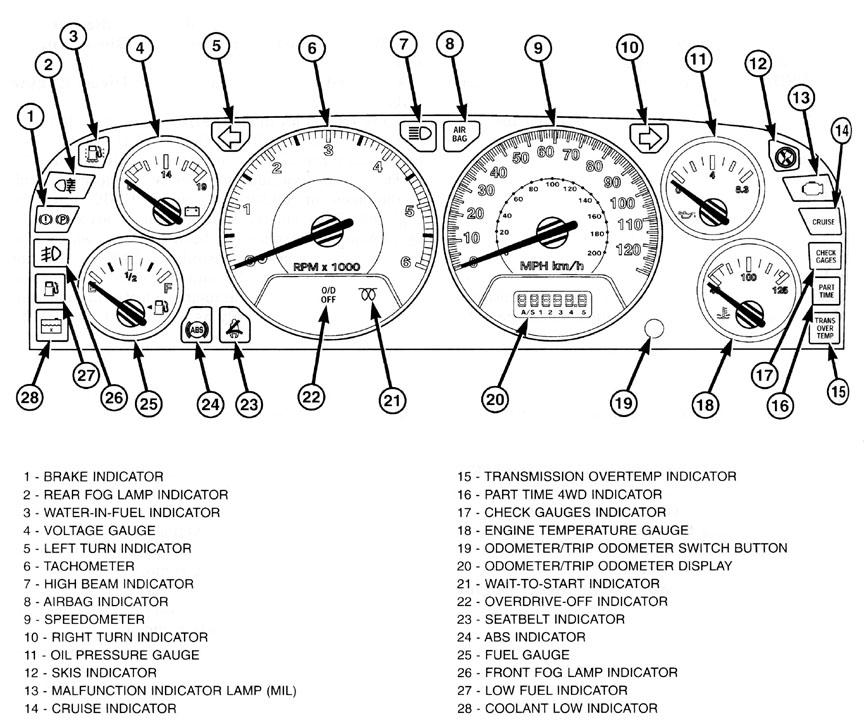
Cluster layout and descriptions, example shown is from 2002.
Courtesy light, front door (# 192)
These can be changed by carefully prying off the lens cover with a small flat-blade screwdriver and wiggling the bulb free from its socket. The bulbs can sometimes be difficult to remove and may require unhooking the socket from the back (as suggested by the ’02 Service Manual). This is actually quite easy, remove the phillips screw in the door handle recess, pry the outside edge of the door panel off to pop a few clips free, and reach in to remove the bulb and socket (1/4 turn counter-clockwise).
Courtesy, under panel (# 906)
The bulbs for the two under panel courtesy lights can be changed by simply prying off the white dome covers which are held in place with plastic tabs. Both sockets can be accessed without removing any trim pieces or other parts.
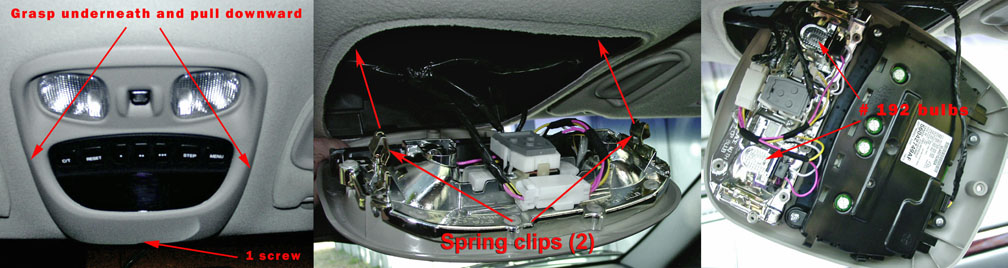
Dome / Reading (# 192)
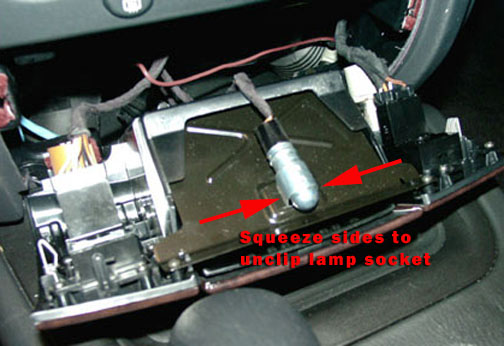
Two dome / reading lights are located in the overhead console. To remove the console, remove the single phillips screw located near the windshield side. The screw should be removed with a non-magnetic screwdriver as to avoid interference with the compass. The console is also held in place by two spring clips. Grab the console from the sides, wedging your fingers underneath it, and carefully and firmly pull it straight down.

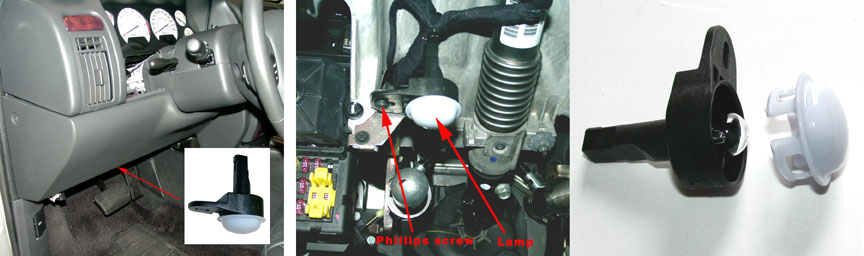
Glove box (# 194)
1. Empty contents of glove box.
2. Loosen or remove bezel trim piece – The bulb socket can be accessed by removing just two of the three bezel cover screws, which will allow the top right of the bezel piece to be pulled out far enough to pull the socket through. However, to make things a little easier it is not too difficult to remove all three screws and the trim bezel entirely. It is held in place by two strong spring clips. Grasp the bezel at the bottom, around the back edge, and firmly pull or jerk it forward and away.
3. Roll the glovebox down. This is done by reaching in to the top inside of the glove box with both hands, in front of the sharp plastic guide pins, and with your middle fingers pushing each rubber stopper up and out of the way to let the pins pass by and the glovebox drop down. Note: Some models may feature a pneumatic glove box damper on the right side of the glove box. The arm of the damper must be lifted upwards to remove it from its keyed slot.
3. The socket is held in place with two plastic retaining tabs, one at the top and one at the bottom of the switch. It’s a tight fit to get your finger over the top clip to try and release it, but that is not really necessary, the socket can be removed by just depressing the bottom tab. To do this, use your right hand middle finger to press up on the bottom of the lower retaining tab, while at the same time reaching in and under the socket with your left forefinger and thumb to wiggle and push the socket forward. This will release the socket from the bottom at an angle, enough so that you can now grab it from the front lip cover while still pushing it from the back to wiggle it free from its mounting hole.
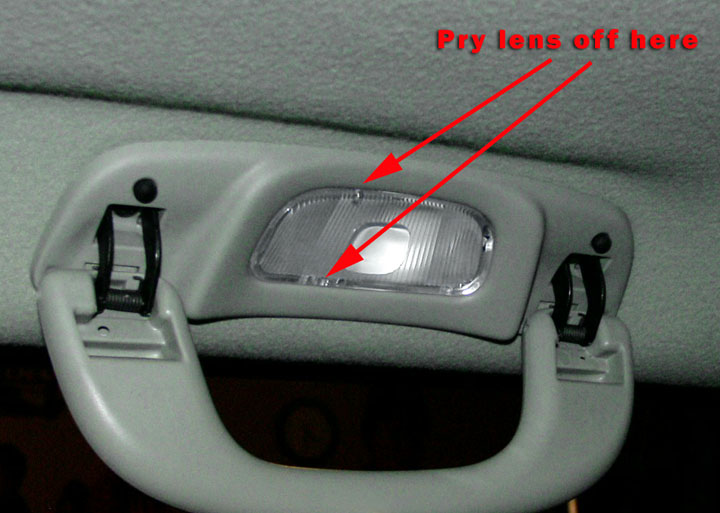
Pull handles (# 214-2)
Using a very small flat blade screwdriver, pry the lens away from the housing as shown in the photo. When replacing the lens cover, align the push-button switch tab on the right side into its slot first and then snap into place the two lock clips.
Sunvisor vanity (# 6501966)
The lens for the vanity lights can be pried off with a tiny screwdriver, starting in either corner. There are two “fuse” style bulbs in each housing. The bulbs are available from your Jeep dealer.
Exterior bulb removal
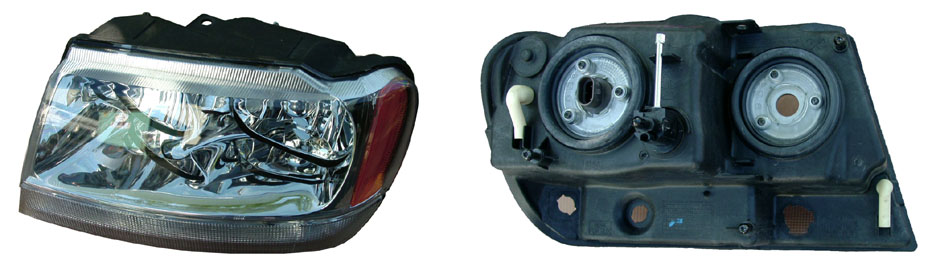
Front: Headlamps, Parking, Side marker, Turn signal (5 bulbs)
Open the hood and remove the single screw with a 7mm socket, located as shown in the photo above left. Grasp the headlight assembly on both sides from underneath and slowly but firmly lift upward and outward to disengage the lower alignment tabs from their sockets. The assembly can now be pulled out by wiggling it forward and out to disengage the upper clips (be cautious of the edges of the grill and fender surrounding the headlamp. The housing is held in place firmly and may require a bit of a pull).
Front: Foglamp (# 9055)
The foglamp bulbs can be accessed and removed from underneath the bumper without tools, although it is a tight fit. Turn the socket 1/4 turn counter-clockwise to remove. Note that the screw in the front of the foglamps is for alignment only and does not remove the outer lens.
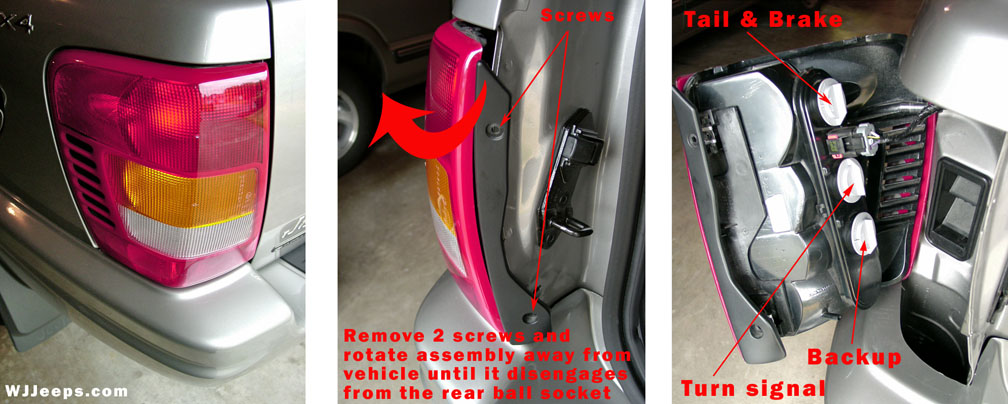
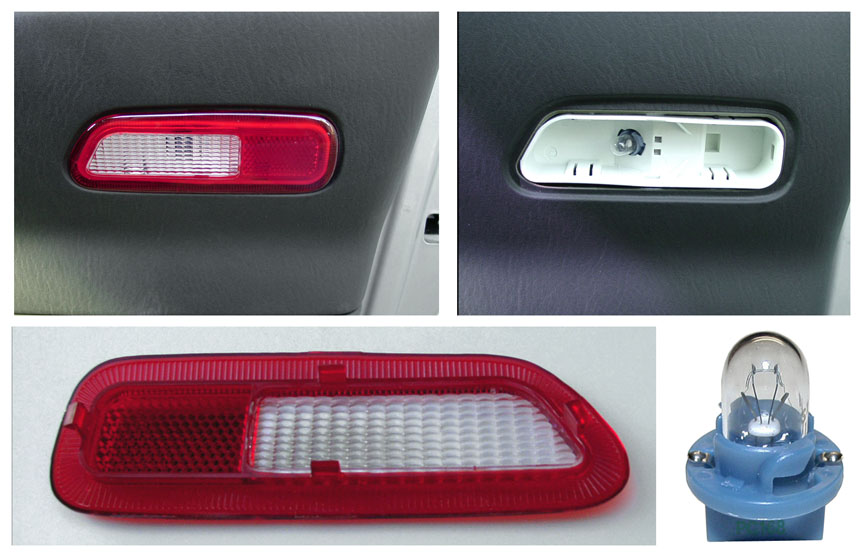
Rear: Brake, Back-up, Tail, Turn signal (3 bulbs, all # 3157)
To access the rear bulbs, open the liftgate and remove the two phillips head screws from the side of the housing as shown in the center photo above. Slowly slide the assembly outwards to disengage the rounded alignment pin from its socket. Each of the three bulb sockets, all containing the same type exact bulb, can be removed by turning them counter-clockwise 1/4 turn.
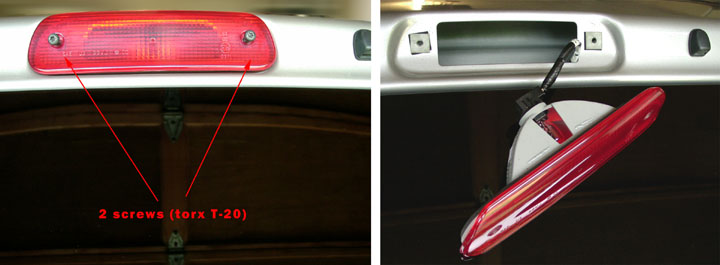
Rear: high mount stop light (# 921)
The lens housing for the high mount stop light is attached with two T-20 torx head screws. Turn the lamp socket 1/4 turn counter-clockwise to remove.
Underhood (# 561)
The plastic lens cover of the hood lamp can be easily snapped off using a tiny flat screwdriver. It is held in place with plastic clips in each corner.
This extremely handy feature was eliminated on the 2002 models. The bright light was conveniently mounted over the dipsticks, lighting the entire engine area. It works with a gravity-type switch that turns the light on and off when the hood is opened and closed.
2002 owners can easily install the original factory hood lamp. The screw hole and mounting tab are still present, hidden under the hood insulation cover. A rectangular piece needs to be cut out where the mounting holes are. Wiring must be run as well. A fused hot lead can be run directly to the battery or under-hood fuse box, or fed across the hood (under the insulation) and through the firewall to the inside dash. The ground wire can be run almost anywhere.
It’s probably possible to tie into the interior light system for the benefit of having the automatic 8-minute battery protection off timer, I have not been able to confirm yet how this can be done, as that would be ideal. Otherwise, a manual on-off switch can easily be added for convenience.
The lamp-end electrical connector plug is not available separately, so one must either purchase the harness or devise a way to connect the wiring to the 2 lamp socket pins. Wires can be soldered directly on, or attached to the right size push-on connector ends.
Another alternative (better but more expensive) is to purchase the factory wiring harness. This will allow a direct connection at the lamp end, but it must still be manually attached to the battery or + connection and ground as vehicles produced without the hood lamp do not have a factory wired receptacle available.
| Part name: “Lamp” (with bulb & lens) | Part number: 56021441 | List price: $20.80 |
| Part name: “Lens” | Part number: 4897446AA | List price: $ 4.00 |
| Part name: “Harness“ | Part number: 56042574AB | List price: $26.00 |
Lighting upgrade information
Important: Before replacing any automotive bulbs with types or styles other than what the manufacturer has specified or recommended, be sure to check local and Federal laws governing vehicle lighting. An excellent reference web site for this information can be found here: Motor Vehicle Lighting Standards.
The Federal Code of Regulations governing vehicle lamps, reflective devices, and associated equipment, FMVSS No. 108, is more than 100-pages long. If you’d like to read it, click here: FMVSS No. 108 Text.
A very informative FAQ page on vehicle lighting can be found at this site: Lighting FAQ. The same site also features an extensive database of HID information.
Exterior lighting
This section covers headlights and fog lights. Proper headlamp alignment is important, as most glare is caused by lighting that is improperly aimed. The installation of certain high powered headlights may require that the harness be upgraded to handle the additional current flow.
Several standard replacement bulbs are also available in “long-life” versions. These include the 9005XS, 9006XS, 3157 and 194’s. They are usually identified with the addition of “LL” at the end of the bulb number and vary between 1.5 to 2x the life of standard bulbs.
Upgrade write-ups:
Chris Henry has written several articles covering WJ front lighting for Jeeps Unlimited. Click on the links below to read his excellent write-ups:
| Headlight bulb upgrade | Low beam 9006 to 9005 upgrade | Headlight harness upgrade |
Fog light upgradePIAA 912 driving lights installation

Photos of Chris Henry’s 2001 WJ with upgraded headlamps, upgraded fog light bulbs, and a set of PIAA 912’s custom mounted in the lower grill. Many more pictures are featured with his articles linked above.
Headlamp options
There can be several advantages and disadvantages in using different lighting systems. In most States, the low beam is not supposed to exceed 55 watts and high beams are not to exceed 60 watts. It’s legal, though, to run higher wattage for “off road” use, but many drivers have used these higher-powered lights on-road. It’s best to research thoroughly to obtain different opinions and additional information before you make your upgrade decision.
Jeep uses the “straight base” style headlamp bulbs, designated by the “XS” or “X/S” in the part number. The standard 9005/9006 right-angle base bulbs used by most manufacturers can fit into sockets made for the XS bulbs but may require slight modifications or different installation techniques. Always make sure that any bulbs or lights you change/modify on your vehicle is legal and safe.
- Replacement bulbs -Standard:Sylvania 9005X/S & 9006X/S. 65/55 watts, 3280K/3140K. Premium quality. PDF file – Specifications.
Sylvania Long Life 9005X/S LL & 9006X/S LL. 65/55 watts, 3100K/3050K. (1.5x life/2.0x life of standard bulb). PDF file – Specifications.
- Replacement bulbs – Performance:
Eaglite Xenon 9005XS & 9006XS. 100/80 watts, 4200K/4200K. Xenon bulbs provide a very white light with a slight blue hue up close. They are designed to simulate the look of true HID systems. The bulbs are optically dyed with a UV filter, which filters out the yellow light that halogen bulbs produce. The UV filter is blue which is why the bulbs look blue but appear white when lit. Eaglite Superwhite bulbs both contain high concentrations of xenon gas, which extends the life of the bulb and allows you to more safely use higher wattages. Available at MidnightMoose.com.
PIAA 9005 & 9006 Xtreme White Plus. 60 watts (=120w) / 51 watts (=115w), 4000K / 4000K. Requires special but simple installation technique, see Chris Henry’s article link above). More information can be found on the PIAA web site.
Sylvania Silverstar 9005 ST & 9006 ST. 70/60 watts, 4000K/4000K. “SilverStar’s color temperature is a white hot 4,000K, far higher than other halogens on the market and com parable to HID. SilverStar shines with a luminance up to 20% greater than other halogens. A sharp profile, silver tip, and amethyst blue coating create a dramatic, high-end, crisp, clean look.” More information on the Silverstar’s can be found on Sylvania’s web site.
Euro housings:
- Harness upgrade:Kolak, PIAA
- HID kits and lamps (High Intensity Discharge):There are no true HID kits available for the WJ’s, only bulb and ballast kits. Before you make a decision of whether or not to use HID bulbs, it is suggested that you read this HID Lighting Tutorial, HIDo’s and HIDon’ts.
- OEM Headlamp assemblies:Some Laredo owners have elected to change their headlight housings to the Limited versions which feature clear lower lenses. A table with the part numbers for all models along with retail prices is shown below.
2002 Limited Headlamp assembly, front and back view.
OEM Headlamp assemblies |
|||
| Application | Year | Part # | MSRP |
| Laredo | 1999-00 (Right) | 55155128 | $280.00 |
| Laredo | 1999-00 (Left) | 55155129 | $280.00 |
| Laredo | 2001-02 (Right) | 55155128AB | $295.00 |
| Laredo | 2001-02 (Left) | 55155129AB | $295.00 |
| Limited | 1999-00 (Left) | 55155552 | $280.00 |
| Limited | 1999-00 (Right) | 55155553 | $280.00 |
| Limited | 2001-02 (Left) | 55155552AB | $295.00 |
| Limited | 2001-02 (Right) | 55155553AB | $295.00 |
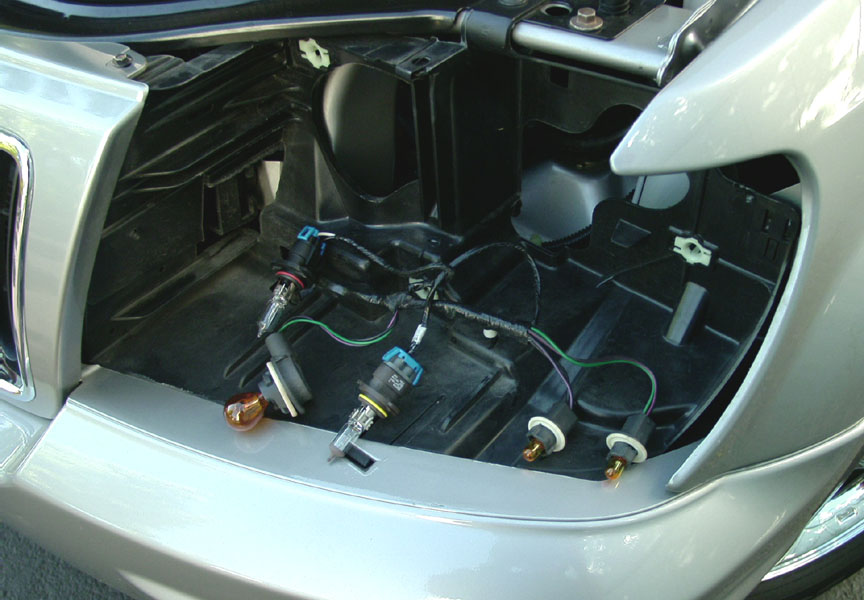
Headlight recess area, showing the stock harness and all 5 bulbs
Custom colored bulbs:
Aftermarket custom color bulbs are available for the following exterior bulbs, although they are not typically legal or recommended for most on-road applications:
# 3157 (Back-up, brake, tail, turn signals)
# 161 (License plate)
# 194 (Parking, side marker)
# 921 (Center high stop light)
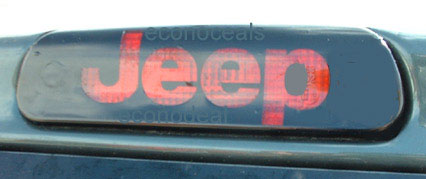
This unique upper stop light mod, consisting of a custom black vinyl decal that fits over the lens, is sold by seller “Econodeals” on Ebay.
- Fog lamp optionsFor Laredo’s and other models without the factory fog lamp option, the same exact lamps are available as a Mopar accessory.
- Replacement bulbs – Standard:Sylvania 9055. 55 watts, 2950K. Advanced halogen, long-life design. More information available on Sylvania’s web site: Advanced Halogen 9000 series PDF.
- Replacement bulbs – Premium:Sylvania Cool Blue bulb 9005CB. 65 watts, 3550K. More information available on Sylvania’s web site: Cool Blue.Sylvania Silverstar 9005. 60 watts, 4000K. “SilverStar’s color temperature is a white hot 4,000K, far higher than other halogens on the market and comparable to HID. SilverStar shines with a luminance up to 20% greater than other halogens. A sharp profile, silver tip, and amethyst blue coating create a dramatic, high-end, crisp, clean look.” More information available on Sylvania’s web site: Silverstar high performance halogen.PIAA 9005 Platinum Super White. 60 watt=110w, 3800K. More information available on PIAA’s web site: PIAA 9005.
Assemblies:

PIAA 1700X Platinum Plasma Blue Fog Lamp.. 55 watts. Available in kit form with two lamps, wiring harness, relay, and switch (part # 1790). 3-15/16″ wide x 2-1/16″ high x 3″ deep. Silver PPS housing, chrome plated aluminum trim ring, and glass lens. Requires fitting adjustments. More information available on PIAA’s web site: PIAA 1700X.
Lighting upgrades – interior
Many of the interior bulbs in the WJ’s can be upgraded, typically consisting of using different colored and/or different wattage bulbs. Even though some bulbs may appear identical in size and fit, it’s recommended to at least stay close to the original factory specified bulb sizes and specifications.
So far, only one type from all the interior bulbs is available in a different color from aftermarket companies – the # 194 Glove compartment light. However, this bulb could be used in the front door courtesy lights, the ashtray, and the overhead lights. If colored effects are desired for other lights such as in the Cargo area, under-panel courtesy, assist handles and the vanity visors, special bulb paints are available from several manufacturers (see the lighting links section).