Welcome to the JeepSpecs.com in-depth page on WJ Generation Jeep Grand Cherokee overhead console and EVIC system. We have organized as much information as we could find into a helpful article below. Is something incorrect or missing? Please get in touch with us and we’ll fix it!

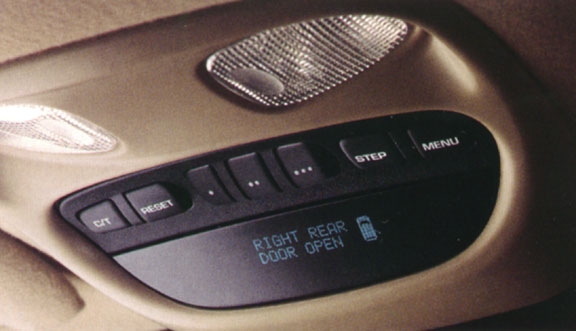
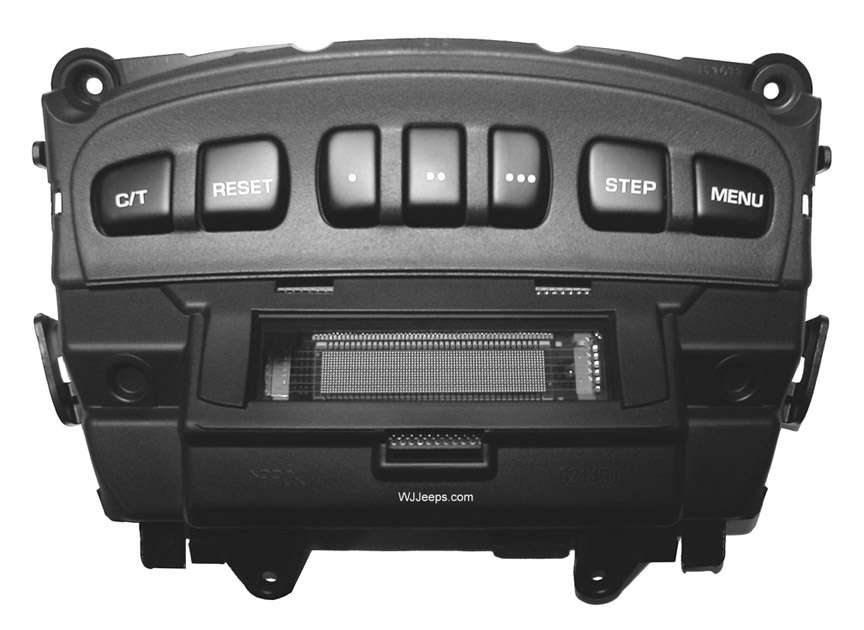
The Electronic Vehicle Information Center (EVIC) is located in the overhead console on models equipped with this option. Three versions of the EVIC module are available on the Grand Cherokee. These three versions are identical except that some models include an integral three-push button universal transmitter transceiver (“Homelink®”) and/or Tire Pressure Monitoring System (TPMS). All three EVIC modules feature a large Vacuum Fluorescent Display (VFD) screen for displaying information, and back-lit push button function switches labeled C/T (compass/temperature), RESET, STEP, and MENU. The VFD screen can also display a vehicle graphic that is used for door and liftgate open indications and to show if a turn signal has been left on. The EVIC messages and displays are coordinated with warning indicators in the instrument cluster to avoid duplication.
The EVIC module includes the following display options:
- Compass and Temperature – provides the outside temperature and one of eight compass readings to indicate the direction the vehicle is facing.
- Average fuel economy – shows the average fuel economy since the last trip computer reset.
- Distance to empty – shows the estimated distance that can be travelled with the fuel remaining in the fuel tank. This estimated distance is computed using the average miles-per-gallon from the last 30 gallons of fuel used.
- Instant fuel economy – shows the present fuel economy based upon the current vehicle distance and fuel used information.
(NOTE: The “Instant Fuel Economy” feature was deleted starting with 2003 models.) - Trip distance – shows the distance travelled since the last trip computer reset.
- Elapsed time – shows the accumulated ignition-on time since the last trip computer reset.
- Distance to service – shows the distance remaining until the next scheduled service interval.
- Tire Pressure – shows the tire pressure in each tire.
(NOTE: A “4-Tire” economy system was introduced starting with 2003 models). - Blank screen – the EVIC compass/temperature/ trip computer VFD is turned off.
The EVIC is capable of displaying the following alert messages, which are accompanied by an audible announcement consisting of a series of beeps:
- TURN SIGNALS ON (with vehicle graphic) Indicates that a turn signal has remained on for about one mile).
- PERFORM SERVICE – Indicates that a customer programmable service interval distance has been reached.
- DOOR OPEN (one or more, with vehicle graphic) – Indicates that a door is open or not fully closed.
- LIFTGATE OPEN (with vehicle graphic) Indicates that the liftgate is open or not fully closed.
- LIFTGLASS OPEN (with vehicle graphic) Indicates that the liftglass is open or not fully closed.
- COOLANT LEVEL LOW (with vehicle graphic) – Indicates that the coolant level in the engine coolant reservoir is low.
- XX LOW PRESSURE (with vehicle graphic) – Indicates that the air pressure in the selected tire is low.
- WASHER FLUID LOW (with vehicle graphic) – Indicates that the fluid level in the washer fluid reservoir is low.
- The EVIC “Menu” push button provides the vehicle operator with a user interface, which allows the selection of several optional customer programmable electronic features to suit individual preferences.
If the vehicle is equipped with the optional memory system, the EVIC will display the following memory system messages:
- MEMORY #X POSITION SET (X = Driver 1 or Driver 2) – This message appears in the EVIC display each time the memory system is successfully programmed. It is accompanied by an audible announcement chime tone.
- MEMORY SYSTEM DISABLED – The memory system is automatically disabled while the driver side seat belt is fastened and/or while the automatic transmission gear selector is in any position except Park or Neutral. This message appears in the EVIC display as a reminder when a memory switch push button is depressed while the memory system is disabled. If the REMOTE LINKED TO MEMORY customer programmable feature has been selected, this message will also appear when the Unlock button of the Remote Keyless Entry (RKE) transmitter is depressed while the memory system is disabled.
If the vehicle is equipped with the optional universal transmitter transceiver (HomeLink), the EVIC will also display-messages and an icon indicating when the Universal Transmitter is being trained, which of the three transmitter buttons is transmitting, and when the transceiver is cleared. See Homelink for more information on this feature.
If the vehicle is equipped with the optional Tire Pressure Monitor System, the EVIC will also display messages and an icon indicating when the tire air pressure falls below a given set-point, and which of the five tires is transmitting the low pressure warning, and when the condition is cleared.
Data input for all EVIC functions, including VFD dimming level, is received through PCI data bus messages. The EVIC module uses its internal programming and all of its data inputs to calculate and display the requested data.
EVIC module front view EVIC module circuit board
| The EVIC module assembly cannot be repaired, and is available for service only as a unit. This unit includes the push button switches and the plastic housing (but not the display lens), as shown above. If any of these components are faulty or damaged, the complete EVIC module must be replaced. The four incandescent bulbs used for EVIC push button backlighting and the front display lens are available for separate replacement.The photo above right shows the second of three different versions of the EVIC module circuit boards, this one containing the HomeLink transmitter circuitry. The third version adds the Tire Pressure Monitor System components. |
Upgrading your WJ Grand Cherokee EVIC
Vehicles with the basic EVIC module can be easily upgraded to add the Homelink universal garage door transmitter and/or the Tire Pressure Monitor system (TPMS) by simply exchanging modules. No rewiring or other modifications are required when exchanging overhead consoles and EVIC’s between Grand Cherokee WJ models (1999-2004). The TPMS requires the installation of 5 valve stem/wheel transmitters in addition to the module. See the Tire Pressure Monitor System section for detailed information on upgrading EVIC modules and adding the TPMS.Jeep LibertyThe overhead consoles from Grand Cherokee’s have been a popular item to install in other Chrysler vehicles, notably the Jeep Liberty. Many “KJ” owners have installed/upgraded WJ overhead consoles and EVIC modules into their vehicles. For more information on these installations see Installing an OTIS / EVIC into a KJ by Anthony (LibertyKJ)
WJ Grand Cherokee EVIC modules
Note: There are 3 different levels of modules produced for the WJ. Programming differences and changes are also noted where known. In some cases, only the most current modules are available from Chrysler, others may be discontinued as soon as a new revision or change becomes available. Some modules may cross over between model years.

| Type | 1999-2000 | 2001 | 2002 | 2003* | 2004 |
| Basic | 56042273AB superseded by:56042273AC MSRP: $384.00 |
56042754AA MSRP: $259.00 superseded by:56042754AB MSRP: $259.00 |
56042754AE MSRP: $304.00 superseded by:56042754AF MSRP: $359.00 |
56042754AG MSRP: $409.00 superseded by:56042754AH MSRP: $425.00 |
56042754AJ (February 2003) MSRP: $619.00 |
| With Homelink | 56042271AB MSRP: $429.00 superseded by:56042271AC MSRP: $429.00 superseded by:56042271AD MSRP: $525.00 |
56042749AA MSRP: $417.00 superseded by:56042749AB MSRP: $367.00 |
56042749AE MSRP: $299.00 superseded by:56042749AF MSRP: $367.00 |
56042749AG MSRP: $425.00 superseded by:56042749AH MSRP: $367.00 |
56042749AJ MSRP: $619.00 (February 2003) |
| With Homelink and TPMS | N/A (can be retrofitted) |
N/A (can be retrofitted) |
56042756AF (July 2001) MSRP: $409.00 56042756AG** |
56042756AI MSRP: $409.00 |
56042756AJ (February 2003) MSRP: $645.00 |
| * Starting with 2003 model year production, the “Instant MPG” feature was deleted on all modules. For those that want that feature, look for modules issued in 2002, marked in red text in the chart.** “AG” series (January 2002) and newer modules are programmed with either the 4-tire system or the 5-tire system. The 4-tire system modules can be programmed by the dealer to turn on the 5th spare tire bit. Typically, base WJ models with steel-wheel spare tires featured the 4-tire system while upper trim lines with aluminum wheel spares came with the 5-tire system. | |||||
(Prices listed are for reference purposes only and may vary by dealer. Parts are not available from this web site. Prices current as of October 2008)
Removing the overhead console and EVIC
1. Remove phillips screw. The screw is located near the windshield side, and should be removed with a non-magnetic screwdriver (to avoid interference with the compass).
2. Grab the console from the sides, wedging your fingers underneath it. Carefully and firmly pry it straight down. Slightly rocking it back and forth while pulling downward makes it easier. The EVIC module assembly can be removed without unhooking the courtesy light or sunroof wiring. It is attached with four phillips screws and has one wiring harness.
3. To completely remove the overhead console, disconnect the EVIC harness, courtesy light harness, and the sunroof switch connector (if equipped).
WJ Overhead console EVIC wiring
Above left, overhead console with EVIC, reading lights and sunroof switch. The center photo shows the back of the console. The EVIC module is attached to the rear with four screws. The close-up photo at far right shows in detail the dual reading lights, sunroof switch (if equipped) and associated wiring.

EVIC wiring harness

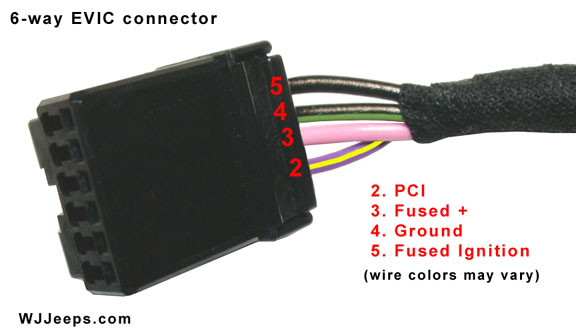
Adding an overhead console/EVIC to a Chrysler vehicle that did not come with one from the factory requires the harness connector and wiring for the EVIC module to be hooked up. The harness used for the Grand Cherokee can only be purchased from Jeep as part of a very large vehicle harness costing a couple hundred dollars or more. Sometimes just the actual connector with a few inches of wire can be obtained at a junk yard but they are usually a little difficult to find.
The best alternative, although expensive at around $40, is to order an overhead wiring harness from a Dodge Intrepid. It’s a rather large harness and all you will use is the 6-pin connector branch and a length of its wiring. By unraveling the taped harness you can cut the connector off with only about 26 inches of wire before you run into factory splices/branches. Since this is of course too short, you can either add your own extensions or do what I did for an install, I found about 5 feet of the same 4 wire colors further ahead in the harness and soldered these to the 26″ section I had, resulting in the connector having 7 feet of wiring, enough to run from the overhead, across the headliner, down the ‘A’ pillar and under the dash.
Intrepid overhead wiring harness: P/N 4760108AH MSRP: $44.00.
Dodge Intrepid overhead harness Customized EVIC harness
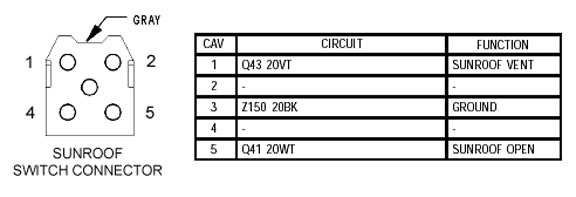
Sunroof switch wiring pinouts

EVIC test modes
Self test mode:
1. Ignition off
2. Press and hold both the C/T and Reset buttons
3. Turn ignition to “On”
4. Release buttons after you see the software revision appear on the display
5. Following completion of these tests, the EVIC will display one of the following messages:
- Pass Self Test
Momentarily depress the Reset button to return to the compass/computer display mode. The EVIC is working properly. - Failed Self Test
The EVIC module has a failure. The EVIC module is faulty and must replaced. - Not Receiving J1850 Message
The EVIC is not receiving proper message input from the PCI data bus. This can result from one more faulty electronic modules in the vehicle, or a faulty PCI data bus. The use of a DRB scan and the proper Diagnostic Procedures manual required for further diagnosis.
Compass Engineering Mode:
While in the compass/temperature display, press and hold the C/T button for 10-15 seconds. The compass will switch to the “Compass Engineering Mode”. This will display the raw angle at which you are travelling, in degrees. This mode would not be of great use on the freeway (the undamped readout makes wild swings when passing trucks, bridges, etc.) but it might be of some use off-road when trying to correlate your location to a position on a topo map.
DRBIII test mode:
1. Select “Body”, “VIC”, “Sys test” and then “Self test”.
DRB bit information:
| EVIC DRBIII information Message as follows: D3, 01, Byte 1, Byte 2, Byte 3, CRC. |
||
| Byte 1:Bits 0-1
RKE unlock doors Bits 2-3 Rolling door locks Bits 4-5 Headlamps on with wipers Bits 6-7 Horn Chirp |
Byte 2:Bits 0-1
Optical Chirp (flash lights) Bits 2-3 Headlamp delay Bits 4-5 Headlamp delay Bits 6-7 Easy exit seat |
Byte 3:Bits 0-1
Remote training Bits 2-3 RKE linked to memory Bits 4-5 Auto unlock on exit Bits 6-7 Low Fuel Chime |
See the Tire Pressure Monitor System section for detailed information on upgrading EVIC modules and adding the TPMS.


