
Welcome to the JeepSpecs.com in-depth page on WJ Generation Jeep Grand Cherokee cooling system service. We have organized as much information as we could find into a helpful article below. Is something incorrect or missing? Please get in touch with us and we’ll fix it!
 1999 Jeep Grand Cherokee 4.7L V-8 Engine. J-912
Thermostats
Both the 4.0L and 4.7L engines use 195° thermostats for all model years from 1999-2004. When replacing a thermostat it is very important to install one with the same temperature rating (the only exception might be with certain performance modifications or chips that recommend or require a different temperature thermostat). No benefits or performance gains can be realized by installing a “cooler” thermostat into a stock engine. Doing so is not recommended, it will give you colder heat in the winter and may interfere with engine performance.
A thermostat rated lower than the factory thermostat will richen your fuel mixture a bit at the expense of gas mileage, increased exhaust emissions and dirtying your oil faster – not to mention shortening the life of your cylinder walls and catalytic converters and more frequent spark plug changes. The unnoticeable performance gain, if any at all, is simply not worth the potential drawbacks.
Radiator hose clamps
The cooling system utilizes both worm drive and spring type hose clamps. If a spring type clamp replacement is necessary, replace with the original Mopar equipment spring type clamp.
CAUTION: A number or letter is stamped into the tongue of constant tension clamps. If replacement is necessary, use only a original equipment clamp with matching number or letter. See image below.
The worm type hose clamp uses a specified torque value to maintain proper tension on a hose connection. The spring type hose clamp applies constant tension on a hose connection.
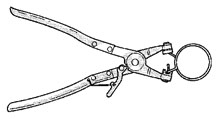
WARNING: CONSTANT TENSION HOSE CLAMPS ARE USED ON MOST COOLING SYSTEM HOSES. WHEN REMOVING OR INSTALLING, USE ONLY TOOLS DESIGNED FOR SERVICING THIS TYPE OF CLAMP, SUCH AS SPECIAL CLAMP TOOL MILLER p/n 8495A. SNAP-ON CLAMP TOOL p/n HCP20 MAY BE USED FOR LARGER CLAMPS. ALWAYS WEAR SAFETY GLASSES WHEN SERVICING CONSTANT TENSION CLAMPS. A NUMBER OR LETTER IS STAMPED INTO THE TONGUE OF CONSTANT TENSION CLAMPS. IF REPLACEMENT IS NECESSARY, USE ONLY AN ORIGINAL EQUIPMENT CLAMP WITH MATCHING NUMBER OR LETTER.
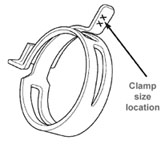
Radiator hose constant tension clamp – size location
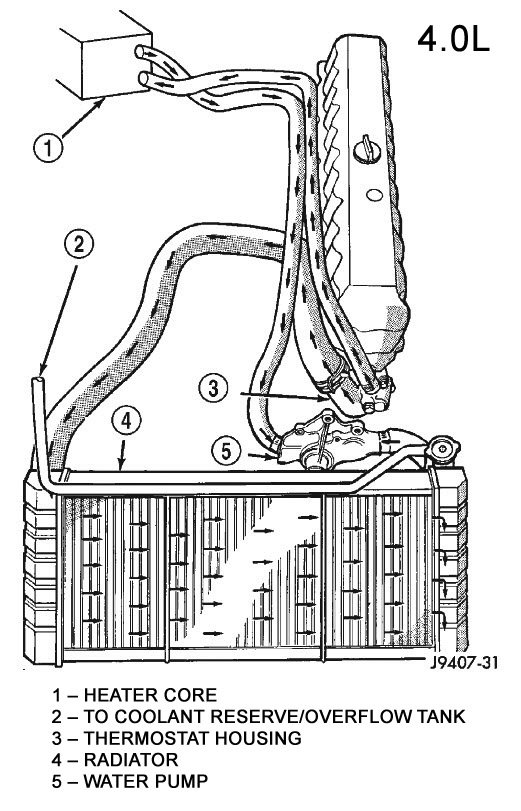
4.0L engine – Draining the cooling system
WARNING: DO NOT REMOVE THE CYLINDER BLOCK DRAIN PLUGS OR LOOSEN THE RADIATOR DRAINCOCK WITH SYSTEM HOT AND UNDER PRESSURE. SERIOUS BURNS FROM COOLANT CAN OCCUR.
1. DO NOT remove radiator cap first. With engine cold, locate radiator draincock on the right lower side of radiator facing to rear of vehicle.
2. Attach one end of a hose to the draincock. Put the other end into a clean container. Open draincock and drain coolant from radiator. This will empty the coolant reserve/overflow tank. The coolant does not have to be removed from the tank unless the system is being refilled with a fresh mixture. When tank is empty, remove radiator cap and continue draining cooling system. To drain the engine block of coolant, remove the cylinder block drain plug, located on the side of cylinder block below the exhaust manifold.
4.0L engine – refilling the cooling system
Coolant recommendations and cautions:
The recommended mixture is 50/50 ethylene-glycol and low mineral content water. Never use pure antifreeze. Only Mopar Antifreeze Coolant, 5 Year/100,000 Mile Formula (glycol base coolant with corrosion inhibitors called HOAT) is recommended. This coolant offers the best engine cooling without corrosion when mixed with 50% distilled water.
Antifreeze mixture must always be at least 44%, all climates year round. Maximum protection (-90d) is provided with a 68% mixture protection. If the percentage is lower than 44 percent, engine parts may be eroded by cavitation, and cooling system components may be severely damaged by corrosion.
CAUTION: Mopar Antifreeze/Coolant, 5 Year/100,000 Mile Formula (MS-9769) may not be mixed with any other type of antifreeze. Mixing of coolants other than specified (non-HOAT or other HOAT), may result in engine damage that may not be covered under the new vehicle warranty, and decreased corrosion protection.
CAUTION: Do not use coolant additives that are claimed to improve engine cooling.
4.0L coolant capacity:
1999-2000: 13.0 qts. (including 2.3 qts. for resevoir)
2001-2004: 15.0 qts. (including 1 qt. for resevoir)
1. Tighten the radiator draincock and the cylinder block drain plug(s) (if removed).
2. Fill system using a 50/50 mixture of ethyleneglycol antifreeze and low mineral content water. Fill radiator to top and install radiator cap. Add sufficient coolant to the reserve/overflow tank to raise level to FULL mark.
3. With heater control unit in the HEAT position, operate engine with radiator cap in place.
4. After engine has reached normal operating temperature, shut engine off and allow it to cool. When engine is cooling down, coolant will be drawn into the radiator from the reserve/overflow tank.
5. Add coolant to reserve/overflow tank as necessary. Only add coolant to the reserve/overflow tank when the engine is cold. Coolant level in a warm engine will be higher due to thermal expansion. To purge the cooling system of all air, this heat up/cool down cycle (adding coolant to cold engine) must be performed three times. Add necessary coolant to raise tank level to the FULL mark after each cool down period.
4.0L engine – Adding additional coolant
The use of aluminum cylinder blocks, cylinder heads and water pumps requires special corrosion protection. Only Mopart Antifreeze/Coolant, 5 Year/100,000 Mile Formula (glycol base coolant with corrosion inhibitors called HOAT, for Hybrid Organic Additive Technology) is recommended. This coolant offers the best engine cooling without corrosion when mixed with 50% distilled water to obtain to obtain a freeze point of -35°F (-37°C). If it loses color or becomes contaminated, drain, flush, and replace with fresh properly mixed coolant solution.
CAUTION: Do not use coolant additives that are claimed to improve engine cooling.
4.7L engine – Draining the cooling system
WARNING: DO NOT REMOVE THE CYLINDER BLOCK DRAIN PLUGS OR LOOSEN THE RADIATOR DRAINCOCK WITH SYSTEM HOT AND UNDER PRESSURE. SERIOUS BURNS FROM COOLANT CAN OCCUR.
1. DO NOT remove radiator cap first. With engine cold, locate radiator draincock on the left lower side of radiator facing to rear of vehicle.
2. Attach one end of a hose to the draincock. Put the other end into a clean container. Open draincock and drain coolant from radiator. This will empty the coolant reserve/overflow tank. The coolant does not have to be removed from the tank unless the system is being refilled with a fresh mixture. When tank is empty, remove radiator cap and continue draining cooling system. To drain the engine block of coolant, remove the cylinder block drain plug, located on the side of cylinder block below the exhaust manifold.
4.7L engine – refilling the cooling system and adding additional coolant
Coolant recommendations and cautions:
The recommended mixture is 50/50 ethylene-glycol and low mineral content water. Never use pure antifreeze. Only Mopar Antifreeze Coolant, 5 Year/100,000 Mile Formula (glycol base coolant with corrosion inhibitors called HOAT) is recommended. This coolant offers the best engine cooling without corrosion when mixed with 50% distilled water.
Antifreeze mixture must always be at least 44%, all climates year round. Maximum protection (-90d) is provided with a 68% mixture protection. If the percentage is lower than 44 percent, engine parts may be eroded by cavitation, and cooling system components may be severely damaged by corrosion.
CAUTION: Mopar Antifreeze/Coolant, 5 Year/100,000 Mile Formula (MS-9769) may not be mixed with any other type of antifreeze. Mixing of coolants other than specified (non-HOAT or other HOAT), may result in engine damage that may not be covered under the new vehicle warranty, and decreased corrosion protection.
CAUTION: Do not use coolant additives that are claimed to improve engine cooling.
4.7L coolant capacity:
1999-2000: 13.0 qts. (including 2.3 qts. for resevoir)
2001-2004: 14.5 qts. (including 1 qt. for resevoir)
1. Tighten the radiator draincock and the cylinder block drain plug(s) (if removed).
CAUTION: Failure to purge air from the cooling system can result in an overheating condition and severe engine damage.
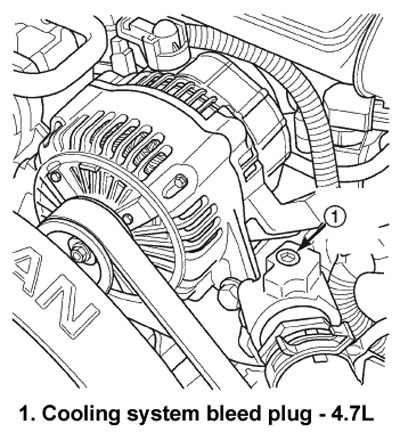
2. Remove the cooling system bleed plug from the radiator upper hose inlet housing (see photo below for plug location). Fill system using a 50/50 mixture of ethylene-glycol antifreeze and low mineral content water, until coolant begains coming out of the cooling system bleed hole. Install the cooling system bleed plug. Fill radiator to top and install radiator cap. Add sufficient coolant to the reserve/overflow tank to raise level to FULL mark.
3. With heater control unit in the HEAT position, operate engine with radiator cap in place.
4. After engine has reached normal operating temperature, shut engine off and allow it to cool. When engine is cooling down, coolant will be drawn into the radiator from the reserve/overflow tank.
5. Add coolant to reserve/overflow tank as necessary. Only add coolant to the reserve/overflow tank when the engine is cold. Coolant level in a warm engine will be higher due to thermal expansion. To purge the cooling system of all air, this heat up/cool down cycle (adding coolant to cold engine) must be performed three times. Add necessary coolant to raise tank level to the FULL mark after each cool down period.


4.0L and 4.7L – Cooling system reverse flushing
CAUTION: The cooling system normally operates at 14 to 18 psi (97 to 124 kPa) pressure. Exceeding this pressure may damage the radiator or hoses.
Reverse flushing of the cooling system is the forcing of water through the cooling system. This is done using air pressure in the opposite direction of normal coolant flow. It is usually only necessary with very dirty systems with evidence of partial plugging.
Chemical cleaning
If visual inspection indicates the formation of sludge or scaly deposits, use a radiator cleaner (Mopar Radiator Kleen or equivalent) before flushing. This will soften scale and other deposits and aid the flushing operation.
CAUTION: Be sure instructions on the container are followed
Reverse flushing the radiator
Disconnect the radiator hoses from the radiator fittings. Attach a section of radiator hose to the radiator bottom outlet fitting and insert the flushing gun. Connect a water supply hose and air supply hose to the flushing gun.
CAUTION: The cooling system normally operates at 14 to 18 psi (97-to-124 kPa) pressure. Exceeding this pressure may damage the radiator or hoses.
Allow the radiator to fill with water. When radiator is filled, apply air in short blasts allowing radiator to refill between blasts. Continue this reverse flushing until clean water flows out through rear of radiator cooling tube passages. For more information, refer to operating instructions supplied with flushing equipment. Have radiator cleaned more extensively by a radiator repair shop.
Reverse flushing the engine
Drain the cooling system (as described above). Remove the thermostat housing and thermostat. Install the thermostat housing. Disconnect the radiator upper hose from the radiator and attach the flushing gun to the hose. Disconnect the radiator lower hose from the water pump. Attach a lead away hose to the water pump inlet fitting.
CAUTION: Be sure that the heater control valve is closed (heat off). This is done to prevent coolant flow with scale and other deposits from entering the heater core.
Connect the water supply hose and air supply hose to the flushing gun. Allow the engine to fill with water. When the engine is filled, apply air in short blasts, allowing the system to fill between air blasts. Continue until clean water flows through the lead away hose. For more information, refer to operating instructions supplied with flushing equipment.
Remove the lead away hose, flushing gun, water supply hose and air supply hose. Remove the thermostat housing. Install the thermostat and housing with a replacement gasket. Connect the radiator hoses. Refill the cooling system with the correct antifreeze/water mixture as described above.
4.0L engine – Thermostat removal
WARNING: DO NOT LOOSEN THE RADIATOR DRAINCOCK WITH THE SYSTEM HOT AND PRESSURIZED. SERIOUS BURNS FROM THE COOLANT CAN OCCUR.
1. Drain the coolant from the radiator until the level is below the thermostat housing. Do not waste reusable coolant. If the solution is clean, drain the coolant into a clean container for reuse.
2. Remove radiator upper hose and heater hose at thermostat housing. See cautions above for removing radiator hose clamps.
3. Disconnect wiring connector at engine coolant temperature sensor.
4. Remove thermostat housing mounting bolts, thermostat housing, gasket and thermostat. Discard old gasket.
5. Clean the gasket mating surfaces.
WARNING: CONSTANT TENSION HOSE CLAMPS ARE USED ON MOST COOLING SYSTEM HOSES. WHEN REMOVING OR INSTALLING, USE ONLY TOOLS DESIGNED FOR SERVICING THIS TYPE OF CLAMP, SUCH AS SPECIAL CLAMP TOOL MILLER p/n 8495A. SNAP-ON CLAMP TOOL p/n HCP20 MAY BE USED FOR LARGER CLAMPS. ALWAYS WEAR SAFETY GLASSES WHEN SERVICING CONSTANT TENSION CLAMPS. A NUMBER OR LETTER IS STAMPED INTO THE TONGUE OF CONSTANT TENSION CLAMPS. IF REPLACEMENT IS NECESSARY, USE ONLY AN ORIGINAL EQUIPMENT CLAMP WITH MATCHING NUMBER OR LETTER.
4.0L engine – Thermostat installation
1. Install the replacement thermostat so that the pellet, which is encircled by a coil spring, faces the engine. All thermostats are marked on the outer flange to indicate the proper installed position.
(a) Observe the recess groove in the engine cylinder head.
(b) Position thermostat in groove with arrow and air bleed hole on outer flange pointing up.
2. Install replacement gasket and thermostat housing.
CAUTION: Tightening the thermostat housing unevenly or with the thermostat out of its recess, may result in a cracked housing.
3. Tighten the housing bolts to 16 ft. lbs. (22 N·m) torque.
4. Install hoses to thermostat housing.
5. Install electrical connector to coolant temperature sensor.
6. Be sure that the radiator draincock is tightly closed. Fill the cooling system to the correct level with the required coolant mixture. See refill directions above.
7. Start and warm the engine. Check for leaks.
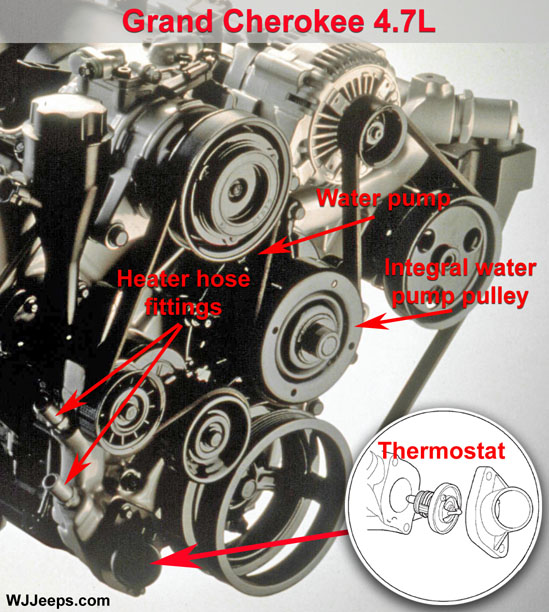
4.7L engine – Thermostat removal
WARNING: DO NOT LOOSEN RADIATOR DRAINCOCK WITH SYSTEM HOT AND PRESSURIZED. SERIOUS BURNS FROM COOLANT CAN OCCUR.
1. Disconnect negative battery cable at battery.
2. Drain cooling system. Do not waste reusable coolant. If solution is clean, drain coolant into a clean container for reuse. If thermostat is being replaced, be sure that replacement is specified thermostat for vehicle model and engine type.
3. Remove splash shield.
4. Remove lower radiator hose clamp and lower radiator hose at thermostat housing. See cautions above for removing radiator hose clamps.
5. Remove thermostat housing mounting bolts, thermostat housing and thermostat.
4.7L engine – Thermostat installation
1. Clean mating areas of timing chain cover and thermostat housing.
2. Install thermostat (spring side down) into recessed machined groove on timing chain cover.
3. Position thermostat housing on timing chain cover.
4. Install two housing-to-timing chain cover bolts. Tighten bolts to 115 in. lbs. (13 N·m) torque.
CAUTION: Housing must be tightened evenly and thermostat must be centered into recessed groove in timimg chain cover. If not, it may result in a cracked housing, damaged timing chain cover threads or coolant leaks.
5. Install lower radiator hose on thermostat housing.
6. Install splash shield.
7. Be sure that the radiator draincock is tightly closed. Fill cooling system. See refill directions above.
8. Connect negative battery cable to battery.
9. Start and warm the engine. Check for leaks.
WJ Thermostat parts 1999-2004 |
|||
| 4.0L | ThermostatGasket
Housing |
52028186AB53020547AB
53006192 |
$6.20$2.10
$13.70 |
| 4.7L | Thermostat & gasketHousing | 52079476AB53020887AB | $26.60$14.50 |