

Welcome to the JeepSpecs.com in-depth page on WJ Generation Jeep Grand Cherokee grilles & fascia removal. We have organized as much information as we could find into a helpful article below. Is something incorrect or missing? Please get in touch with us and we’ll fix it!
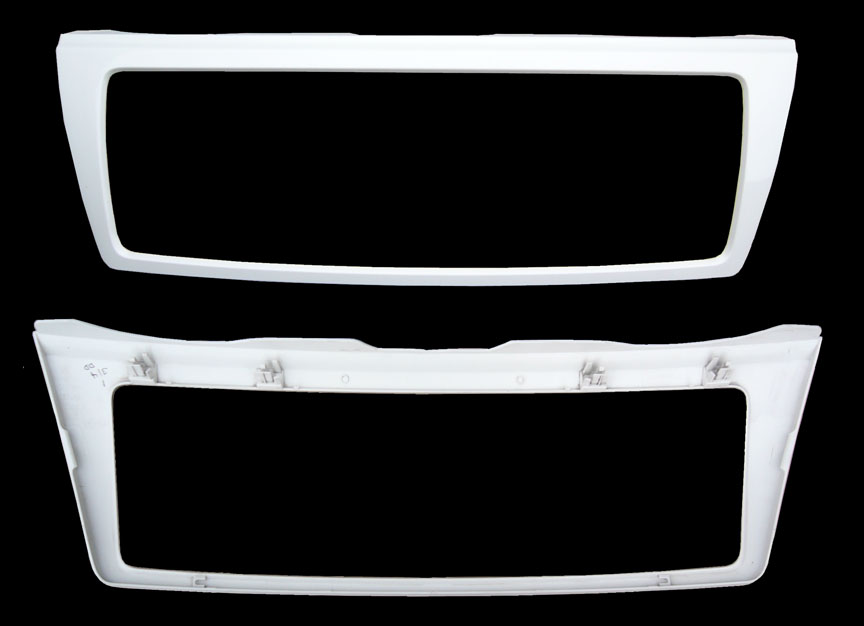
Front and back views of the 2002 Limited fascia with removable outer grille
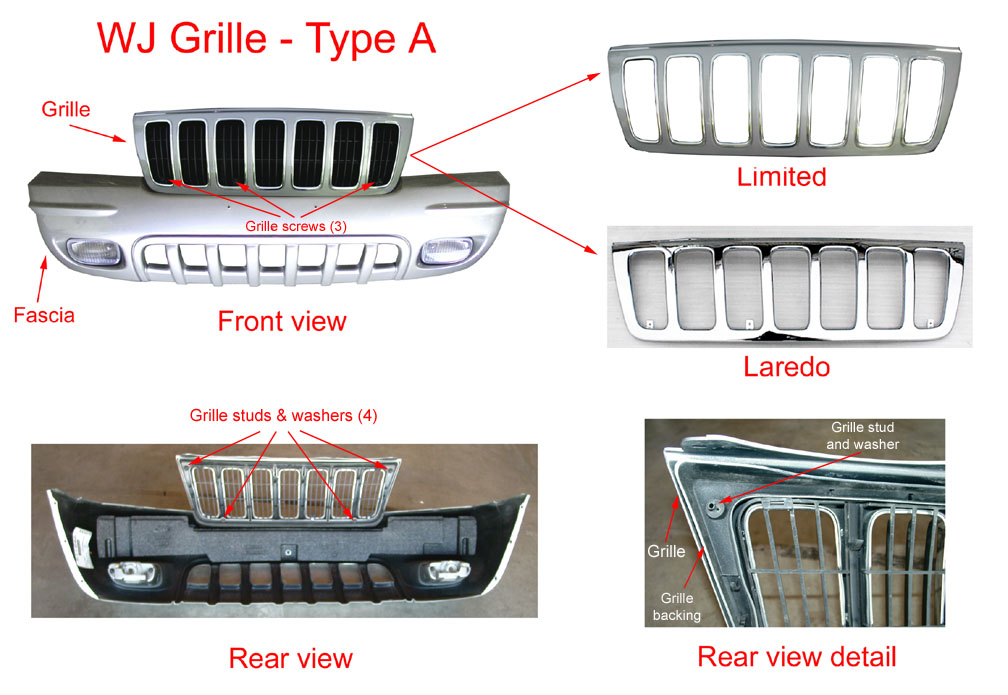
WJ grille and fascia assembly types
| Model / Year | 1999-2000 | 2001-2003 | 2004 |
| Laredo / Sport / SE | Type A | Type A | Type C |
| Limited / Overland | Type B | Type A | Type C |
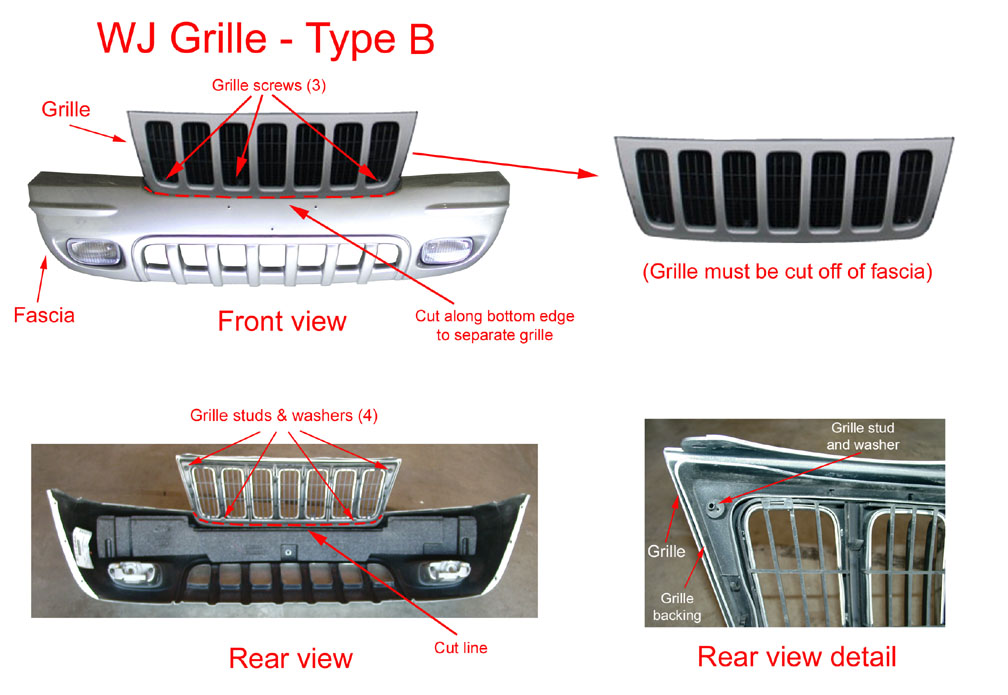
Type A: The fascia and grille are a two-piece assembly and can be easily separatedType B: The fascia and body-color grille are a one-piece assembly and cannot be taken apart and separated without permanently cutting it.
Type C: The fascia and grille are a two-piece assembly and can be separated, the grille will come off without removing the fascia.


| Type A | Type B | Type C |
|---|
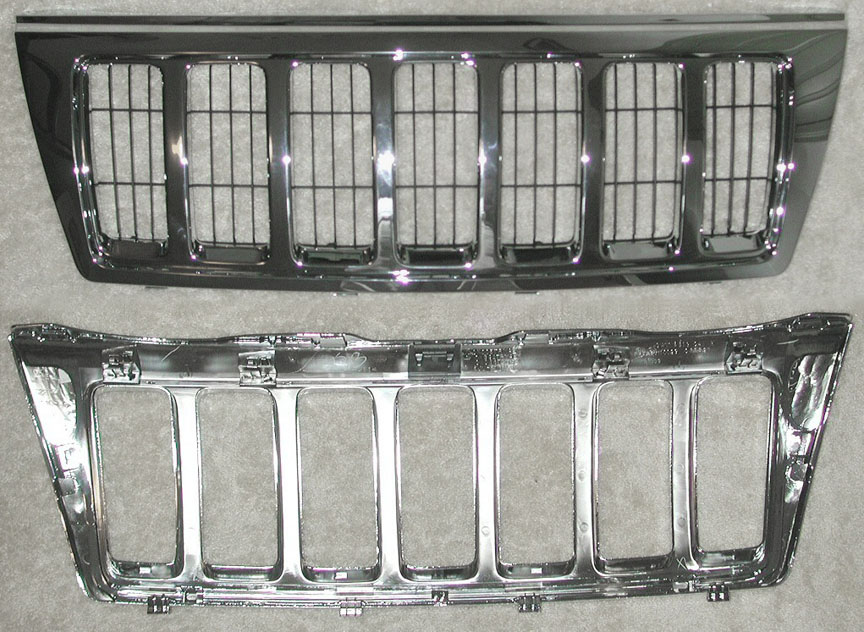
1999-2003 Laredo chrome grilles (Type A) – The chrome grilles are separate from the fascia and can be removed and replaced with any of the 2001-2003 Limited grilles that feature the chrome throat rings. The available colors are listed in the chart below. The 1999-2003 Laredo chrome grilles can also be installed on 1999-2003 Limited models.
1999 and 2000 Limited grilles (Type B) – The body-colored Limited grilles used in 1999 and 2000 are manufactured only as a complete one-piece assembly attached to the fascia. To replace these grilles with either a Laredo chrome grille or a 2001-2003 chromed-ring grille requires that the existing grille be cut away from the fascia. Further details are provided in the Grille removal section.
2001-2003 Limited grilles (Type A) – These grilles are available separate from the fascia, and in the body colors listed in the chart below. The chrome trim throat rings, however, are not available separately. The 2001-2003 Limited grilles with the rings can be installed on all 1999-2003 Laredo models. Alternatively, Laredo chrome grilles can be installed on 1999-2003 Limited models.
2004 grilles (Type C) – Jeep redesigned the front grille and fascia for 2004. The new design allowed for a wide variety different grille variations that Jeep used in the model lineup. The outer part of the grille face featured either the body color or chrome finish while the inner portion was either a brushed silver finish or chrome. Some owners have successfully installed 2004 grilles onto 1999-2003 WJ’s using their existing fascias and headlamp mounting modules, but that method requires a slight amount of fit adjustments in order to get the grille to seat properly. See Grilles Part 4.
Type A: (1999-2003 Laredo and 2001-2003 Limited)
Type A – Grille and/or fascia removal:
Method 1 – Removing the grille without removing the fascia:
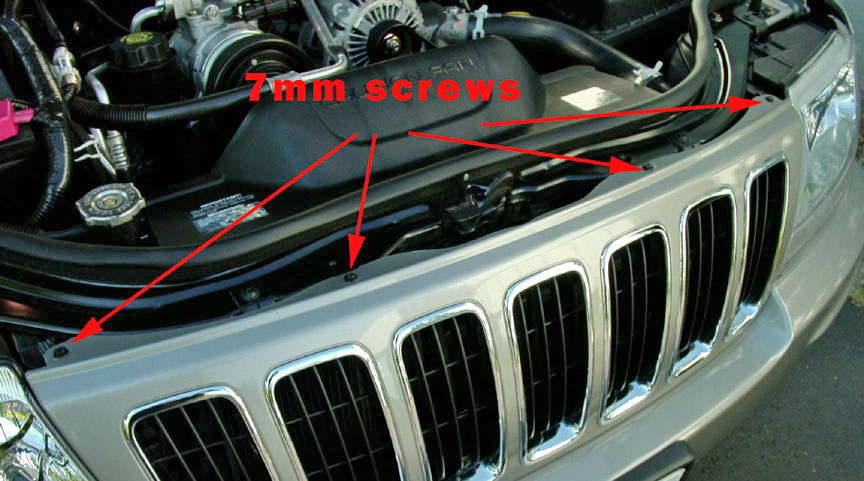
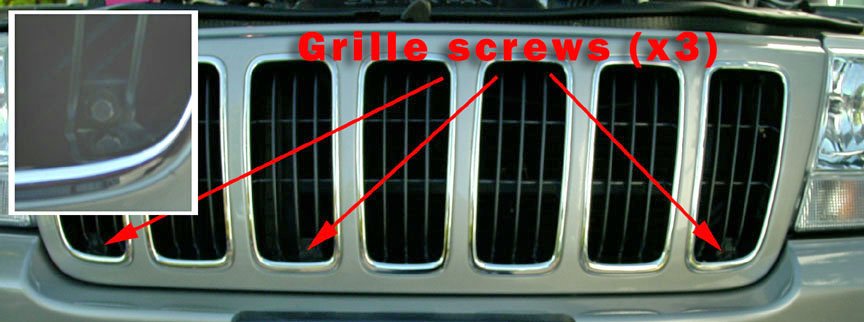
1. Remove the three exterior screws with a 7mm socket. The screws are located inside the lower front part of the grille, across the front. (See photo # 5 below).
2. From inside the hood, remove the four 7mm screws located along the top of the grille. (See photo # 3 below).
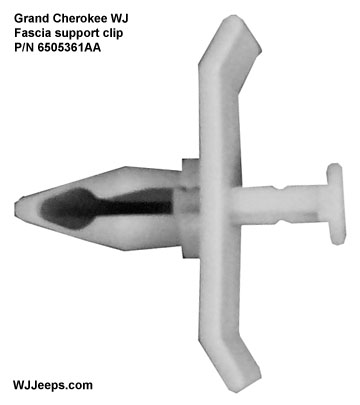
3. Pulling the grille towards you, reach inside with a pair of pliers or a flat blade screwdriver and pry off the two metal washers that are located at the top of the back of the grille. These washers are attached to plastic studs, attaching the grille to the black backing frame.
4. With a pair of pliers, reach to the bottom of the inside grille and grab each of the two plastic posts, bending them back and forth until they break off. (See photo # 6 below).
5. The grille can now be removed from the vehicle.
On 1999-2003 grilles, the black grille backing is permanently attached to the fascia.
Method 2 – Removing the fascia and grille:
| 1 | 2 | 3 | 4 |
|---|
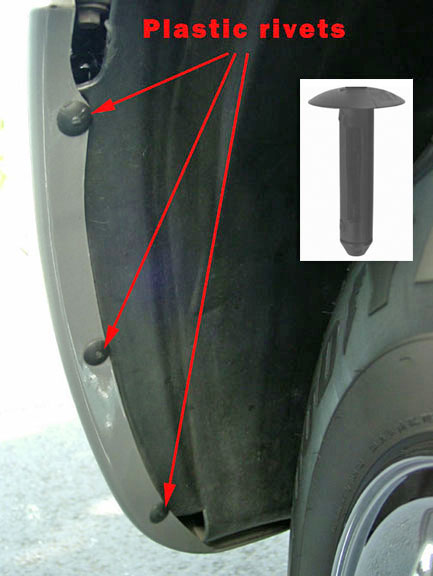
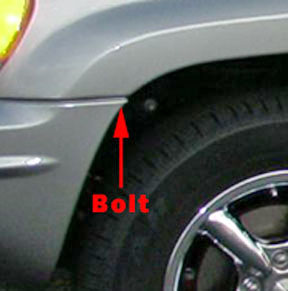
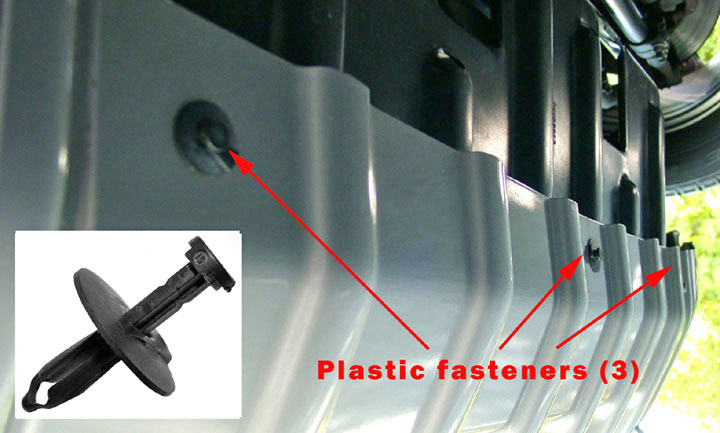
1. Remove the three plastic rivets that attach the fascia to each wheelwell liner. These can be carefully drilled out using a 1/4″ or so bit. Drilling into the center of the rivet about 1/16″ is enough to allow the rivet head to separate and come off. You can also pry them out with a flat blade screwdriver enough to insert a pair of side-cutters and cut the rivet heads off. Use a rag or other protection under the screwdriver to prevent scratching the edge of the fender.
2. With a 10mm socket wrench, remove one upper bolt in each wheelwell that attaches the fascia to the fender.
3. From inside the hood, remove the four screws (7mm socket) located along the top of the grille.
4. Remove the three push pin fasteners (P/N 55176248) underneath on the bottom of the fascia. These are “push pin” fasteners and are removed by prying on the center rectangular head with a small flat blade screwdriver enough to pop it down and pull the pin completely out. The plastic holders must also be removed and are easily popped free by pulling the fascia edge down.
5. Remove the three screws in the front of the grille with a 7mm socket.
6. Unplug the fog light bulb harness on each side, if so equipped. Turn the sockets 1/4 turn counter-clockwise to remove. Wrap each harness/bulb up and out of the way to protect it while working on the vehicle.
7. The fascia can now be slid forward and carefully removed.
8. To separate the grille, remove the four washers attaching the grille from the back. Grab the outside of the washers with a pair of pliers and twist them while pulling upwards.
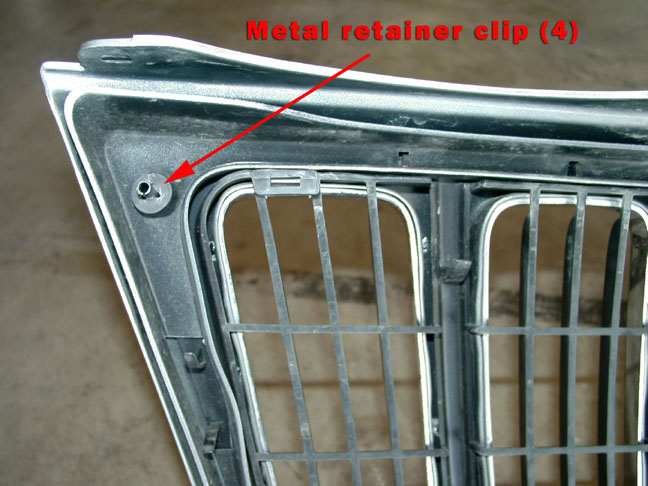
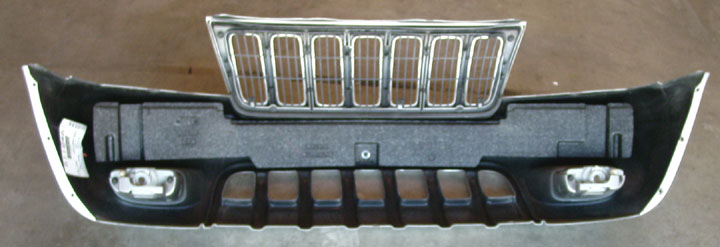
Location of front grille screws and close-up of grille support showing one of the four rear retaining clips
Type A – Reinstalling the grille & fascia

Driver’s side fascia support clip
1. Reattach the outer grille to the fascia
2. Hold the fascia up to the front of the vehicle and guide both grooved sides that are at the top of each side of the fascia through the plastic support clips. Also, don’t forget to reconnect the fog lamp sockets.
3. Reinstall the 3 push-pin fasteners underneath the fascia
4. Reinstall the 3 front grille screws
5. Reinstall the 4 top grille screws
6. Reinstall the 10mm fascia-to-fender bolts on each side
7. Install new plastic wheelwell rivets, 3 on each side
Type B: (1999-2000 Limited)
Type B – Grille and/or fascia removal:
The only difference between the Type A grille and the Type B grille is that the fascia and body-color front grille are a one-piece assembly and cannot be taken apart and separated without permanently cutting it. The plastic grille can be cut along its bottom edge and removed from the fascia using a cutting tool or a sturdy sharp knife. This can be done with or without removing the fascia, but the latter may not be the best choice.
Removing the fascia makes cutting out the grille a lot easier as it can be accessed from the back, avoiding the potential of scratching the top edge of the fascia while cutting it. If you want to do this without removing the fascia, you would need to protect the bottom edge somehow, perhaps with a cloth secured with duct tape, tightly underneath the cutting area.
To remove the Type B fascia and grille, follow the directions above for Type A – Grille and/or fascia removal. You can use Method 1 for removing the grille without removing the fascia (adding the “cutting step”), or Method 2 for removing the fascia and grille together and then cutting off the grille if desired.
Type C: (All 2004 models)
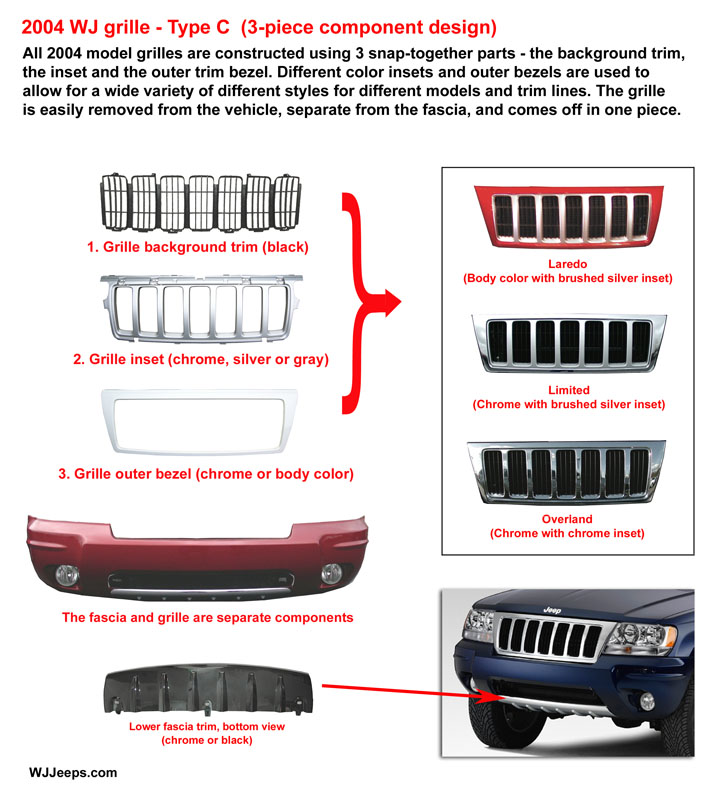
The Grand Cherokee front end was refreshened for the 2004 model year. The foglights were redesigned and are now round. The grilles come in body-color or chrome, and feature silver or chrome insets. The seven slots are now more vertical, and the headlamp mounting module was also changed to accept the new grille and fascia mounting points. The ’04 Limited and Overland models also feature an Anti-Flutter bracket that attaches in front of the lower fascia attachment bracket (to prevent the new lower applique moving up/down in disturbed air).
The 2004 grilles are held in place by 9 retaining tabs and clips, snapping directly onto the new headlight mounting module. There are no screws attaching the grille and it can be removed without removing the fascia.
1. Using a trim stick C-4755 or equivalent, separate the top of the grille by releasing the five upper clips.
2. Roll the grille forward and release the four lower retaining tabs and remove the grille.

| Limited grille outer trim close-up | Limited grille inset close-up | 2004 Overland grille |
|---|
Fascia removal: 2004
3. Remove the three plastic rivets that attach the fascia to each wheelwell liner. These can be carefully drilled out using a 1/4″ or so bit. Drilling into the center of the rivet about 1/16″ is enough to allow the rivet head to separate and come off. You can also pry them out with a flat blade screwdriver enough to insert a pair of side-cutters and cut the rivet heads off. Use a rag or other protection under the screwdriver to prevent scratching the edge of the fender.
4. With a 10mm socket wrench, remove one upper bolt in each wheelwell that attaches the fascia to the fender.
5. Remove the three push pin fasteners (P/N 55176248) underneath on the bottom of the fascia. These are “push pin” fasteners and are removed by prying on the center rectangular head with a small flat blade screwdriver enough to pop it down and pull the pin completely out. The plastic holders must also be removed and are easily popped free by pulling the fascia edge down.
6. Remove the 5 push pin fasteners from the front center of the fascia.
7. Unplug the fog light bulb harness on each side, if so equipped. Turn the sockets 1/4 turn counter-clockwise to remove. Wrap each harness/bulb up and out of the way to protect it while working on the vehicle.
8. The fascia can now be slid forward and carefully removed.
Reinstalling the grille & fascia 2004:
Driver’s side fascia support clip
1. Hold the fascia up to the front of the vehicle and guide both grooved sides that are at the top of each side of the fascia through the plastic support clips. Also, don’t forget to reconnect the fog lamp sockets.
2. Reinstall the 3 push-pin fasteners underneath the fascia
3. Reinstall the 5 Push Pin fasteners on the front center of the fascia
4. Reinstall the 10mm fascia-to-fender bolts on each side
5. Reinstall the grille by positioning it on the fascia and engaging the lower retaining tabs. Rotate the grille up and engage the upper retaining clips beginning at the center and moving outward.
6. Install new plastic wheelwell rivets, 3 on each side.
Installing 2004 front ends on 1999-2003 model WJ’s
Plastic wheelwell rivets
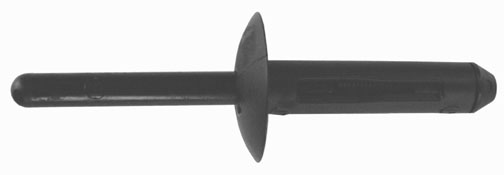
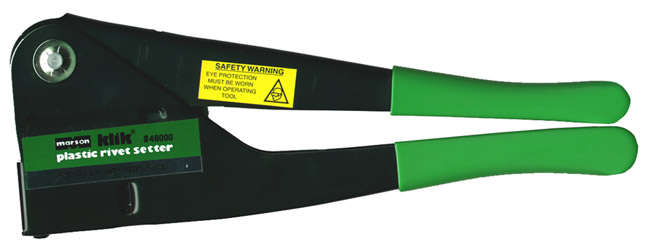
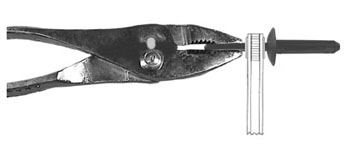
MA48150 plastic rivets and MA48000 Rivet Setter
The factory plastic rivets used to attach the fascia to the wheelwell liners have a MSRP of $6.45 each (P/N 34201631). You can get identical rivets for far less at auto body supply shops and also online. The rivets are made by the Marson Corp. (Alcoa) and are called Klik-Loktm Plastic Rivets, P/N MA48150 (or 58150 in bulk packs). Marson also makes a tool for installing the rivets, Plastic Rivet Setter P/N MA48000. The rivets however can be installed without the tool, by simply pulling on the end with a pair of pliers while holding the rivet base in place, although they will not be quite as tight as with using a rivet gun.
Note: The Marson model 48000 rivet gun is available from Amazon.com. The plastic rivets are available online from several suppliers (search: Marson 48150 Plastic Rivets). The size is 6.3mm, .158″ – .394″ Grip Range. Aside from fenderwells, you’ll end up finding a lot of other uses for a rivet gun, both automotive related as well as household projects.
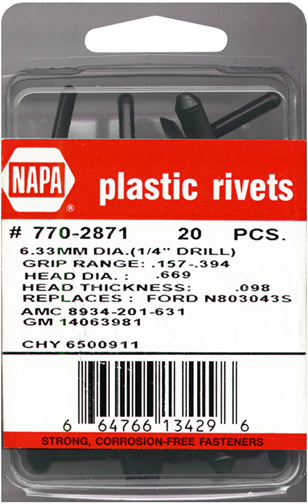
| NAPA also sells plastic rivets that are very similar to the factory rivets. The part number for their box of 20 rivets is #770-2871. These rivets are compatible with the Marson rivet setter gun shown above. |
Setting plastic rivets without a rivet gun
Initially it’s best to “pre-set” the rivets ahead of installing them. This is done by slightly but firmly pulling on the center pin with a pair of pliers while holding onto the rivet with your hand, enough to pull the pin out just a little, about 1/4″. The pin can then be pushed back in to its original location for installation, making the rivet a little easier to set since the plastic has been “started”.
Tightly hold the rivet in place in its mounting hole, using a box wrench or similar tool placed over the rivet stem. Make sure the wheelwell liner is lined up with and against the fenderwell. With a pair of pliers, grab the stem as close as possible to the wrench. While gripping the stem tightly, bring the pliers downward over the wrench, pulling the center pin a little to “start” the rivet engagement. Then re-grab the center rivet again, close to the wrench, and force the pin out some more. This may take two or three sequences to bring the center pin all the way out far enough to set the rivet. Cut the protruding portion of the pin off with a knife or side cutters and you’re done. Once you install one rivet this way and get the hang of it, the rest will take just a few seconds.