
Welcome to the JeepSpecs.com in-depth page on how to upgrade the WJ Generation Jeep Grand Cherokee sound system. We have organized as much information as we could find into a helpful table below. Is something incorrect or missing? Please get in touch with us and we’ll fix it!
— Under construction —
The goal of the “Options” section below is to try and sort out the variations of possible upgrades to the WJ factory system and to define what is needed or recommended for the upgrade and installation. This section will be expanded in the months ahead to clarify and describe the many different options as best as possible.
1999-2004 WJ Infinity system upgrade optionsClick on the # in the Option column for additional information |
||||||
| Option | Head Unit | Speakers | Amplifier | CD changer | ||
| # 1 | Factory | Replace | Factory | Factory | ||
| # 2 | Factory | Replace | Replace | Factory | ||
| # 3 | Factory | Factory or replace speakers
|
Factory
|
Factory | ||
| # 4 | Factory | Replace + add subwoofer |
Replace + add sub amp |
Factory | ||
| # 5 | Replace | Factory or replace speakers | Factory | Replace (required) | ||
| # 6 | Replace | Replace | Replace | Replace (required) | ||
| # 7 | Replace | Replace + add subwoofer |
Replace + add sub amp |
Replace (required) | ||
| # 8 | Adding the Sirius Satellite Radio system | |||||
| # 9 | Adding auxiliary audio sources to the factory radio | |||||
Option # 1. Keep factory head unit and Infinity amplifier, replace Infinity speakers
| Option | Head Unit | Speakers | Amplifier | CD changer |
| # 1 | Factory | Replace | Factory | Factory |

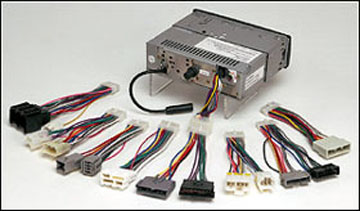
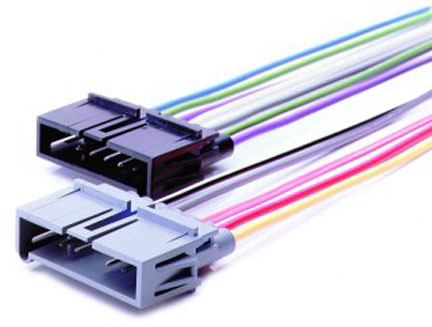
OEM-1 Interface and cables for adding a new amplifier
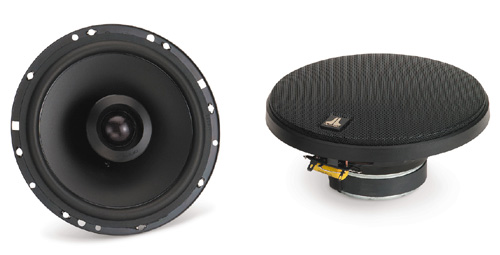
The easiest and least expensive upgrade is to simply replace the stock Infinity speakers. The stock Infinity speakers are well matched to the head unit and amplifier so changing out just the speakers does not result in a very noticeable sound improvement. However, many owners use this as a “first step” in their upgrade path, especially when budget is a consideration. A new amplifier and/or head unit as well as other components can be added in the future.
Components:
Dash: 2x 2.5″ tweeters (some brands of 3″ tweeters can be used but require custom fitting)
Front doors (Bass): 2x 6.5″ speakers (or 2x 6″x9″ speakers)
Rear doors (Full-range): 2x 6.5″ speakers
Accessories/connectors:
# 10 Aftermarket speaker to factory speaker harness. (door speakers only)
# 11 Speaker mounting templates (to install 6.5″ speakers in front 6×9 opening).
# 11 Speaker mounting templates (to install 6.5″ speakers in rear 6.5 opening. Some speakers will fit in the same space as the factory speakers but the adaptor plates make for a tighter and better fit).
| Option | Head Unit | Speakers | Amplifier | CD changer |
| # 2 | Factory | Replace | Replace | Factory |
Installation option 2a: (using OEM-1 adaptor)
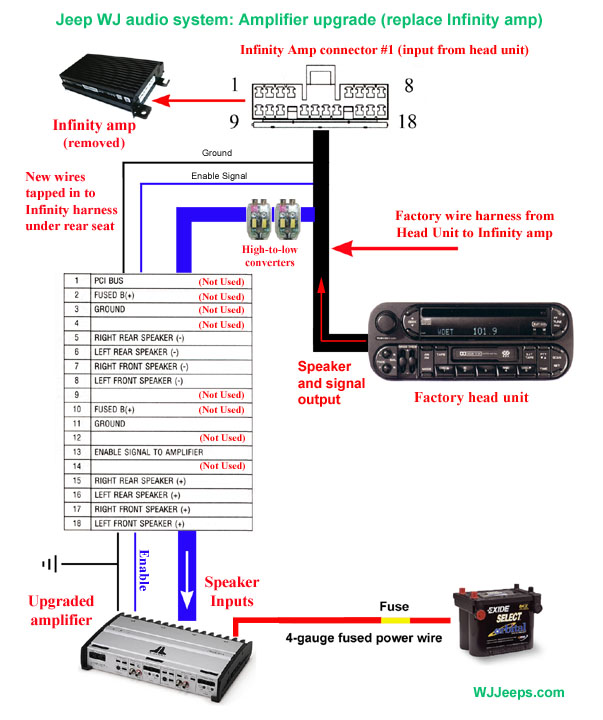
The OEM-1 has built-in signal level converters. One of the cables plugs into the OEM-1 and the factory radio, and the other is a short harness offering 4 channels of RCA output and the trigger feed for the amplifier. RCA wires and one remote wire will have to be run from the OEM-1 at the head unit back to the location of the new amplifier.
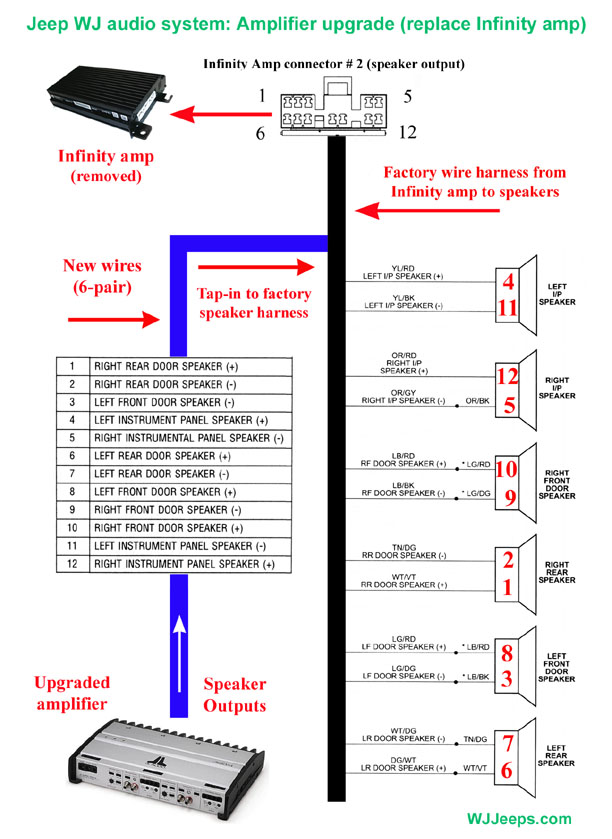
You will also need to tap into the factory speaker harness under the rear seat (6 speakers=12 wires) and run those to the amplifier speaker output terminals (or run entirely new wiring from the amp to all of the speakers). See “New amp to speakers connection” diagram below.
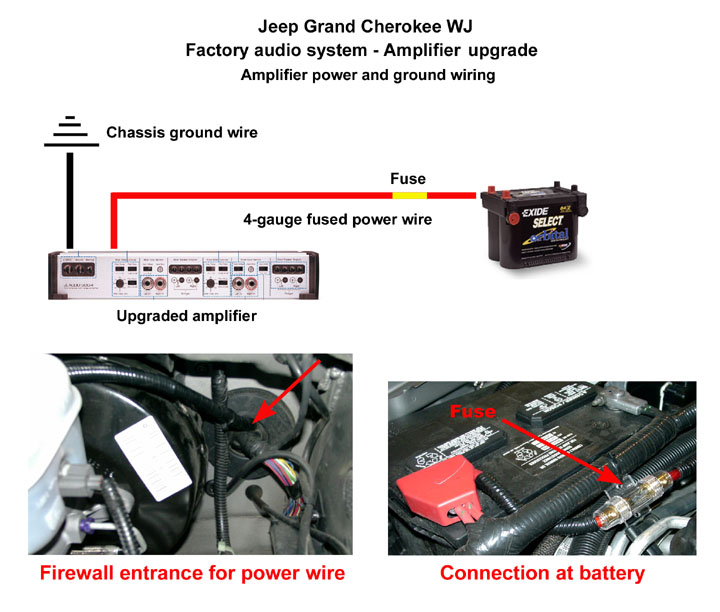
The new amplifier will need a power feed run directly to the battery. The ground wire for the amp can be attached to the vehicle body near the amplifier mounting location.
Although costing at least $100, this adaptor package makes installation a lot easier for owners upgrading their amp as it saves tapping into the 8 input wires (as in option 2b below) and has the signal level converters built in.
1999-2001 head units:
OEM-1 Interface + “ADD-CHR” and “AMP-RCA” cables.
1999-2004 head units:
OEM-1 Interface + “ADD-CHR2” and “AMP-RCA” cables.
Summary of parts needed for Option # 2a Installation:
1x 4-channel amplifier
2x 6.5″ front Door speakers (or 6″x9″)
2x 6.5″ rear door speakers
2x 2.5″ dash tweeters
1x OEM-1 Interface plus two cables
1x 20′ 4-gauge power cable with fuse (amplifier to battery)
1x Short ground cable (amplifier to chassis)
2x 20′ RCA wire pairs (From OEM-1 unit to amplifier)
6x Speaker wires, RCA on one end (amp), bare on other end (from amp to factory speaker harness under rear seat)
Installation option 2b: (without using OEM-1 adaptor)
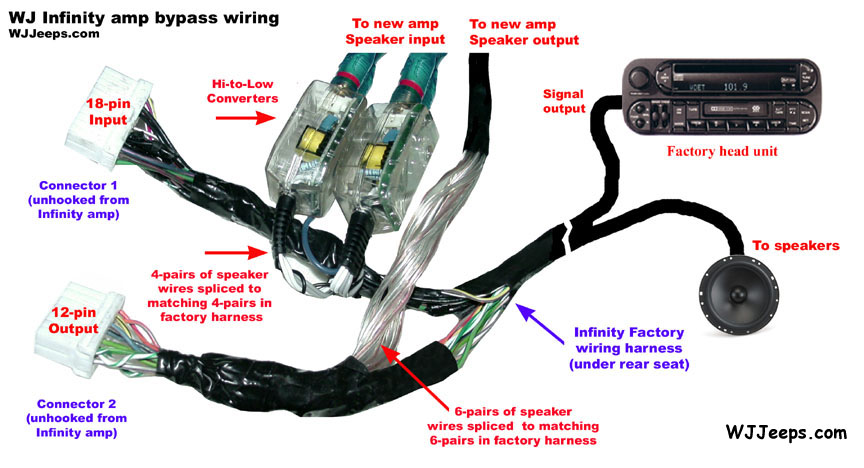
Installation of a replacement amplifier without using an OEM-1 adaptor requires tapping into both the 8 audio output and the 12 speaker wires in the Infinity harness at the existing Infinity amp location and adding signal level converters (as shown in the diagrams below). New wiring can also be run from the new amp to the speakers as some owners do for their installations, but this involves a lot of extra work and is not really necessary for most applications.
Summary of parts needed for Option # 2b Installation:
1x 4-channel amplifier
2x High to low signal level converters
1x 20′ 4-gauge power cable with fuse (amplifier to battery)
1x Short ground cable (amplifier to chassis)
6x Speaker wire pairs, RCA on one end (amp), bare on other end (from amp to factory speaker harness under rear seat)
4x 6′ RCA wire pairs (signal converters to new amplifier)
Option # 3. Keep factory head unit and Infinity amp, keep or replace Infinity speakers, add subwoofer and subwoofer amplifier
| Option | Head Unit | Speakers | Amplifier | CD changer | ||
| # 3 | Factory | Factory or replace speakers
|
Factory
|
Factory |

OEM-1 Interface and cables for adding a subwoofer amplifier
This installation is most easily accomplished with the OEM-1 and two cables. The OEM-1 has built-in signal level converters. One of the cables plugs into the OEM-1 and the factory radio, and the other is a short harness offering 4 channels of RCA output and the trigger feed for the amplifier. RCA wires and one remote wire will have to be run from the AOEM at the head unit back to the location of the new amplifier.
The new amplifier will also need a power feed run directly to the battery. The ground wire for the amp can be attached to the vehicle body near the amplifier mounting location. The subwoofer is wired directly to the new amplifier
Helpful or required accessories:
1999-2001 head units:
OEM-1 Interface + “ADD-CHR” and “AMP-RCA” cables.
1999-2004 head units:
OEM-1 Interface + “ADD-CHR2” and “AMP-RCA” cables.
Summary of parts needed for Option # 3 Installation:
1x OEM-1 kit with 2 cables
1x Single channel amplifier (mono)
1x Subwoofer with enclosure
1x 20′ 4-gauge power cable with fuse (amplifier to battery)
1x Short ground cable (amplifier to chassis)
1x Speaker wire from subwoofer to new amplifier
Option # 4. Keep factory head unit, replace Infinity amp and Infinity speakers, add new amp, add subwoofer and subwoofer amp.
| Option | Head Unit | Speakers | Amplifier | CD changer |
| # 4 | Factory | Replace + add subwoofer |
Replace + add sub amp |
Factory |
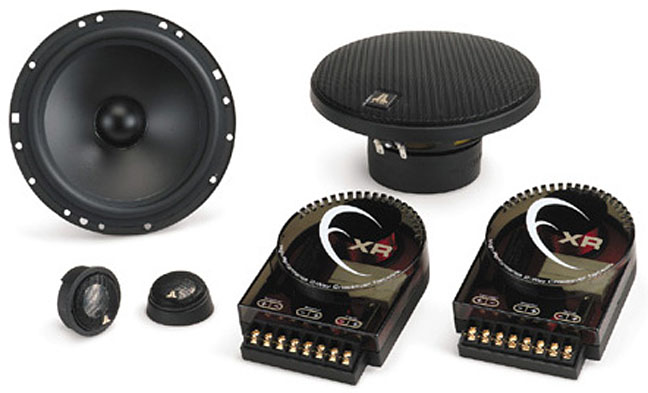
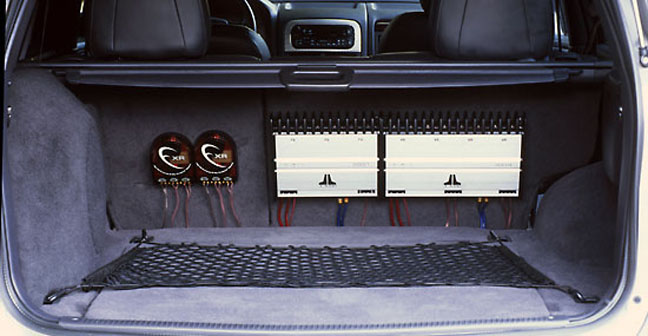
One of the best examples of this premium upgrade is the JL Audio system installation that is shown Here.
Option # 5. Replace factory head unit, keep Infinity amp, keep or replace Infinity speakers
| Option | Head Unit | Speakers | Amplifier | CD changer |
| # 5 | Replace | Factory or replace speakers | Factory | Replace (required) |
5a. Replacing the factory head unit with a different or upgraded factory head unit:
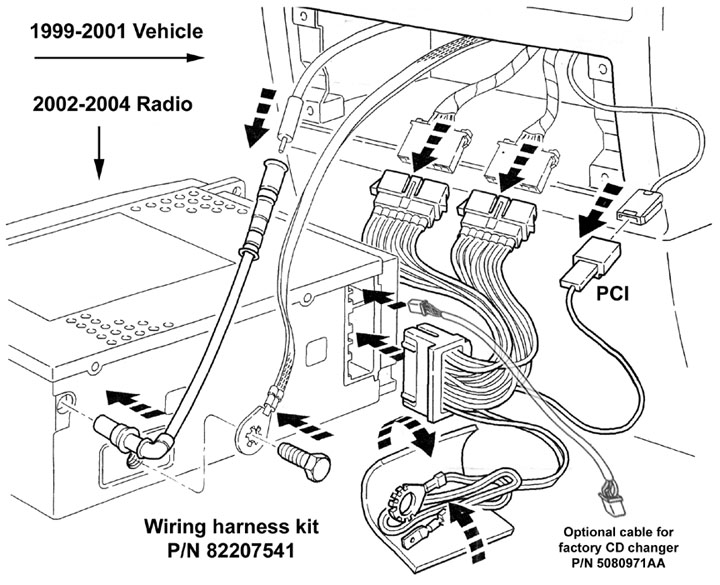
Owners of WJ’s with just a basic AM/FM radio with cassette or CD player can easily upgrade to just about any other radio unit made for the Grand Cherokee’s. Installation is a 5-minute “plug and play” job. Two different connectors are used on the WJ’s, 1999-2001 models have a dual 7-pin connector while 2002-2004 models feature the new style 22-pin connector. If you are installing a newer radio in a 1999-2001 Grand Cherokee you will need the Mopar P/N 82207541AC harness adaptor kit, Accessory # 9. This kit includes the antenna adaptor.
5b. Replacing the factory head unit with the factory RB1 Navigation radio:
The RB1 will plug right in to any 2002-2004 WJ and fit perfectly into the dash with no modifications. With the harness adaptor kit mentioned above the unit can be installed just as easily into 1999-2001 vehicles. See the RB1 installation page for detailed information on installing the navigation radio.
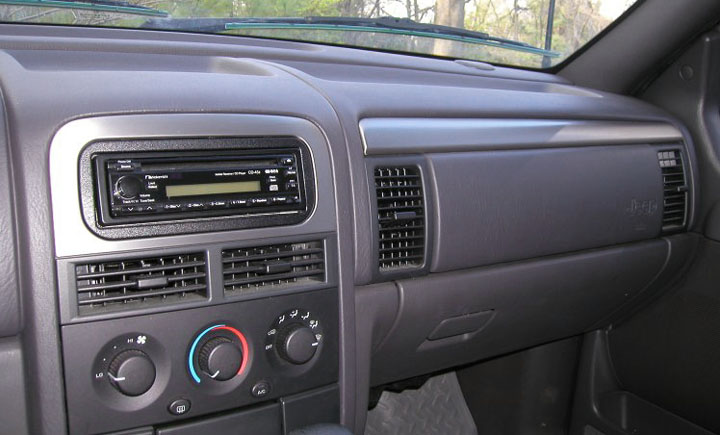
5c. Replacing the factory head unit with an aftermarket head unit:
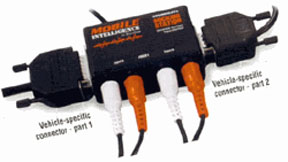
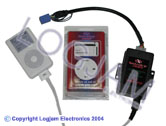
The easiest solution for this upgrade is to use one of the OEM-1 adaptor kits, as seen in the photo above. The OEM-1 has built-in signal level converters and no cutting or splicing of the factory wires is required, making the installation of an aftermarket deck extremely easy.
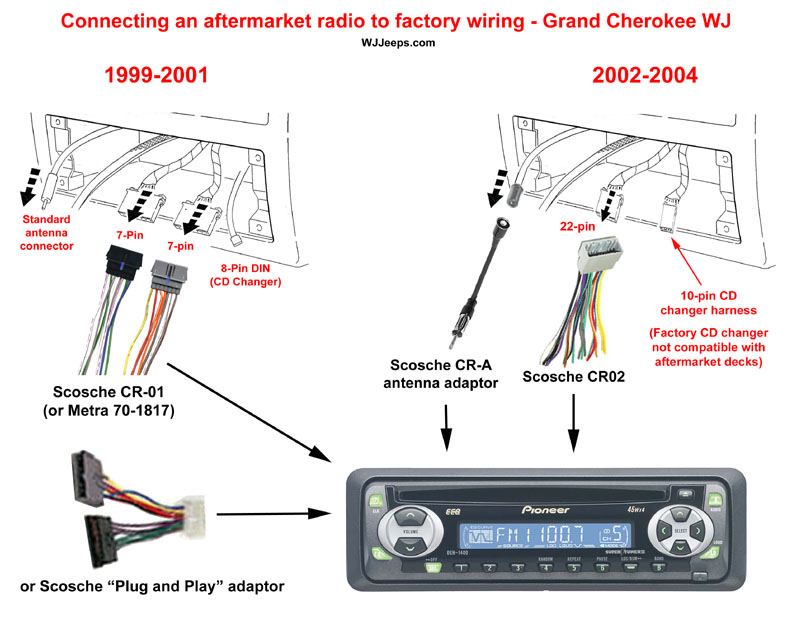
Alternatively, and cheaper, “Plug and Play” and other conversion cables are made for most brands of car stereos. See Accessory #6b below for the cable choices for different brand head units and different model year WJ’s. Some cable adaptors have a plug on one end and bare wires on the other so that just about any brand aftermarket radio could be used. The plug fits into the factory radio harness and the bare wires are crimped or soldered to the new aftermarket decks wiring harness. A bezel trim kit is also required for any 1-DIN size aftermarket stereos to fit the 1.5 DIN oval dash opening used in all WJ’s.
Helpful or required accessories:
Accessory # 1. Antenna adaptors (starting with the 2002 model year Chrysler switched to a new style locking antenna connector. If you are upgrading to an aftermarket head unit you will need an adaptor. An adaptor is also required when installing a 2002-up factory head unit into a 1999-2001 WJ.)
Accessory # 2 CD changer cable (for connecting factory CD changer to factory radio)
Accessory # 3 CD changer cable/adaptor (for connecting aftermarket CD Changer to factory radio)
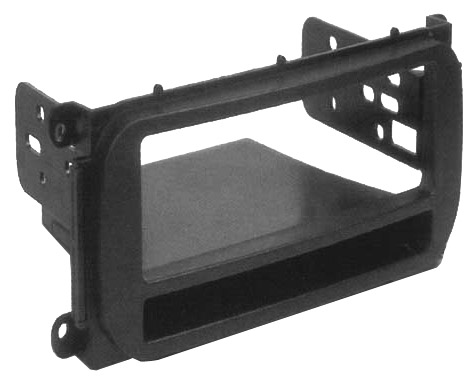
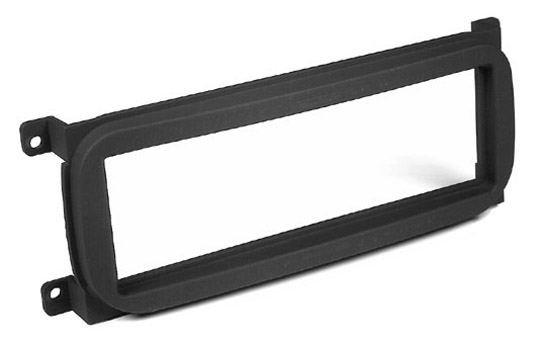
Accessory # 8. Radio bezel trim kits (required for installing most aftermarket decks.)
Accessory # 9. Radio harness adaptor kit (for installing a 2002-2004 factory radio into a 1999-2001 vehicle. The 2002-up radios feature a 22-pin connector vs the dual 7-pin connectors used from 1999-2001.)
Option # 6. Replace factory head unit, Infinity amp and Infinity speakers (keep none of the factory components)
| Option | Head Unit | Speakers | Amplifier | CD changer |
| # 6 | Replace | Replace | Replace | Replace (required)
|
Option # 7. Replace factory head unit, Infinity amp and speakers, add a subwoofer and a subwoofer amp (keep none of the factory components).
| Option | Head Unit | Speakers | Amplifier | CD changer |
| # 7 | Replace | Replace + add subwoofer |
Replace + add sub amp |
Replace (required)
|
Option # 8. Adding the Sirius Satellite Radio system
Adding the Sirius Satellite Radio system
For Sirius satellite information and installation details our special section on Sirius Satellite Radio
Option # 9. Adding auxiliary audio sources to the factory radio (MP3 etc.)
# 9 Adding auxiliary audio sources to the factory radio
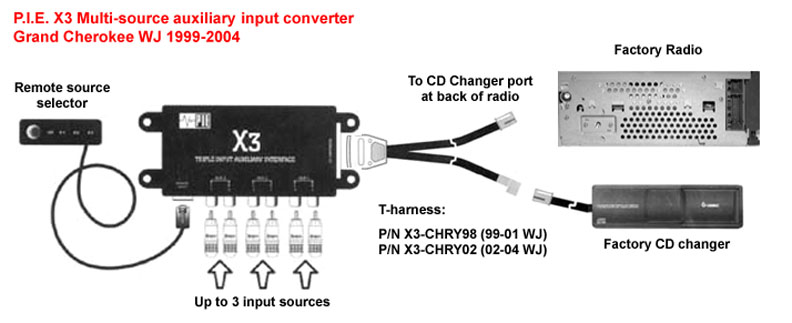
P.I.E. X3 Multi-source input converter
A new Auxiliary Input Converter system from P.I.E. allows the user to add up to three auxiliary input sources and have them connected directly between the CD changer and factory radios. You can connect MP3 portable players, an XM radios, iPods or any combination of three separate audio sources, all at the same time AND still use the OEM or aftermarket CD Changer! The X-3 system interrupts the audio of the CD changer, switching between the three user-selectable RCA level auxiliary audio sources, and defaults back to the CD changer if desired. The X-3 system consists of two parts, the Selector Brain Module (X-3), and the vehicle-specific T-harness. The X-3 can be installed anywhere in the passenger compartment of the WJ. An optional 15′ extension cable is available for the wired remote source selector.
P.I.E. Auxiliary input converter: X-3 base unit with wired remote control
Adaptor cable: 1999-2001 Models: X3-CHRY98
Adaptor cable: 2002-2004 Models: X3-CHRY02
Remote control 15′ extension cable: X3-EXT/15
NOTE: Must have a functioning OEM CD-Changer, or aftermarket CD-Changer using a PIE protocol converter. An X3 vehicle specific harness is also required.
See Auxiliary input connectors below for additional converter choices
| 1999-2004 WJ Non-Infinity system upgrade options | |||||
| Head Unit | Speakers | Amplifier | CD changer | ||
| 1 | Factory | Replace | Factory, in-radio | Factory | |
| 2 | Factory | Factory | Add system amp | Factory | |
| 3 | Factory | Replace | Add system amp | Factory | |
| 4 | Factory | Factory
|
Add sub amp | Factory | |
| 5 | Factory | Replace + add subwoofer | Add sub amp | Factory | |
| 6 | Factory | Replace + add subwoofer | Add sub amp & system amp | Factory | |
| 7 | Replace | Factory | Factory, in-radio | Replace (required) | |
| 8 | Replace | Replace | Factory, in-radio | Replace (required) | |
| 9 | Replace | Replace | Add system amp | Replace (required) | |
| 10 | Replace | Replace + add subwoofer | Add sub amp & system amp | Replace (required) | |
WJ audio system installation accessories & adaptors
1. Antenna adaptors
Scosche model CRA antenna adaptor. Allows hook-up of aftermarket radio with standard antenna connector to Chrysler 2002-up new style locking connector.
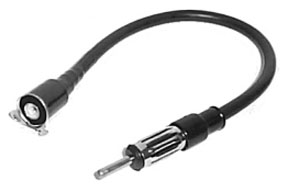
Scosche CRA
Scosche model CRAR reverse antenna adaptor. Allows hook-up of standard antenna cable into 2002 and up factory radios with the new style locking connector
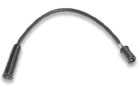
cosche CRAR reverse antenna adaptor
2. CD changer: Cables for connecting factory CD changers to factory premium radios
Back to Accessories index
For vehicles that did not come from the factory with a CD changer. Radio must have CD changer controls. CD changer must be 1999 or newer. A 5-meter DIN cable is included when you buy the Mopar CD changer kit. If you buy a used factory CD changer this cable may not be included.
Also required to house the CD changer is a rear console kit, available in Agate, Taupe, Sandstone or Slate Gray. This “kit” is the trim housing and lid only and does not include any changer unit mounting hardware. For more information on factory CD changers and kits, including part numbers and specifications, see OEM 10-Disc changers.
1999-2001* WJ radios, 8-pin round (Radio) to 8-pin square (CD changer) – P/N 5013661AA (also Mopar P/N 4883251)
(*Note: Some base 2002 models used the 8-pin to 8-pin connectors)
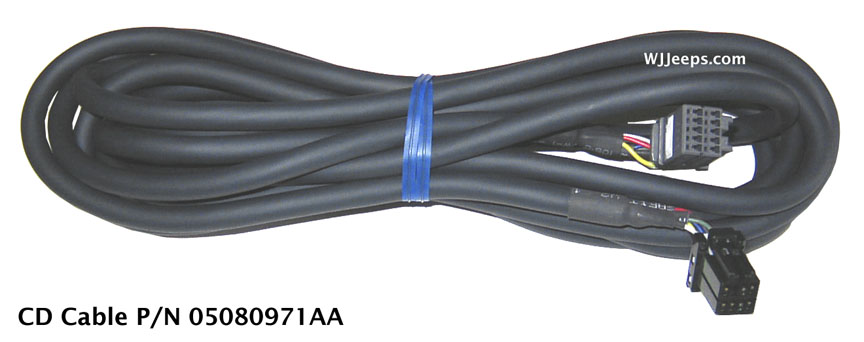
2002*-2004 WJ radios (Including RB1 Nav radio), 10-pin square (Radio) to 8-pin square (CD changer). Note: This cable will also allow operation of a factory CD changer in a 1999-2001 WJ having a 2002 or later radio installed. – P/N 05080971AA
(*Note: Some base 2002 models used the 8-pin to 8-pin connectors).
Factory CD Changer mounting bracket:
Mounting holes are pre-drilled for WJ’s that did not come from the factory with a CD changer. Previously, this bracket was available only with the CD changer package. As of September 2003, Mopar now offers this as a separate part, # 82204864.
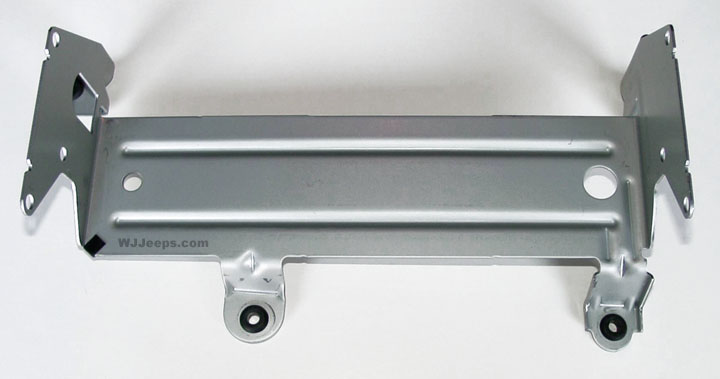
Metal CD changer mounting bracket
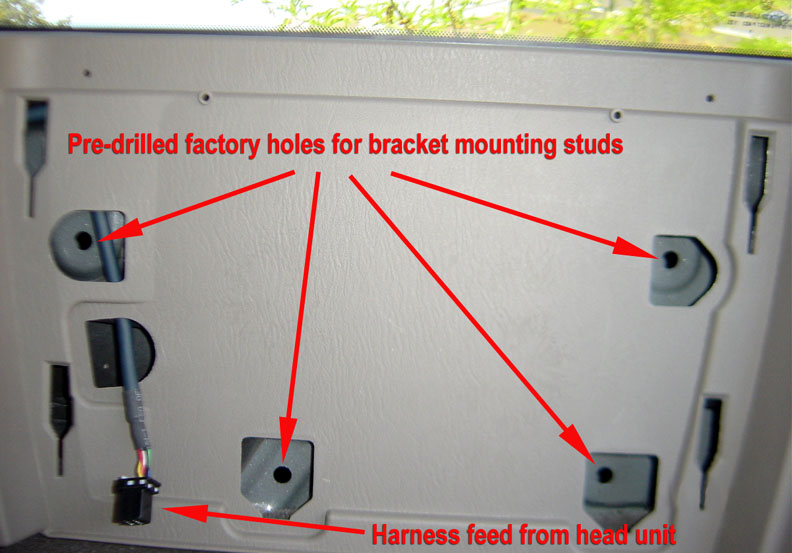
Location of factory holes for the bracket studs

Changer bracket mounting stud and nut
Back to Accessories index
1999-2001:
Alpine, Audiovox, Nakamichi, Panasonic, Sanyo. Connects to the 8 pin DIN connector on the radio and to the aftermarket CD changer cable. Interface for Alpine 6-disc changer CHM-S601, CHM-S611 and CHM-S620, Panasonic EUC-DP601 & EUC-DP801, Nakamichi MB-70 & MF-51, Audiovox SPS6CDS & SPS10CDS. May also work with some older Pioneer units. Peripheral P/N “CHYAS”.
(Note – only for 1999-2001 models that have a “CD-C” radio button (not for radios with “CD” or “Mode” buttons).
Peripheral CHYAS
1999-2001:
Kenwood. Connects to the 8-pin DIN connector on the radio and to the aftermarket CD changer cable. Interface for Kenwood 6-disc changer KDC-C667 and Kenwood 10-disc changers KDC-C717 and KDC-CX89. The KDC-CX89 is MP3 capable. Pacific Interface Electronics P/N CHRY98/PC-KNW2.
(Note – only for 1999-2001 models that have a “CD-C” radio button (not for radios with “CD” or “Mode” buttons)
PIE CHRY98/PC-KNW2
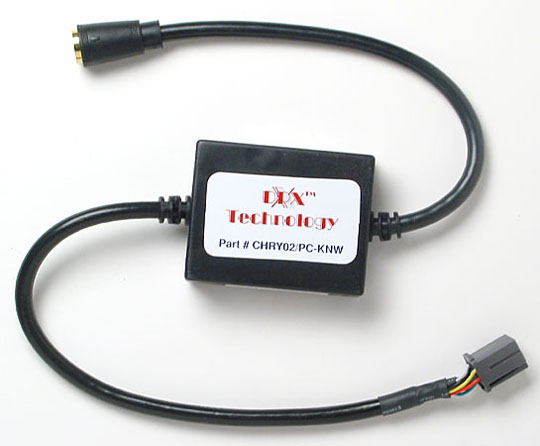
2002-2004:
Kenwood. Connects to the 10-pin square connector on the factory Jeep radio and to the aftermarket CD changer cable. Interface for Kenwood 6-disc changer KDC-C667 and Kenwood 10-disc changers KDC-C717 and KDC-CX89. The KDC-CX89 is MP3 capable. Pacific Interface Electronics P/N CHRY02/PC-KNW.
(Note – Radio must have CD changer controls)
PIE CHRY02/PC-KNW
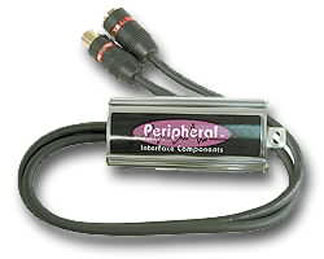
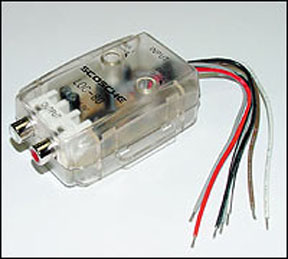
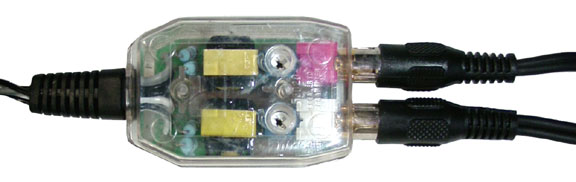
4. High level to low level converters
Back to Accessories index
Line output converters, adjustable. Converts high level audio signal (factory head unit) to RCA low level audio signal (aftermarket power amplifier). Two required, one for front channels, one for rear channels. The Scosche is available from Scosche.com and the DEI can be found at Car Stereo Pro.com, as well as from other audio accessory dealers.
5. MP3 player adaptors
(See also Auxiliary Audio Input Adaptors)
Back to Accessories index
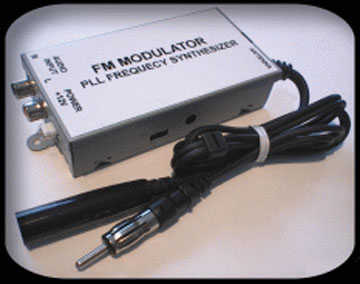
Adaptor for hooking up external MP3 players to factory system (1999-2004 WJ). This digital PLL tuned FM Modulator hooks up to the radio antenna lead and has audio inputs to allow the use of external audio devices such as MP3 players. The PLL-1 allows you to pick from three fixed frequencies to transmit on, 88.3, 88.7 and 89.1Mhz.
Note: 2002 and up WJ models require two special antenna adaptors.
Sound quality issues: Some users have reported varying degrees of sound quality using this unit, from good to poor. It is recommended that if you decide to purchase one of these units that you buy it from a vendor who has or will offer an unrestricted return option.
6. Radio: Replacing or adding an aftermarket head unit
Option 6a – OEM-1 Interface
The OEM-1 interface adaptor kit is used when replacing or adding an aftermarket head units such as Kenwood, Panasonic, Alpine, Pioneer, etc. to the Infinity factory sound system. The OEM-1 has an 18 pin connector on one end and a 16 pin connector on the other. Once the two cables are chosen for the particular installation, just plug them into the OEM-1, plug them into the factory radio harness and then plug into the aftermarket stereo that is being installed. No wire connections to the factory harness or ccnnectors are required. The factory cables are not cut or removed – they are used.
The model OEM-1 is a four channel device that gives you 2:1 gain as well as infinite attenuation. This allows signal adjustment to the correct level between the factory system and what is being added or changed. All four channels are individually adjusted for accurate sound levels. Each channel completely isolates the aftermarket equipment from the factory system to give 100% compatibility in every installation. Correct phasing is maintained. Signal ground is also isolated to avoid ground loops.
Using the OEM-1 interface to add an aftermarket head unit requires the OEM-1 unit plus one “A” cable and one “B” cable:
Cable: “A” |
|||
| ALP-16 Alpine | AUD-14 Audiovox | BLA-16 Blaupunkt | CLA-16 Clarion |
| ELC-16 Eclipse | JVC-16 JVC | Ken-16 Kenwood | Pan-16 Panasonic |
| PIO-12 Pioneer | PIO-14 Pioneer | PIO-16 Pioneer | San-12 Sanyo |
| SON-16 Sony | RAD-RCA Universal (RCA connectors) |
||
Cable: “B” |
|
| AMP-CHR (1999-2001 WJ’s) | AMP-CHR02 (2002-2004 WJ’s) |
1999-2001:
Aftermarket head unit to factory harness connector. Direct plug-in to factory harness plug on one end, bare wires on the other. Allows you to remove the factory radio and install an aftermarket head unit without cutting any factory wiring.
Scosche P/N CR-01 or Metra P/N 70-1817
Scosche CR-01 (Male)
1999-2001:
Replacing the original wire harness that plugs into the factory radio. Scosche also makes a reverse adaptor of the CR-01, model CR-01R. This harness plugs directly in to the back of 1999-2001 factory head units and has bare wires on the other end to splice into the vehicle radio harness wiring. This would be useful in cases where the factory wiring near the radio has been damaged or the connector has been cut off. Scosche CR-01R
1999-2001:
“Connector-to-connector” wiring harness. Aftermarket head unit 16-pin connector to factory harness, “Plug and Play”. This allows the direct plug-in from aftermarket radios using the universal 16-pin plug connector, to the factory radio harness connector. No cutting or splicing of factory wiring is required. Manufactured by Scosche.

Scosche Plug and Play adaptors
Chrysler to Alpine – SMCR01ALP16
Chrysler to Clarion – SMCR01CLR16
Chrysler to Eclipse – SMCR01ECL16
Chrysler to Panasonic – SMCR01PAN16
Chrysler to Pioneer – SMCR01PIO16
Chrysler to Sony – SMCR01SON16
2002-2004:
Aftermarket head unit to factory harness connector. Direct plug-in to factory wiring harness on one end, bare wires on the other to hook up to aftermarket deck wiring. You will also need an antenna adaptor to convert from the new (and unique) style to the standard plug-in on the aftermarket unit. Scosche CR02 (Male)
Scosche CR02 (Male)
2002-2004:
Replacing the original wire harness that plugs into the factory radio. Scosche also makes a reverse adaptor of the CR-02, model CR-02R. This harness plugs directly in to the back of 2002-2004 factory head units and has bare wires on the other end to splice into the vehicle radio harness wiring. This would be useful in cases where the factory wiring near the radio has been damaged or the connector has been cut off. Scosche CR02R (Female).

Scosche CR02R (Female)
7. Radio: Auxiliary Audio Input adaptors for factory Head Units (for hooking up MP3 and iPOD players etc.)
Back to Accessories index
7a. For systems with a factory or aftermarket CD changer:
P.I.E. Multi-source auxiliary input converter. The new PIE X-3 Auxiliary Input Converter system allows the user to add up to three auxiliary input sources and have them connected directly between the CD changer and factory radio. You can connect your MP3 portable player, an XM radio, an iPod, or any combination of three separate audio sources, all at the same time AND still use your OEM or aftermarket CD Changer! The X-3 system interrupts the audio of the CD changer, switching between the three user-selectable RCA level auxiliary audio sources, and defaults back to the CD changer if desired. The X-3 system consists of two parts, the Selector Brain Module or X-3, and the vehicle-specific T-harness sold separately.
NOTE: Must have a functioning OEM CD-Changer, or aftermarket CD-Changer using a PIE protocol converter. An X3 vehicle specific harness is also required
P.I.E. X3 Multi-source input converter (MSRP $89.95)
Adaptor cable for 1999-2001 Grand Cherokee: X3-CHRY98 (MSRP: $39.95)
Adaptor cable for 2002-2004 Grand Cherokee: X3-CHRY02 (MSRP: $39.95)
Remote control 15′ extension cable: X3-EXT/15 (MSRP: $29.95)
Available from PIE retailers
Soundgate AUXCHRY auxillary single input converter. The Soundgate AUXCHRY converts the CD Changer port of your OEM factory radio into an auxiliary input. With this converter installed, you can now connect any device that has RCA outputs directly to your car or truck radio without using an FM modulator. The AUXCHRY utilizes sophisticated microprocessor control, ultra-relable surface-mount construction and advanced software design to flawlessly match the external audio source to the factory audio system. This interface, along with either the Soundgate CRCBLDIN or CRCBLSQ Interface cable (purchased separately) provides a splice-free, direct plug-in to your factory radio (see cable descriptions below for specific application details).
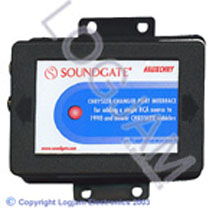
Soundgate AUXCHRY auxillary single input converter (MSRP $99.95)
Adaptor cable for 99-01 Grand Cherokee: CRCBLDIN (MSRP $21.95)
Adaptor cable for 02-04 Grand Cherokee: CRCBLSQ (MSRP $21.95)
Available from PIE retailers
Soundgate SDS1 Docking Station Multiple Auxillary Input Converter. The Soundgate SDS1 allows you to add not one, but two audio sources directly to the CD Changer data port of almost any factory or aftermarket radio, and you can still keep your factory CD Changer connected! The SDS1 is capable of working with most factory or aftermarket radios with CD changer controls. A simple momentary switch with LED indicator, which mounts in the passenger compartment, will allow you to switch between CD Changer, Aux Input “A” and Aux Input “B” simply and easily. Each SDS1 requires a vehicle-specific cable, sold separately, in order to adapt to your particular vehicle. The cable connects at the radio.
IMPORTANT: The vehicle must have a direct-connect CD changer installed and continuously running for the docking station to work.
Adaptor cable for 99-01 Grand Cherokee: DOCKCHRY1U (MSRP $89.95)
Adaptor cable for 02-04 Grand Cherokee: DOCKCHRY2S (MSRP $89.95)
Available from PIE retailers
7b. For systems without a CD changer (requires radio with CD changer jack):
The Auxiliary Input Converters convert the CD Changer port of your OEM factory radio into an auxiliary input. With this converter installed, you can connect any device that has RCA outputs directly to your radio without using an FM modulator. For plugging in MP3 players and other audio devices. PIE has 3 different models available for the WJ Grand Cherokee, as shown below. These adaptors cannot be used if a factory CD changer is plugged in to the radio, as they utilize the same jack.
Available from PIE retailers.
7b1. 1999-2000 (for Radios with “Disc” or “Mode” buttons):
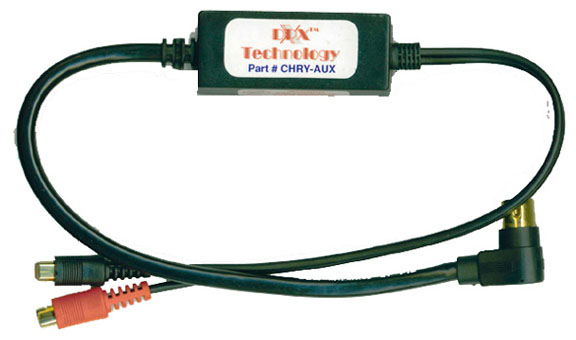
7b1. CHRY-AUX
Single-source auxiliary input converter. Plugs into the 8-pin CD changer DIN connector on the back of the factory premium radio, allowing Left and Right channel audio signals to be input into factory head unit. PIE CHRY-AUX hookup diagram.
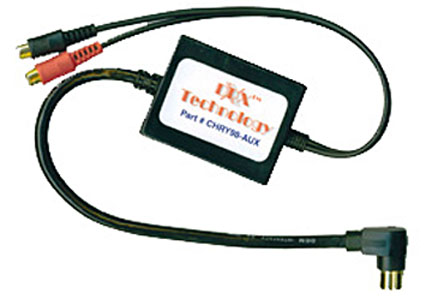
7b2. CHRY98-AUX
Note: For Radios with 5-preset radio with 5-band EQ, “DISC^” and “DISCv” on preset 1 & 5, and “MODE” button; OR Radios with 6-preset radio with Bass and Treble slider controls, “DIRECT DISC SELECT 1-6” printed above radio presets, and “MODE/EJECT” button.)
7b2. 1999-2001 (for Radios with a “CD-C” button):
Single-source auxiliary input converter. Plugs into the 8-pin CD changer DIN connector on the back of the factory premium radio, allowing Left and Right channel audio signals to be input into factory head unit. PIE CHRY98-AUX hookup diagram
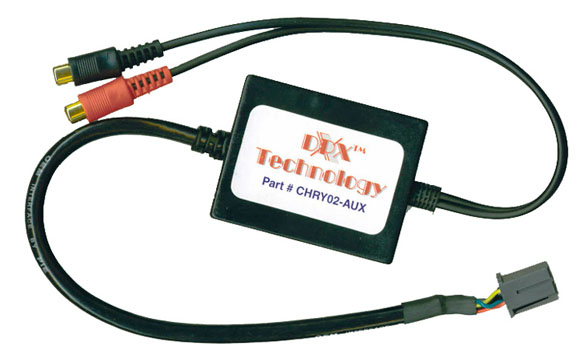
7b3. CHRY02-AUX
7b3. 2002-2004 (all models with CD changer controls except RB1 Navigation radio):
Single-source auxiliary input converter. Plugs into the 10-pin CD changer connector on the back of the factory premium radio, allowing Left and Right channel audio signals to be input into factory head unit. PIE CHRY02-AUX hookup diagram.
7c. iPOD interfaces:
7c1. 1999-2001 models
P.I.E. model CHRY98/PC-POD. The only iPODŽ interface that allows DIRECT PLAYLIST ACCESS, as well as track up/down, fast-forward, rewind, and shuffle functions to be controlled from your factory radio.
This interface also allows ‘fast track’ which is a rapid track up / down function, and ‘bank select’ which will allow you to select banks of 99 songs, for more rapid navigation through your iPod music collection. This device will also charge your iPOD while it is connected to your vehicle.
With this single interface, you can listen to, charge, and control your Apple iPod (3G, 4G, and Mini) through the CD changer controls of your OEM radio. Simply plug the i-Pod into the provided dock cable, stow your iPod out of sight, and enjoy your iPod music library. Control of the I-Pod interface is now accomplished through the CD changer/steering wheel controls of your OEM radio eliminating the need to fumble with the iPod while driving. Simply configure your favorite iPod music into 6 or 10 identifiable playlists (number of playlists depends on the OEM radio). You can then select these playlists using the disc select functions of your OEM radio. Each playlist is seen as a disc to the OEM radio and has the capacity to hold up to 9,999 songs!
- Compatible with all vehicles that have a “rounded face” radio and have a “CD-C” button. Installs directly into the CD changer data port in the rear of the factory radio.
- If you have a factory installed CD changer, it will need to be disconnected in order to use the CHRY98/PC-POD.
- IMPORTANT: the controls on the iPOD are disabled when the iPOD is connected to the P.I.E. iPOD interface
c1. CHRY98/PC-POD
7c2. 2002-2004 models (compatible with RB1 navigation radio)
P.I.E. model CHRY02/PC-POD. The only iPODŽ interface that allows DIRECT PLAYLIST ACCESS, as well as track up/down, fast-forward, rewind, and shuffle functions to be controlled from your factory radio.
This interface also allows ‘fast track’ which is a rapid track up / down function, and ‘bank select’ which will allow you to select banks of 99 songs, for more rapid navigation through your iPod music collection. This device will also charge your iPOD while it is connected to your vehicle.
With this single interface, you can listen to, charge, and control your Apple iPod (3G, 4G, and Mini) through the CD changer controls of your OEM radio. Simply plug the i-Pod into the provided dock cable, stow your iPod out of sight, and enjoy your iPod music library. Control of the I-Pod interface is now accomplished through the CD changer/steering wheel controls of your OEM radio eliminating the need to fumble with the iPod while driving. Simply configure your favorite iPod music into 6 or 10 identifiable playlists (number of playlists depends on the OEM radio). You can then select these playlists using the disc select functions of your OEM radio. Each playlist is seen as a disc to the OEM radio and has the capacity to hold up to 9,999 songs!
- The CHRY02/PC-POD is NOT compatible with the RB4 factory navigation radio
- The CHRY02/PC-POD IS compatible with the RB1 factory navigation radio
- The CHRY02/PC-POD is NOT compatible with the in-dash 6-disc Radio (RBQ)
- Compatible with all vehicles that have the new, 10-pin square connector at the headunit and be a CD changer controlling radio.
- IMPORTANT: the controls on the iPOD are disabled when the iPOD is connected to the P.I.E. iPOD interface
8. Radio: Bezel trim kits
Aftermarket radio trim kits (1999-2004 WJ). Adaptor and brackets to fit aftermarket radio into WJ factory radio opening.
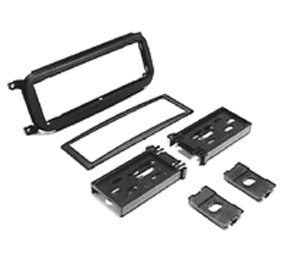
| Metra P/N 99-6504 | Metra P/N 99-6503 | Nakamichi CD45Z in a WJ | Scosche P/N CR1277 |
|---|
9. Radio: Harness adaptor for installing a 2002-2004 radio into a 1999-2001 vehicle
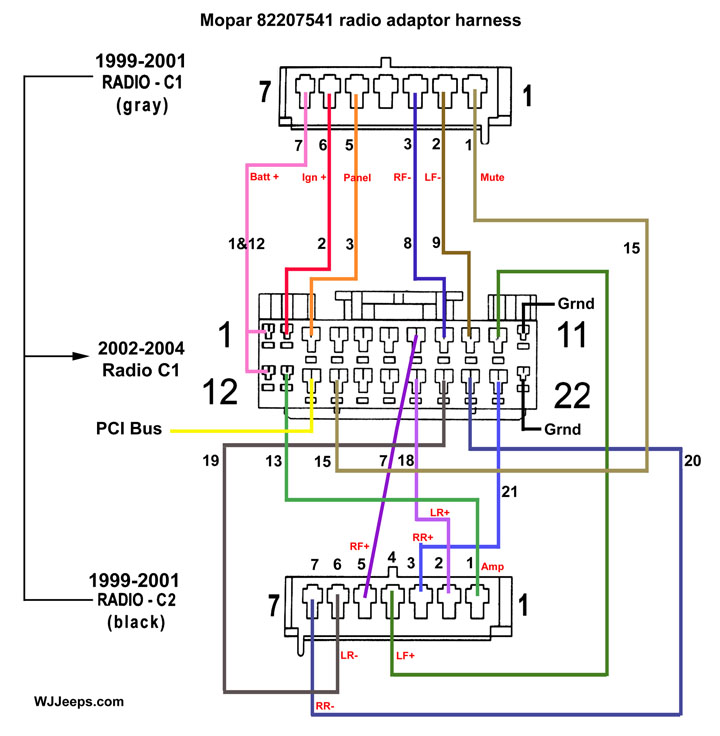
Factory head unit from 2002-2004 installed into earlier 1999-2001 models. This wiring harness adapter is needed when installing a factory radio equipped with the newer 22-way connector into a vehicle equipped with the older style 7-way connectors. For the 2002 model year, Chrysler changed most of their radios over to a new 22-pin connector set-up. Some base WJ models for 2002 still featured the older style 7-pin connector. The harness kit from Mopar also includes an antenna adaptor to convert the new style antenna plug in the radio to the standard vehicle antenna cable used in 1999-2001 models. Mopar P/N 82207541AC.
This adaptor harness was designed to allow 2002 radios with the 22-way connector to fit in same model year vehicles with the 7-way connectors. Mopar does not recommend installing 2002-up radios in 1999-2001 WJ’s if you are keeping the factory speakers and amp system. Due to preprogrammed audio equalization levels that are in the vehicle’s body controller, if a signal from the radio is not recognized by the body controller, the unit will default to a flat curve. Combined with various levels of speakers used from model year to model year, the sound quality of the audio may be reduced. However, some 1999 and 2000 WJ owners have installed the newer radios (and RB1 Navigation unit) and reported positive results with the factory sound system.
Note: If the radio has CD changer controls, a special 10-pin to 8-pin cable can be purchased to allow the use of a factory changer.

10. Speakers: Aftermarket speakers to factory speaker harness
Adaptor to connects aftermarket speakers to factory harness (1999-2004 WJ). Allows factory wiring to remain intact with no cutting or splicing. Autotoys.com P/N “SC 4500 SPEAKER”. Note- we still need to verify this part as working with all models.
11. Speakers: Mounting templates
Templates for mounting 6.5″ round speakers into 6×9 factory front door openings (1999-2004 WJ). Several companies sell generic adaptor plates for fitting 6.5 inch speakers into a 6×9 openings. If you are planning to install a component set of speakers, some of these adaptors do not provide room for the separate tweeter and custom plates must be cut. Scosche now makes an injection molded adaptor that will allow for both the 6.5″ speaker and a component tweeter – P/N 142 SA69. They also make one for the rear 6.5″ speakers – P/N 142 SAC656. Even though aftermarket speakers will fit directly into the rear door holes, using the adaptor is easier and also a better fit for mounting the speaker. See Front door speaker installation and Rear door speaker installation.
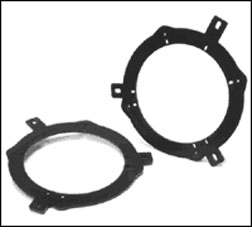
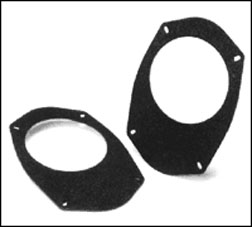
| Scosche SAC 656 Adaptors | Scosche SA69 Adaptors |
|---|
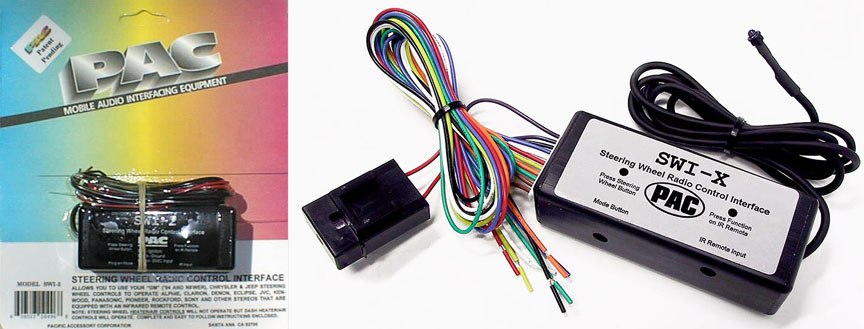
12. Steering wheel control adaptors
Adaptors to allow use of factory steering wheel controls with aftermarket head units (1999-2004 WJ).
Pacific Accessory Corp. (PAC) model SWI-X
The SWI-X will interface almost all infrared head units with almost all vehicles with steering wheel or rear seat controls. It converts the signals generated by the factory remote location controls into infrared signals. Step by step programming with LED confirmation, micro sized infrared LED for an unobtrusive install, fail safe memory will not lose programming.
See PAC Corporation SWI-X for more information
The Peripheral PESWIX is a infrared learning remote which can virtually learn all aftermarket radios wireless IR remote signals. The PESWIX converts the signals generated by the factory remote location controls into infrared signals.
Simple 3 wire hook-up, Step-by-step programming with LED confirmation, Non-volatile memory will not lose programming even when power is disconnected, LED emitter eye can be mounted up to 10ft. away (within line of sight) from receiving unit.

Peripheral model PESWIX
Mobile audio web site links:
Manufacturers: |
||
| Alpine | JL Audio | Panasonic |
Informational:CarStereos101.com – “The leading online consumer guide to the car audio industry.” Install Doctor.com – Do-It-Yourself Mobile Electronics Installation Resource. Jeeps Unlimited.com – Stereo and electronics forum. Mobile Audio.com – “The definitive source of car audio information on the World Wide Web”. Rec.audio.car Frequently Asked Questions Sales:AutoToys.com – Accessories, alarms, interfaces, harnesses, installation photos, kits, tech pages, tools. MECI.com – Automotive accessories MrAlternator.com – Alternators OnLine Car Stereo.com – Large selection of car audio components and accessories. PowerMaxx.com – Alternators |
||