
Welcome to the JeepSpecs.com in-depth page on WJ Generation Jeep Grand Cherokee side and rear view mirror guide. We have organized as much information as we could find into a helpful article below. Is something incorrect or missing? Please get in touch with us and we’ll fix it!
WJ mirrors
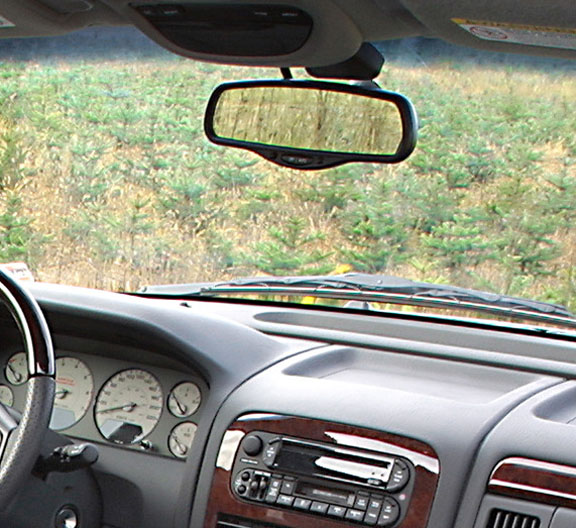
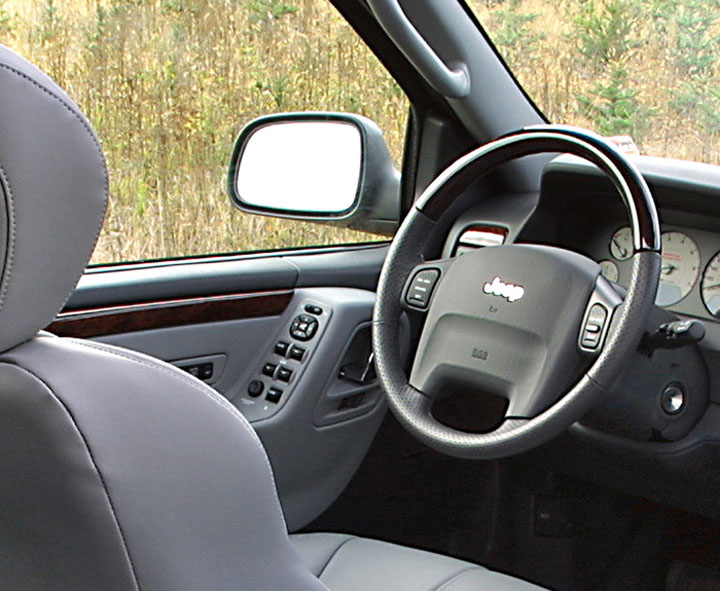
All WJ models feature one of three different types of outside rear view mirrors and either of two types of inside rear view mirrors. Basic WJ models include standard power operated outside mirrors. All outside mirrors have 3 manual detent positions, full forward, full rearward, and normal. Premium power heated mirrors, with and without the driver’s side auto-dimming feature, are offered or included on other models. A memory system that automatically positions the power mirrors for two different drivers is included on most Limited and all Overland models. The memory system on 1999-2002 WJ’s included both outside mirrors. Starting with 2003 model production, the memory function was dropped from the passenger side mirror.
Side view mirror types:
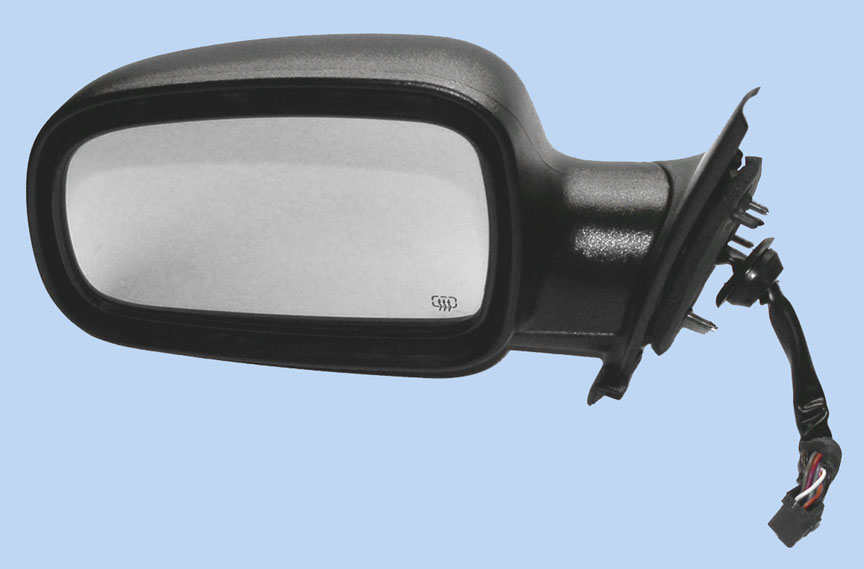
1. Power, non heated
These are featured in basic Laredo models. The power mirror system allows the driver to adjust both outside mirrors electrically from the driver seat position by operating a switch on the driver side front door trim panel. The power mirror system receives non-switched battery current through a fuse in the Power Distribution Center (PDC) so that the power mirrors remain operational, regardless of the ignition switch position.
2. Power / Heated
The electrically heated mirrors feature an electric heating grid located behind the glass of each mirror. These grids consist of a single resistor wire routed in a grid-like pattern and captured between two thin sheets of plastic. When electrical current is passed through the resistor wire, it produces enough heat energy to clear the outside mirror glass of ice, snow or fog. Battery current is directed the outside mirror heating grid only when the rear window defogger switch is in the On position.
3. Power / Heated / Auto-dim driver side
An automatic dimming outside rear view mirror is an available factory-installed option for the driver side of the vehicle, if the vehicle is also equipped with the automatic day/night inside rear view mirror. The automatic dimming outside mirror is completely controlled by the circuitry of the automatic day/night inside rear view mirror. The automatic dimming outside mirror will automatically change the reflectance of the mirror to protect the driver from the unwanted headlight glare of trailing vehicles while driving at night. The automatic dimming outside mirror will only operate when the ignition switch is in the On position. Auto-dim mirrors can be identified by the “GNTX” etching designation on the lower front center of the glass (see photo below in the OEM section).
4. Power / Heated / Auto-dim / Power fold-away
Export model Grand Cherokees feature outside mirrors with a power fold-away feature, great for parking in very tight spaces or while climbing through the backwoods. Surprisingly, this option has never been offered on USA models.
1. Prismatic
Day/night anti-glare mirror with prismatic lens. Featured on base Laredo models.
2. Auto-dim
The automatic dimming inside day/night rear view mirror system is a completely self-contained unit that replaces the standard equipment inside rear view mirror. This system will automatically change the reflectance of the inside rear view mirror to protect the driver from the unwanted headlight glare of trailing vehicles while driving at night. The automatic day/night inside mirror receives ignition switched battery current through a fuse in the junction block, and will only operate when the ignition switch is in the On position. Vehicles equipped with the automatic day/night mirror system are also available with an optional factory-installed automatic dimming outside rear view mirror for the driver side of the vehicle.
3. UConnecttm Hands-Free cellular phone system rear view mirror
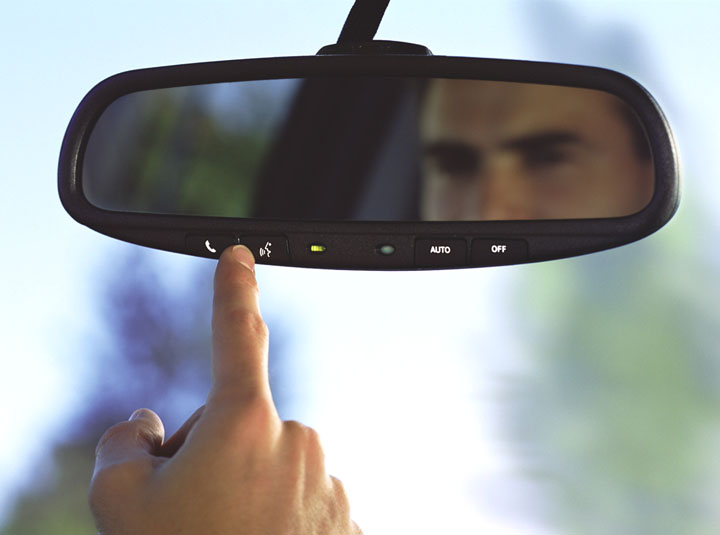
Later in the 2004 model year, the Grand Cherokee may feature a new rear-view mirror with the UConnect, the hands-free cellular phone system, built-in. See the Uconnect page on this web site for more details.
Upgrading: Side view mirrors
1. From standard power mirrors to heated power mirrors:
Owners of WJ models that have the standard non-heated mirrors can upgrade to the heated versions very easily. WJ’s are pre-wired for the heated mirrors. No custom wiring or alterations are required, just remove the old mirror and replace it with the heated version. The mirror heated function operates with the rear defrost button. The inside door panels must be removed to access the mirror mounting bolts. Part numbers are provided on this page for the different WJ mirrors and also the replacement glass. For installation instructions, see Side view mirror removal below.
2. From standard or heated mirrors to heated mirrors with Auto-dim:
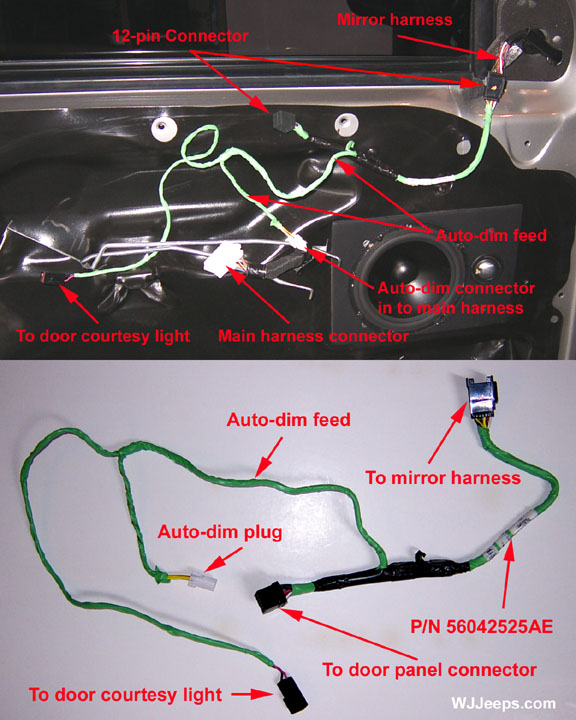
Upgrading to mirrors with the Auto-dim function is a bit more difficult if you want that feature to work, as it appears WJ’s without this option are not fully pre-wired. The Auto-dim feature is controlled through the Auto-dim inside rear view mirror, so for starters that mirror must be upgraded first (which fortunately is very easy, see below). To get the Auto-dim function to work, a pair of wires must be run from the inside mirror connector and spliced into the driver door mirror connector harness.
On factory systems with the Auto-dim mirrors, the factory wiring harnesses that connect the two mirrors together are run through a complex path that travels through several connectors and branches:
From: Inside rear view mirror 7-way connector
To: Left rear headliner C309
To: Junction block C300
To: Left front cowl C302
To: Interior driver door panel 12-way connector C313
To: Outside mirror harness
The easiest solution may be to run a pair of wires from the inside rear view mirror 7-way connector harness (pins 4 and 5), over and into the driver side door panel mirror 12-way wiring harness (pins 7 and 10). See wiring diagrams below.
Installation note/tip (contributed by Jerry M.):
“I successfully hooked up the auto dimming driver’s side mirror and auto dimming rear view inside mirror in an ’04 Laredo. All of the wiring from the auto dimming rear view mirror plug down to the driver’s side front door plug (body side) was there. What I had to do is get a door harness from a Limited WJ that had the auto dimming mirror, in my case, the donor was an ’00 Limited. It worked like a champ, no cutting, splicing, or routing of wires was needed, just swapping out the mirrors and driver’s side front door harness, all plug and play. It seems to not matter pre or post ’02 donor to pre or post ’02 transplantee, as my donor was an ’00 and my WJ is an ’04.”
3. Power adjust / Power fold-away / Heated / Auto-dim mirrors
Installation and cost details for upgrading to these Export mirrors is now under research and will be provided here in the near future.
Export driver door switch panel with added center mirror button for the power fold-away feature
Upgrading: Rear view mirrors
The standard Prismatic rearview mirror can be easily replaced with the Automatic Day/Night mirror. Many if not all WJ’s equipped with the standard mirror have the wiring harness in place above the headliner that will plug right into the Automatic mirror. The harness can be accessed by removing the overhead console.
Note from 2003 owner: Removing the overhead console on my 2003 Grand Cherokee Laredo did not reveal the wiring harness. One needs to remove both clips that hold the sunvisors. The harness is in front of the plastic tub that holds the overhead console in place. The wiring harness is clipped to the back of the tub and is accessed by pulling the header down.. There are two empty wire ports (on the harness electrical connector) there which probably are for the dim feature for the driver side exterior mirror as you state on the site. But pulling down the console alone will not reveal the wiring harness for the rear view mirror. You have to pull the header down and extricate the jack from a clip on the tub that holds the console.
Side view mirror removal:
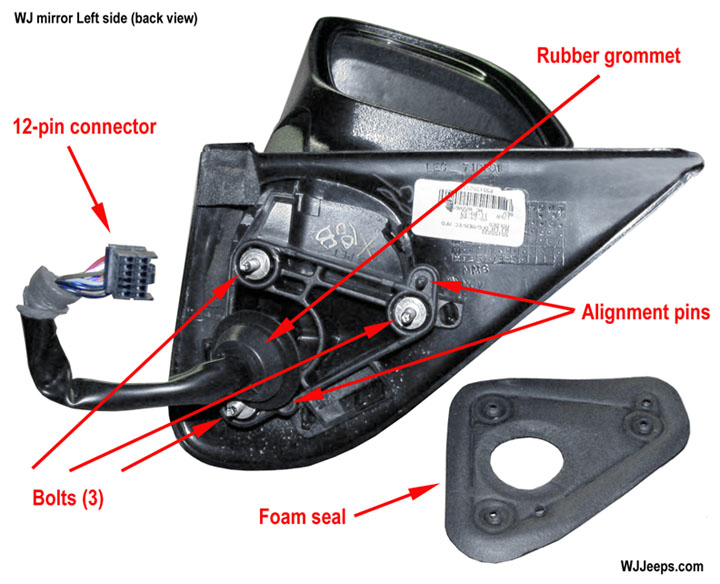
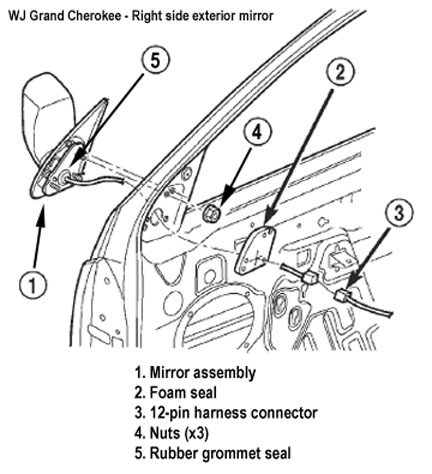
1. Remove door trim panel, refer to Door trim removal. Note that the door panel does not have to be entirely removed. After removing the three door screws, the right hand side of the door can be unsnapped enough from the fasteners to access the mirror bolts.
2. Disengage power mirror harness connector.
3. Remove the foam flag seal covering the mounting area.
4. Remove the three nuts attaching mirror to door.
5. Carefully separate mirror from door. There is a rubber gasket in the center that the wires pass through, it may help a little to push the gasket through from the inner door side with your fingers while pulling the mirror off from the outside.
Side view mirror installation:
1. Position mirror on door. Verify that the center rubber gasket seal is properly positioned. You may need to push it in with your fingers a little to align it correctly.
2. Install the three nuts attaching mirror to door. Tighten to 7.4 NM (65 in. lbs)
3. Install foam flag seal piece.
4. Connect the power mirror harness connector. Note that the connector itself attaches to a white clip on the inside of the door panel trim to keep it from moving around, and that a few inches further down the wiring harness is another clip that holds the wire harness in place against the door trim panel.
5 . Re-install the door trim panel. It’s a good idea at this time, before the door panel is completely fastened back on, to plug in the door wiring harnesses (if removed) and check the power operation functions of the mirror and the auto-dim feature (if equipped, and/or if it was custom wired).
Rear view mirror removal:
1. If equipped, disconnect mirror wiring harness
2. Loosen the mirror setscrew
3. Slide the mirror base upward and off of the bracket
Testing the auto-dim function:
. Turn ignition on, set rear view mirror auto-dim button to “On”
2. Hold your finger over the ambient light sensor on the back of the rearview mirror (the sensor faces the front of the car). You can also cover this hole with a piece of electrical tape.
3. Shine a flashlight into the headlight sensor that is in the front lower left of the mirror. This will operate the dim function and you should see the mirrors darken.
Mirror connector pin-outs and wiring
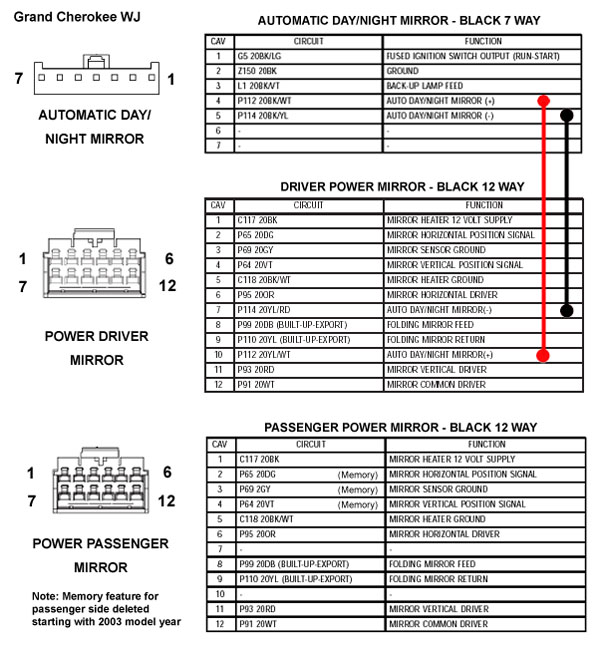
WJ OEM Mirrors 1999-2004
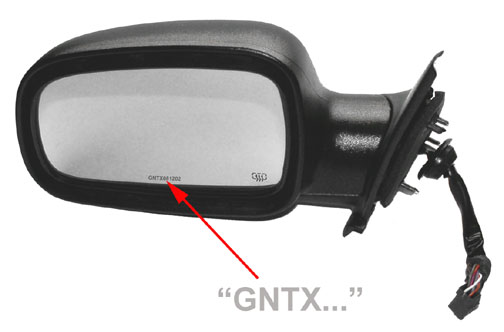
Auto-dim mirrors can be identified by the tiny “GNTX” etching along the bottom edge
WJ mirror part numbers and MSRP
|
|||||
| Type | Sales Code |
Side | 1999-2002 | 2003 | 2004 |
| Standard, Power | GTN | Left
Right |
55155447AB ($102.00) superseded by 55155447AD ($118.00) 55155446AB ($114.00) |
55155447AD ($118.00) (up to 9-12-02)55155447AF ($118.00) (after 9-12-02) 55155446AE ($122.00) 55155446AG ($122.00) |
55155447AF ($118.00)
55155446AG ($118.00) |
| Heated, Power | GTM | Left
Right |
55155233AC ($112.00) superseded by 55155233AD ($121.00) superseded by 55155233AE ($128.00) 55155232AC ($115.00) |
55155233AE ($128.00) (up to 9-12-02)55155233AG ($186.00) (after 9-12-02) 55155232AG ($116.00) 55156880AA ($145.00) |
55155233AG ($186.00)
55156880AA ($145.00) |
| Heated, Power + Auto-dim (Drivers side) + Memory (Right side memory feature deleted for 2003-2004 model year. These mirrors use 5 wires instead of 8 in their 12-pin connector) |
GT3 | Left
Right |
55155231AB ($347.00) superseded by 55155231AE ($375.00) superseded by 55155231AF ($375.00) superseded by 55155231AG ($443.00) 55155230AB ($160.00) |
55155231AF ($375.00) superseded by 55155231AG ($443.00) 55155230AE ($180.00) |
55155231AI ($429.00)
55156880AA ($145.00) |
| Interior rear view mirror | Standard Prismatic1999-2004
04299325 ($35.85)
Automatic day-night1999-20004 55155380 ($148.00)
|
||||
| Note: Parts are not available from this web site. Prices listed are the Manufacturer’s Suggested Retail Price (MSRP) as of September 2007. Prices are for reference purposes only, are subject to change, and may vary by dealer. Always verify the part number and application before purchasing parts. | |||||