

Welcome to the JeepSpecs.com in-depth page of WJ Generation Jeep Grand Cherokee spark plugs. Did we mis anything? Please get in touch with us and tell us about it!
General information
Both the 4.0L 6–cylinder and the 4.7L V-8 engine use resistor type spark plugs. 4.7L V-8 engines are equipped with “fired in suppressor seal” type spark plugs using a copper core ground electrode. Because of the use of an aluminum cylinder head on the 4.7L engine, spark plug torque is very critical. To prevent possible pre-ignition and/or mechanical engine damage, the correct type/heat range/number spark plug must be used.
The 4.7L V–8 engine uses 8 dedicated, and individually fired coil for each spark plug. Each coil is mounted directly to the top of each spark plug. Battery voltage is supplied to the 8 ignition coils from the ASD relay. The Powertrain Control Module advance. This is done to meet changing engine operating conditions. The ignition coil is not oil filled. The windings are embedded in an epoxy compound. This provides heat and vibration resistance that allows the ignition coil to be mounted on the engine. Because of coil design, spark plug cables (secondary cables) are not used.
Some fuel refiners in several areas of the United States have introduced a manganese additive (MMT) for unleaded fuel. During combustion, fuel with MMT causes the entire tip of the spark plug to be coated with a rust colored deposit. This rust color can be misdiagnosed as being caused by coolant in the combustion chamber. Spark plug performance may be affected by MMT deposits.
COLD FOULING/CARBON FOULING
Cold fouling is sometimes referred to as carbon fouling. The deposits that cause cold fouling are basically carbon. A dry, black deposit on one or two plugs in a set may be caused by sticking valves or defective spark plug cables. Cold (carbon) fouling of the entire set of spark plugs may be caused by a clogged air cleaner element or repeated short operating times (short trips).
WET FOULING OR GAS FOULING
A spark plug coated with excessive wet fuel or oil is wet fouled. In older engines, worn piston rings, leaking valve guide seals or excessive cylinder wear can cause wet fouling. In new or recently overhauled engines, wet fouling may occur before break-in (normal oil control) is achieved. This condition can usually be resolved by cleaning and reinstalling the fouled plugs.
OIL OR ASH ENCRUSTED
If one or more spark plugs are oil or oil ash encrusted, evaluate engine condition for the cause of oil entry into that particular combustion chamber.
SCAVENGER DEPOSITS
a normal condition caused by chemical additives in certain fuels. These additives are designed to change the chemical nature of deposits and decrease spark plug misfire tendencies. Notice that accumulation on the ground electrode and shell area may be heavy, but the deposits are easily removed. Spark plugs with scavenger deposits can be considered normal in condition and can be cleaned using standard procedures.
CHIPPED ELECTRODE INSULATOR
A chipped electrode insulator usually results from bending the center electrode while adjusting the spark plug electrode gap. Under certain conditions, severe detonation can also separate the insulator from the center electrode. Spark plugs with this condition must be replaced.
PRE-IGNITION DAMAGE
Pre-ignition damage is usually caused by excessive combustion chamber temperature. The center electrode dissolves first and the ground electrode dissolves somewhat latter. Insulators appear relatively deposit free. Determine if the spark plug has the correct heat range rating for the engine. Determine if ignition timing is over advanced or if other operating conditions are causing engine overheating. (The heat range rating refers to the operating temperature of a particular type spark plug. Spark plugs are designed to operate within specific temperature ranges. This depends upon the thickness and length of the center electrodes porcelain insulator.)
SPARK PLUG OVERHEATING
Overheating is indicated by a white or gray center electrode insulator that also appears blistered. The increase in electrode gap will be considerably in excess of 0.001 inch per 2000 miles of operation. This suggests that a plug with a cooler heat range rating should be used. Over advanced ignition timing, detonation and cooling system malfunctions can also cause spark plug overheating.
CLEANING AND GAPPING (Except HO engines)
The plugs may be cleaned using commercially available spark plug cleaning equipment. After cleaning, file center electrode flat with a small point file or jewelers file before adjusting gap. The Gap specification is 0.035 for the 4.0L engine, and 0.040 for the 4.7L engine.
CAUTION: Never use a motorized wire wheel brush to clean spark plugs. Metallic deposits will remain on spark plug insulator and will cause plug misfire.
CLEANING AND GAPPING (HO engines)
Never clean spark plugs on the 4.7L H.O. engine. Damage to the platinum rivet will result. Also, do not use a wire-type gapping tool for the same reason. Use a tapered-type gauge. The Gap specification is 0.040 for the 4.7L HO engine.
PLUG REMOVAL & INSTALLATION – 4.0L
4.0L Plug: Mopar® P/N SP000ZFR5N Gap: 0.035 Torque: 26-30 ft. lbs.On the 4.0L 6–cylinder engine, the spark plugs are located below the coil rail assembly.
A one-piece coil rail assembly containing three individual coils is used on the 4.0L engine. The bottom of the coil is equipped with 6 individual rubber boots to seal the 6 spark plugs to the coil. Inside each rubber boot is a spring. The spring is used for an electrical contact between the coil and the top of the spark plug. Originally, the rubber boots and springs were not sold separately, the entire coil rail with boots had to be purchased as one assembly. The boots/springs are now available separately from Mopar and from auto parts stores.
Removal
Tips: 6″ socket extension; use anti-sieze in the rubber socket for easy release off the plugs
1. Disconnect negative battery cable at battery.
2. The coil rail assembly must be removed to gain access to any/all spark plugs. The coil is bolted directly to the cylinder head. Remove the 4 coil mounting bolts.

3. Carefully pry up coil assembly from spark plugs. Do this by prying alternately at each end of coil until rubber boots have disengaged from all spark plugs. If boots will not release from spark plugs, use a commercially available spark plug boot removal tool. Twist and loosen a few boots from a few spark plugs to help remove coil.
4. After coil has cleared spark plugs, position coil for access to primary electrical connector. Disconnect connector from coil by pushing slide tab outwards to right side of vehicle. After slide tab has been positioned outwards, push in on secondary release lock on side of connector and pull connector from coil.
5. Remove coil from vehicle.
6. Prior to removing spark plugs, spray compressed air around spark plug hole and area around spark plug. This will help prevent foreign material from entering combustion chamber.
4. Remove spark plug from cylinder head using a 5/8″ spark plug socket with a rubber insert. The rubber insert type socket is required to remove the spark plug from the well after it is unthreaded.
5. Note spark plug condition. You may want to mark the cylinder # on each used plug as they are removed.
6. If boots are worn or damaged they should be replaced. To remove the rubber boots pull firmly and they will come right off. To remove the spring, pull and stretch it a little bit, and then twist counterclockwise to remove.
Installation
Special care should be taken when installing spark plugs into cylinder head spark plug wells. Be sure plugs do not drop into plug wells as ground straps may be bent resulting in a change in plug gap, or electrodes can be damaged.
Always tighten spark plugs to specified torque. Over tightening can cause distortion resulting in a change in spark plug gap or a cracked porcelain insulator.
1. Verify that each plug is correctly gapped to 0.035. Apply a small amount of anti-sieze to the plug threads. Start spark plug into cylinder head by hand to avoid cross threading. It’s best to do this by using just the socket extension bar and socket. Carefully turn slowly while keeping the extension bar as vertical as possible. You should be able to screw the plug all the way in by hand until it “seats” snugly.
2. Tighten spark plugs to 26-30 ft. lbs. (35-41 N·m) torque. If you do not have a torque wrench install plugs snug and then turn 1/4 turn.
3. Connect engine harness connector to coil by snapping into position. Move slide tab towards engine for a positive lock.
4. Position ignition coil rubber boots to all spark plugs. Push down on coil assembly until bolt bases have contacted cylinder head.
5. Install 4 coil mounting bolts. Loosely tighten 4 bolts just enough to allow bolt bases to contact cylinder head. Do a final tightening of each bolt in steps down to 250 in. lbs. (29 N·m) torque. Do not apply full torque to any bolt first.
6. Connect negative battery cable to battery.
7. To replace worn boots/springs, install the new spring by simply pushing the spring onto its post (no twisting needed). Push the new boots on over the new spring.
PLUG REMOVAL & INSTALLATION
4.7L V-8 / 4.7L V-8 HO
Note: 4.7L V-8 = engine VIN code “N”; 4.7L V-8 HO engine = VIN code “J”
4.7 Plug: Mopar® P/N SPRC12MCC4 Gap: 0.040
| CAUTION: The standard 4.7L engine uses copper core ground electrode spark plugs, they must be replaced with the same type/number spark plug as the original. If another spark plug is substituted, pre-ignition will result. |
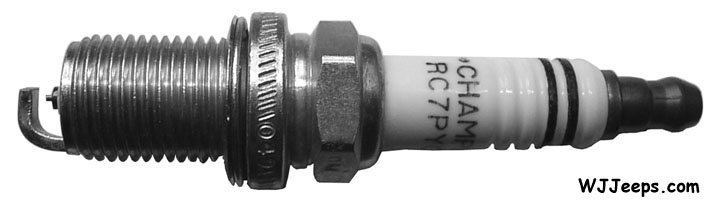
4.7 HO Plug: Mopar® P/N SPRC7PYCB4* Gap: 0.040
| CAUTION: Never substitute the original platinum tipped HO spark plug with a different part number. Serious engine damage may result.. HO plugs cannot be cleaned, damage to the platinum rivet will result. Also, do not use a wire-type gapping tool for the same reason. Use a tapered-type gauge. To prevent possible pre-ignition and/or mechanical engine damage, the correct type/heat range/number spark plug must be used.*NOTE on 4.7 HO plugs: Champion RC7PYCB4 (p/n 3340) is the same as Mopar SPRC7PYCB4 and can be purchased for a fraction of the cost that Mopar charges. |
Spark plug removal
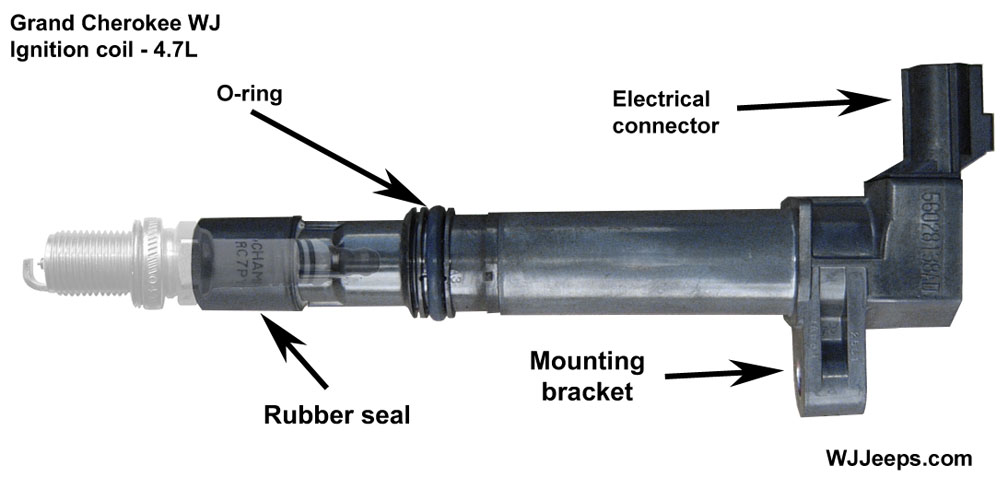
Each individual ignition coil must be removed to gain access to each spark plug. The coil fits into machined holes in the cylinder head. A mounting stud/nut secures each coil to the top of the intake manifold. The bottom of the coil is equipped with a rubber boot to seal the spark plug to the coil. An o-ring is used to seal the coil at the opening into the cylinder head. Inside each rubber boot is a spring. The spring is used for a mechanical contact between the coil and the top of the spark plug. Originally, the rubber boots and springs were not sold separately, the entire coil rail with boots had to be purchased as one assembly. The boots/springs are now available separately from Mopar and from auto parts stores.
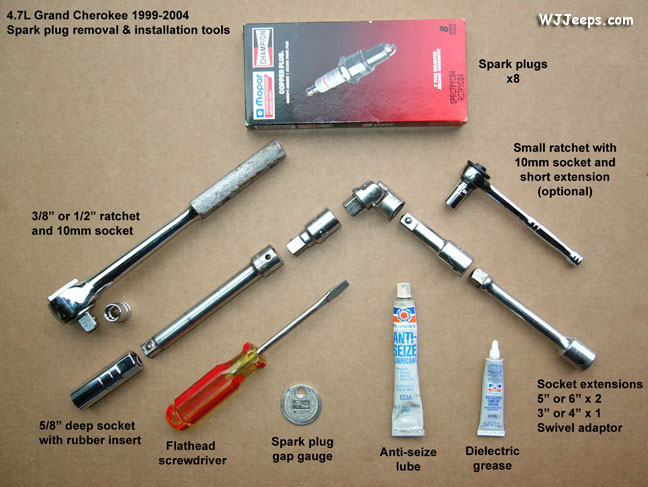
Spark plug removal & installation tools 4.7L ignition coil
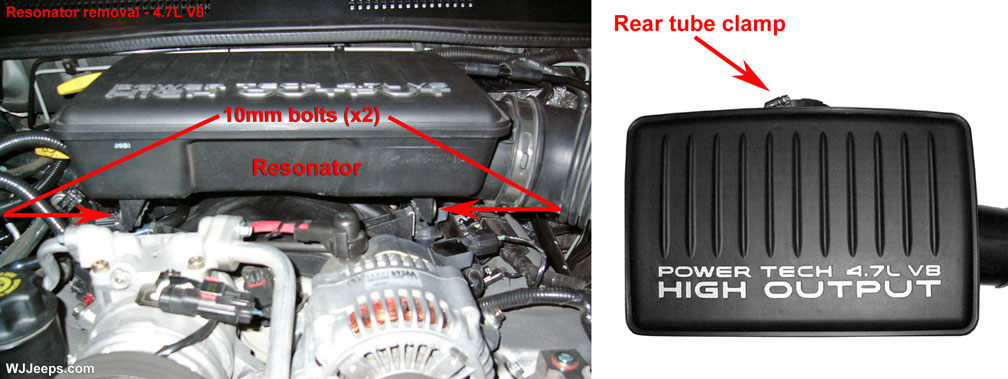
1. Remove the throttle body resonator box and air duct:
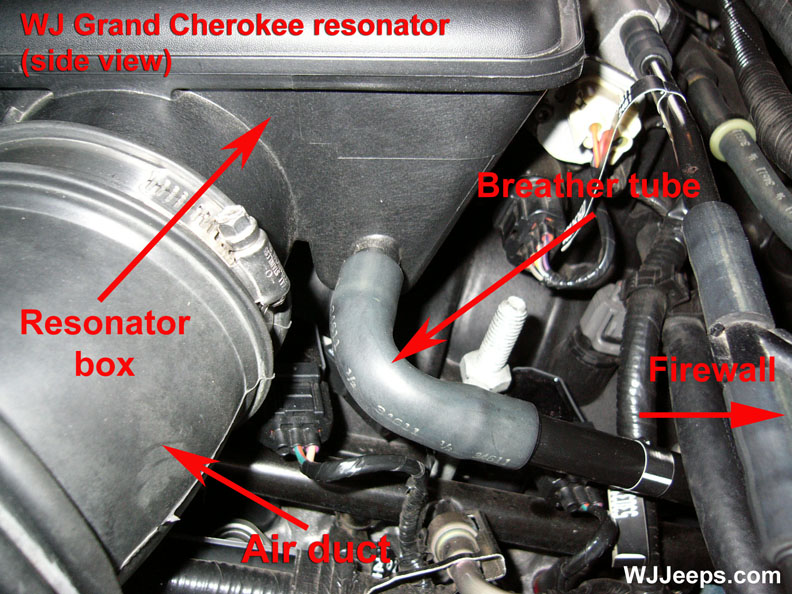
| Resonator box removal | Resonator breather tube |
|---|
| A. Remove the two 10mm bolts, located in front on each side of the resonator. B. With a flat-head screwdriver, loosen the tube clamp attaching the rubber hose to the throttle body at the back of the resonator. C. Remove the small hose attached on the driver side rear of the resonator box. D. Lift up and release the 4 spring clips that secure the air filter lid. You can now remove the resonator, hose and filter box top together as one assembly. |
2. Start with the first plug on either side of the front of the engine. Disconnect the electrical connector from the coil by pushing downward on the release lock on top of the connector, then pull connector away from the coil (see photo below). It is best to perform the removal and installation process for each plug as you go along. Once an old plug is removed, reinstall the new plug as soon as possible to reduce the risk of anything falling into the exposed spark plug hole.
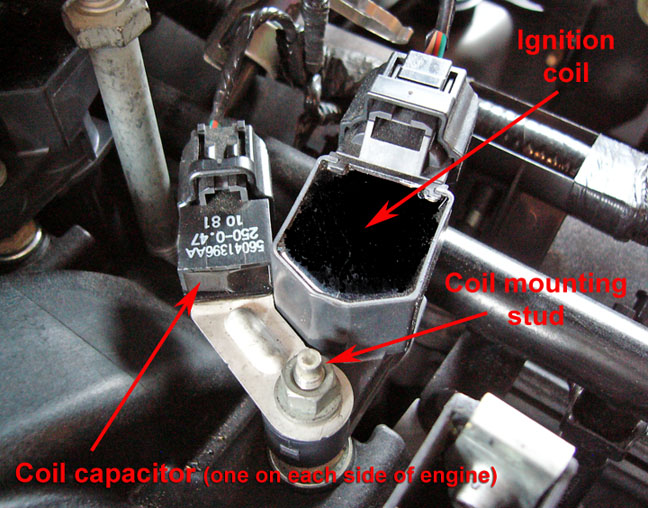
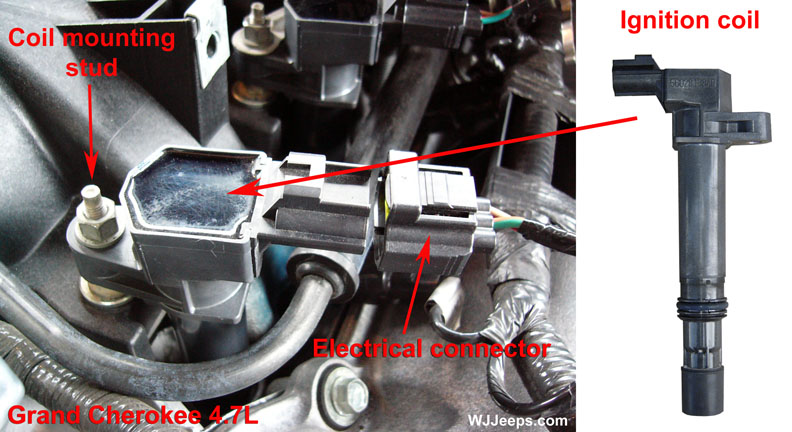
| Coil capacitor mounting | WJ 4.7 Ignition coil location |
|---|
3. Remove the coil mounting nut from the mounting stud using a 10mm socket or wrench (see photo above left). Note that the rear plugs each have a ground strap that must be reinstalled back in the same location on the mounting stud. In addition, a coil capacitor is mounted on each side of the engine, attached to a coil mounting stud.
4. Carefully pull up coil from the cylinder head opening, a slight twisting action will help to free the seal.
5. Remove coil from vehicle.
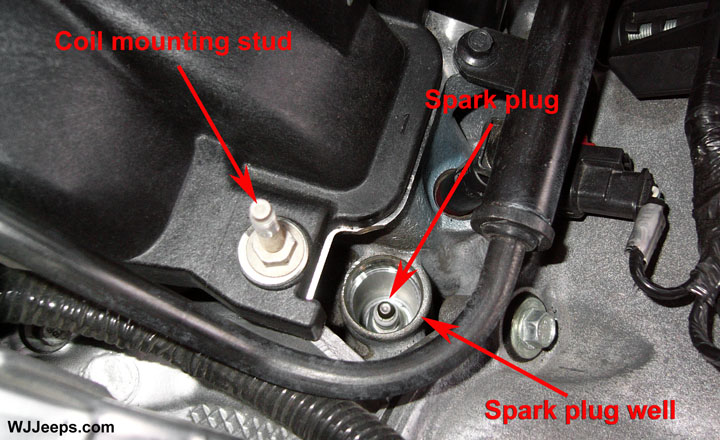
| Before removing each spark plug it’s a good idea to spray compressed air in and around the spark plug well. As plugs are removed and installed, extreme caution must be taken to avoid any debri falling into the exposed spark plug hole. |
6. Remove spark plug from cylinder head using a 5/8″ deep socket with a rubber insert. It is important to have a socket with a grip insert so that the plug can be lifted out of the hole once it is completely loosened, and to assist in reinstalling the new plugs.
A note on the passenger side rearmost plug – this is the most difficult of the plugs to remove and install. You may have to push and hold the transmission dipstick firmly upward to obtain enough room to remove the coil. To remove the plug, feed a 6″ ratchet extension with spark plug socket down into the plug hole and push onto the spark plug. Then add a 2″ or 3″ extension onto the 6″ extension, add the swivel adaptor, add a 6″ extension to that, and finally the ratchet. This will allow enough room to turn the ratchet and loosen the plug. Once loose, remove the ratchet and all but the last extension and finish loosening the plug, turning the socket/single extension by hand. A small flashlight may be helpful when guiding the socket extensions in place. See the “tools” photo above for an idea of how ratchet pieces are hooked together.
Installation
Special care should be taken when installing spark plugs into cylinder head spark plug wells. Be sure plugs do not drop into plug wells as ground straps may be bent resulting in a change in plug gap, or electrodes can be damaged. Always tighten spark plugs to specified torque. Over tightening can cause distortion resulting in a change in spark plug gap or a cracked porcelain insulator.
1. Verify that each plug is correctly gapped to 0.040. Apply a small amount of anti-sieze to the plug threads. Start spark plug into cylinder head by hand to avoid cross threading. It’s best to do this by using just a socket extension bar and socket. Carefully turn slowly while keeping the extension bar as vertical as possible. You should be able to screw the plug all the way in by hand until it “seats” snugly.
2. Tighten spark plugs to 20 ft. lbs. (27 N·m) torque. If you do not have a torque wrench install plugs snug and then turn 1/4 turn.
3. Before re-installing each coil, check condition of coil o-ring and replace if necessary. Clean the outside of the coil tube with a damp rag. To aid in coil installation, apply a bead of dielectric grease to the coil o-ring and smooth it around the o-ring with your finger.
4. Position the ignition coil into the cylinder head opening and push it onto the spark plug. Do this while guiding the coil base over the mounting stud. For the rearmost coils on each side, be sure to reattach the ground straps before putting the nut on the stud. In addition, there is one coil capacitor on each side that is secured to the nearest coil mounting stud.
5. Install the mounting stud nut with a 10mm socket or wrench and tighten to 70 in. lbs. (8 N·m) torque.
6. Connect electrical connector to coil by snapping into position.
7. When all 8 of the new plugs are installed, double-check that all 8 electrical connectors are firmly seated and that all 8 coil nuts are attached and tightened. Reattach the oil dipstick tube and check that no other wiring or connectors were disturbed or moved out of place.
8. Install the resonator assembly. Start by aligning the short rear tube to the throttle body opening. It will take a firm push and some slight twisting action to seat it in place. You can then push down the front of the box, wiggling it some more to align with the bolt tabs on top of the manifold. Install both bottom bolts with a 10mm socket or wrench. Reconnect the breather tube on the driver’s side, located in back of the resonator. Attach the air filter lid by securing the 4 spring clips.
9. Confirm that no tools or parts have been left in the engine bay area. Start engine and check for smooth idle operation.