Welcome to the JeepSpecs.com in-depth page on the WK Generation Jeep Grand Cherokee trailer towing system. Did we miss anything? Please get in touch with us and tell us about it!
Trailer hitch packages, in general, are divided into four classes. Class I and Class II are usually designed to be weight-carrying with use of a ball mount. The Grand Cherokee WJ uses Class III and Class IV, which can carry heavier loads with the use of a weight-distributing hitch assembly that distributes the weight to all trailer and vehicle axles. A ball mount can also be used with Class III and Class IV Hitch Receivers for lesser loads.
Trailer Tow Prep Group (requires V-6 engine)
3.73:1 axle ratio
Mechanical cooling fan
7-way and 4-way plug harness (pre-wired for brake controller)
Trailer Tow Group Class III (requires V-6 engine)
3.73:1 axle ratio
Transmission oil cooler (auxiliary, external)
Frame-mounted receptacle for load-equalizer type hitch
7-way and 4-way plug harness (pre-wired for brake controller)
Trailer Tow Group Class IV (requires V8 or Hemi engine)
3.73:1 axle ratio
Power steering cooler
Transmission oil cooler (auxiliary, external)
Frame-mounted receptacle for load-equalizer type hitch
7-way and 4-way plug harness (pre-wired for brake controller)
Before towing a trailer carefully review this information to tow your load as efficiently and safely as possible. To maintain warranty coverage, follow the requirements and recommendations concerning vehicles used for trailer towing. Perform maintenance services as prescribed in the vehicle’s Maintenance Schedule.
When your vehicle is used for trailer towing, never exceed the gross axle weight rating (GAWR) by the addition of:
The tongue weight of manual. When your vehicle is used for trailer towing, never exceed the gross axle weight rating (GAWR) by the the trailer.
The weight of any other type of cargo or equipment put in or on your vehicle.
Trailer and tongue weight
Gross Trailer Weight (GTW) means the weight of the trailer plus the weight of all cargo, consumables and equipment loaded on the trailer when in actual underway towing condition. The best way to measure GTW is to put your fully loaded trailer on a vehicle scale. The entire weight of the trailer must be supported by the scale.
Always load a trailer with 60% of the cargo weight in the front of the trailer. This places approximately 10% to 15% of the GTW on the tow hitch of your vehicle. This portion of the GTW becomes the tongue weight.
Trailer sway control and equalizing hitch are required for tongue weights above 350 lbs (159 kg)., i.e., trailer weights heavier than 3,500 lbs (1 587 kg).
Complete towing weight information can be found at the end of this page in the Towing specifications section.
Trailer tow wiring
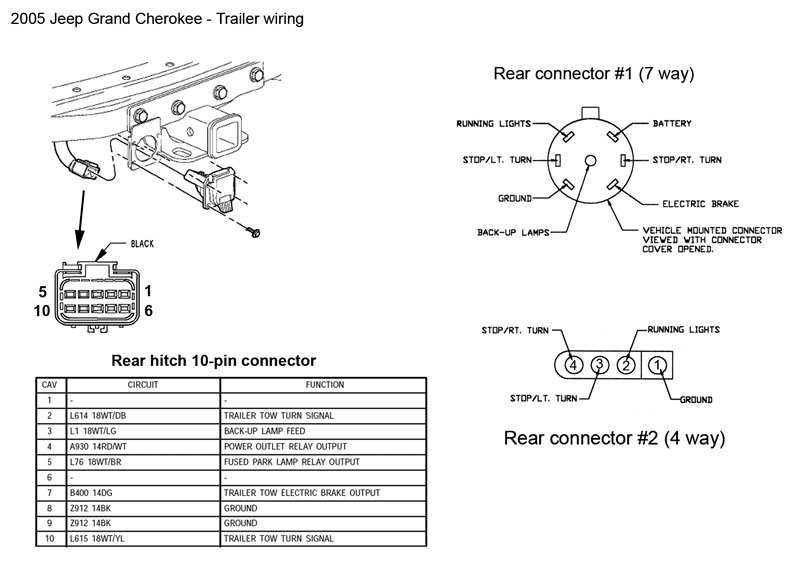
The Trailer Tow Package includes a 4 and 7 pin wiring harness located at the rear underbody of the vehicle. Connect trailer lighting and brakes using factory harnesses only. Do not cut or splice wiring to the brake circuits. The electrical connections are all complete to the vehicle (including wiring for a brake controller) but you must mate the harness to a trailer connector.
Cooling system tips for trailer towing
To reduce potential for engine and transmission over heating in high ambient conditions, take the following actions:
City Traffic: When stopped, put transmission in N (Neutral) and increase engine idle speed.
Highway Driving: Reduce speed.
Air Conditioning: Turn off temporarily.
To reduce the potential for transmission overheating, turn the “TOW/HAUL” feature on when driving in hilly areas or downshift the transmission to the next lower gear range to eliminate excessive transmission shifting. This action will also reduce the possibility of transmission overheating and provide better engine braking.
Recreational towing (behind motorhome, etc.)
1. Towing – 2WD models:
Recreational towing is NOT allowed. Towing with the rear wheels on the ground can result in severe transmission damage which is not covered under the Limited Warranty.
2. Towing – 4WD models:
NOTE: The transfer case must be in the N (Neutral) position, and the transmission must be in the P (Park) position for recreational towing.
CAUTION!
Internal damage to the transfer case will occur if a front or rear wheel lift is used when recreational towing.
Shifting into Neutral (N)
CAUTION!
It is necessary to follow these steps to be certain that the transfer case is fully in N (Neutral) before recreational towing to prevent damage to internal parts.
Use the following procedure to prepare your vehicle for recreational towing.
1. Depress brake pedal.
2. Shift transmission into N (Neutral).
3. Shift transfer case lever into N (Neutral). Refer to “Four-Wheel Drive Operation” in this section.
4. Start engine.
5. Shift transmission into D (Drive).
6. Release brake pedal and ensure that there is no vehicle movement.
7. Shut the engine OFF and place the ignition key into the unlocked OFF position.
8. Shift transmission into P (Park). 9. Apply parking brake.
10. Attach vehicle to the tow vehicle with tow bar. 11. Release parking brake.
CAUTION!
Transmission damage may occur if the transmission is shifted into P (Park) with the transfer case in N (Neutral) and the engine running. With the transfer case in N (Neutral) ensure that the engine is OFF prior to shifting the transmission into P (Park) (refer to steps 7 – 8 above).
Shifting out of Neutral (N)
Use the following procedure to prepare your vehicle for normal usage:
1. Turn the ignition key to the unlocked OFF position. 2. Shift transmission into N (Neutral).
3. Shift transfer case lever to desired position. Refer to “Four-Wheel Drive Operation” in this section.
4. Shift transmission into P (Park).
5. Start the engine.
6. Shift transmission into D (Drive).
NOTE: When shifting out of transfer case N (Neutral), turning the engine OFF may be required to avoid gear clash.
WARNING!
You or others could be injured if you leave the vehicle unattended with the transfer case in the N (Neutral) position without first fully engaging the parking brake. The transfer case N (Neutral) position disengages both the front and rear driveshafts from the powertrain and will allow the vehicle to move regardless of the transmission position. The parking brake should always be applied when the driver is not in the vehicle.
CAUTION!
Do not use a bumper mounted clamp-on tow bar on your vehicle. The bumper face bar will be damaged.
Snow plows, winches etc.
Snow plows, winches, and other aftermarket equipment should not be added to the front end of your vehicle. The airbag crash sensors may be affected by the change in the front end structure. The airbags could deploy unexpectedly or could fail to deploy during a collision.
WARNING!
Do not add a snow plow, winches, or any other aftermarket equipment to the front of your vehicle. This could adversely affect the functioning of the airbag system and you could be injured.
Towing precautions
| WARNING! Improper towing can lead to an injury accident. Follow these guidelines to make your trailer towing as safe as possible: |
||
|
||
Towing data
| 2005-up Grand Cherokee towing specifications | |||
| Engine | Transmission | Maximum gross trailer weight (GTW) | |
| 3.0L CRD V-6 | W5A580 5-speed | 7400 | |
| 3.7L V-6 | W5A580 5-speed | 3500 | |
| 4.7L V8 | 545RFE 5-speed | 6500 | |
| 5.7L V8 | 545RFE 5-speed | 7200 | |
| 6.1L V8 | W5A580 5-speed | 3500 | |
| Gross Vehicle Weight Rating (GVWR) | |||
| 3.0-Liter CRD (2WD / 4WD) | |||
| 3.7-Liter (2WD / 4WD) | 5700 / 5900 | ||
| 4.7-Liter (2WD / 4WD) | 5850 / 6100 | ||
| 5.7-Liter | 6150 | ||
| 6.1-Liter | 5650 | ||
| Maximum Gross Combined Weight Rating (GCWR) | |||
| 3.0-Liter CRD (2WD / 4WD) | |||
| 3.7-Liter (2WD / 4WD) | 8,000 / 8,200 (Class II) | ||
| 4.7-Liter (2WD / 4WD) | 11,200 / 11,450 (Class IV) | ||
| 5.7-Liter (4WD) | 12,200 (Class IV) | ||
| 6.1-Liter | 8,800 (Class II) | ||
| Tongue Load Limit
|
|||
| 3.0-Liter CRD | 720 (Class IV) | ||
| 3.7-Liter | 525 (Class II) | ||
| 4.7-Liter | 720 (Class IV) | ||
| 5.7-Liter | 720 (Class IV) | ||
| 6.1-Liter | 350 (Class II) | ||
| Maximum trailer length | |||
| Class II | 20 ft | ||
| Class III | 25 ft | ||
| IV | 30 ft | ||
| Frontal area limitation | |||
| Class II | 40 sq ft | ||
| Class III | 60 sq ft | ||
| IV | 60 sq ft | ||
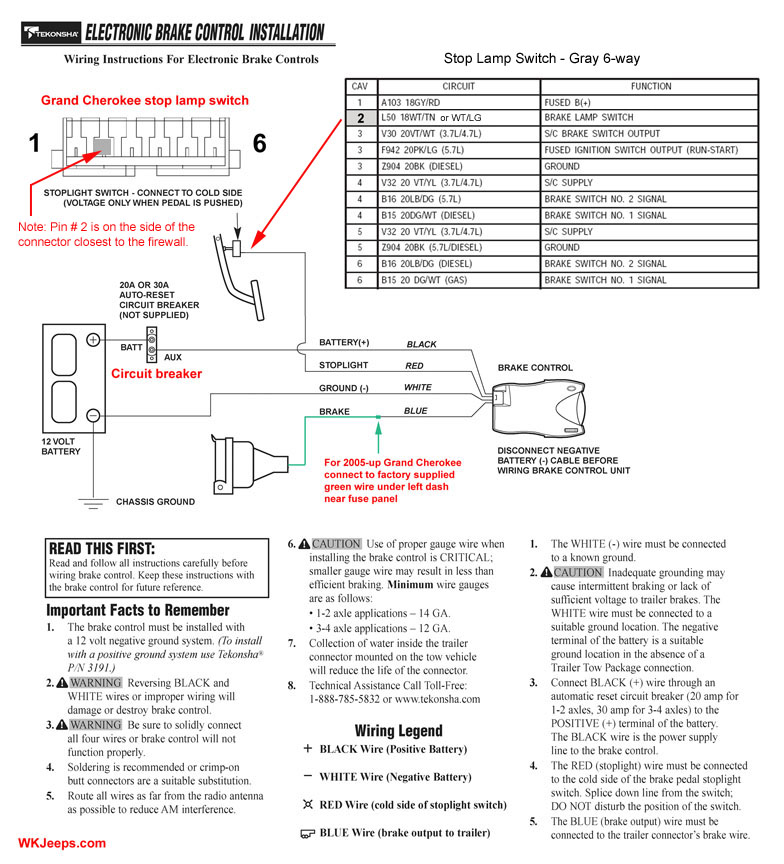
Brake controller wiring
A typical electric brake controller installion requires the hookup of four wires (see diagram at bottom of page):
1. Power – For the 12v power feed, an in-line 20A or 30A auto-reset circuit breaker is required which should be installed close to the battery or power source. Circuit breakers are usually not supplied with brake controllers and may have to be purchased separately.
2. Ground – connects to vehicle chassis Ground
3. Brake lamp switch output – connects to Pin 2 on the vehicle brake lamp switch. Depending on the model year, the wire is either white/light green or white/tan. See the “brake Controller wiring” image diagram at the bottom of this page).
4. Trailer brake controller – connects to factory supplied green wire feed that is located behind the fuse panel (see photo below). This wire runs back to the rear 7-pin exterior trailer connector.
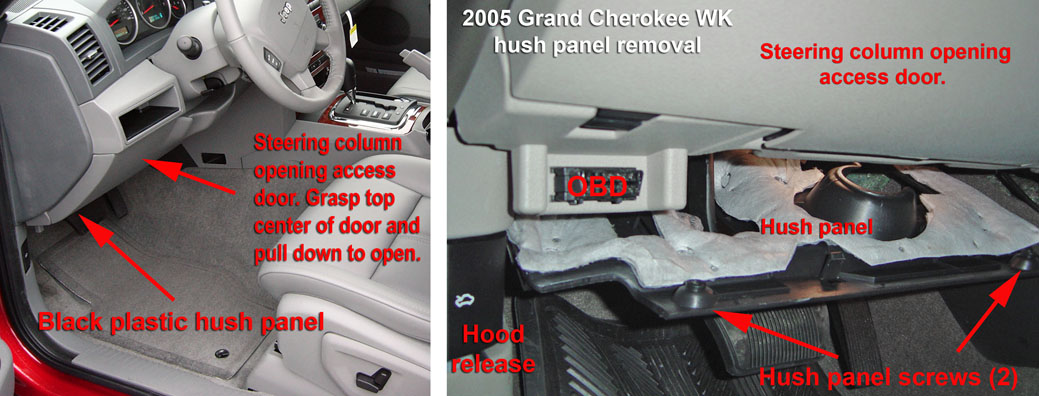
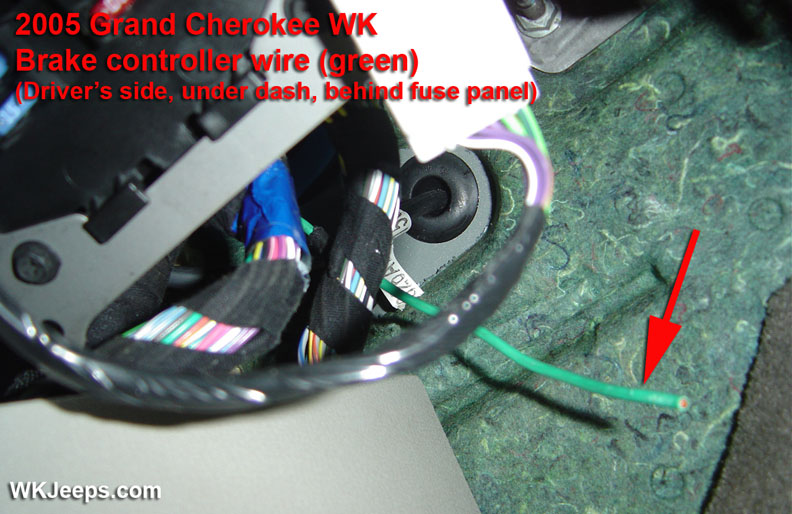
Jeep provides the brake controller feed, a wire that runs from the rear trailer connector up to the left front dash. The wire is located behind the fuse panel and can be accessed by removing the hush panel as shown in the photo below. The steering wheel opening cover can also be pulled down for better access.