
I have TJ Dana 30 shafts in my YJ. The parts you need to do this in a YJ are as follows:
-both inner and outer axles out of a TJ.
-a block off plate for the axle disconnect
-two axle seals
-diff fluid to replace the stuff you drain during the install
When putting TJ shafts into a YJ, you need to put a plate in place of the vacuum switch assembly doo hickey that is there now and seat two seals (one right by the diff and the other on the outboard of the disconnect cavity). I had these parts as part of a kit that come with Warn high strength axles. Guys who buy those shafts for their TJs don’t use those parts and a fellow jeeper was very kind enough to send them to me. The Warn part numbers are:
Inner seal – 37897
Outer seal – 60006
Block off plate – 39147
Note from Stu: I pulled these part numbers off of a reliable forum, however, I’ve not verified them:
Inner seal – Chicago Rawhide CR11343
Outer seal – Spicer 46470
The instructions that came with it are pretty good. Warn’s customer service number is 1-888-722-6730
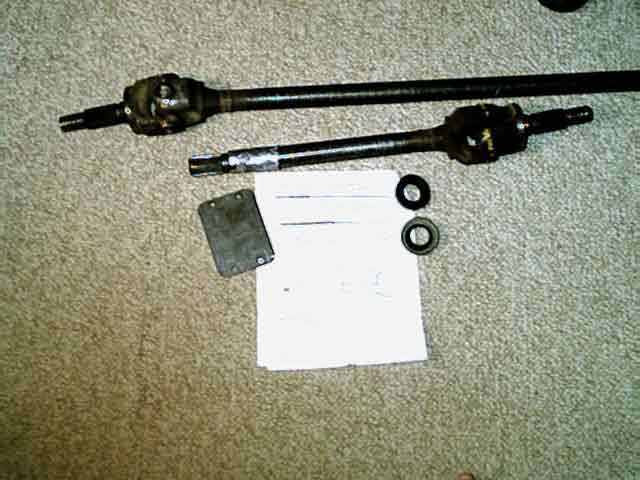
Here is a picture of the parts:
Here are some off-hand abbreviated instructions paraphrased from Warn’s instructions (which are pretty darn good if you are getting the seals from them then make sure the instructions come too) and from the answers I got from fellow jeepers to my own questions when I planned out this modification.
1. Go to Stu’s website and follow the instructions on how to remove everything outside the steering knuckles. ie.. brakes, rotors, tires and he even includes bolt sizes and locations. He did a great job as usual and I won’t even attempt to top his detailed write-up. Go to Stu’s kick ass Dana 30 axle shaft removal write-up.
2. By now you have the shafts ready to be removed, if you haven’t already done so then take out the stock shafts. You will need to remove the vacuum shift motor housing to get out the long side axle. Looking over my FSM it is a pretty obvious process and they have some good illustrations. It starts on page 2-27. Pretty much remove the four bolts holding on the vacuum shift motor housing and gut it of the shift collar fork and anything else there, you will have to have that new outer seal to install in place of the factory stuff. Disconnect the wires going to the shift motor housing and plug the two vacuum lines. Zip-tie anything left of the harness safely under the hood. I really suggest getting a factory service manual if you don’t already have one, it is a must buy item for any jeep owner. I bought mine direct from DC at on the internet at www.techauthority.com The phone number to call is 1-800-890-4038 if you feel talkative.
3. You will need to remove the carrier from your differential in order to place one of the seals. This means getting your tie rod out of the way. Here is a quote from a smart dude named Robert:
“You do not need to use a pickle fork to remove the tie rod. A decent flat bottomed hammer of fair size will work better, a bronze mallet works best. If you haven’t removed them in awhile, hit them with some penetrating oil (not WD) and then use the hammer on the front of the knuckle where the tie rod mounts. Do not hit the tie rod or the tie rod end and leave the castle nut part way on to capture the rod when it falls out of the tapered hole. A pickle fork will only serve to ruin the TRE boots.”
4. Once you have swung the tie rod out of the way you have easy access to the differential. Drain the fluid and open it up. I leave one bolt partially screwed in at the top so that the cover won’t go splashing into the pan of gear oil when I break the gasket seal. Once it’s drained completely I remove the last bolt and the cover.
5. Next is to remove the carrier (make sure you have the axles removed before you pull the carrier or else it won’t come out ) Watch what you are doing and be sure to use a grease pencil or something to mark exactly how you took the carrier out. Here is a quote from another smart dude named Mark:
The bearing and bearing caps must be reinstalled in the same location and position as original. The D30 should have the shims inboard of the bearings, so they will not go anywhere. IF you have regeared, there is a possibility that the installer may have put some shims outboard to cut corners, so keep an eye on it if that’s the case.
That’s really all that’s to it.
6. Time to put the seals in now. As per the Warn instructions you can use a 1 3/8″ socket or appropriately sized wood block to seat the inner seal with blows from a hammer. This is the seal that goes right beside the carrier. Make sure it goes in square and is fully seated, I would also pre-oil the edges with some clean fluid to make sure they don’t get messed up as the shaft is reinstalled.
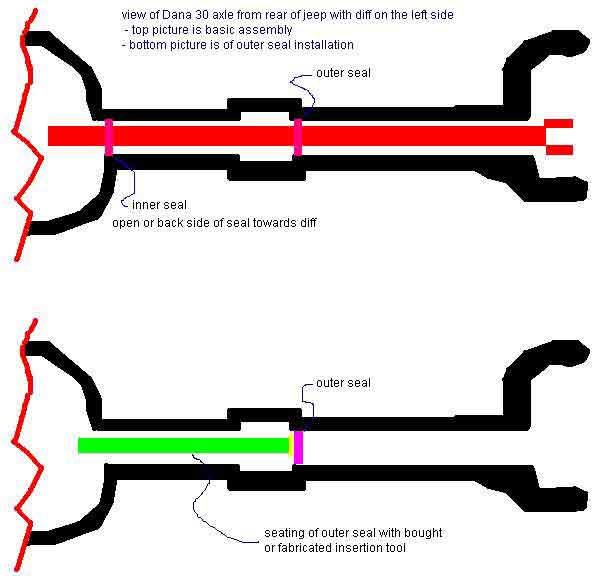
7. The Warn instructions show two ways of seating the outer seal. It goes in the vacuum shift motor area on the side closest to the passenger side tire. I drew a picture of how I plan on installing it and of the basic assembly of the this modification.
8. After both seals are installed then reinstall the carrier being sure to put it back how you marked it before. You do not want to screw up the gear installation.
9. Now slide in the new TJ axles. Be sure to not catch or drag on the seals or you may damage them.
10. Now install the block off plate for the vacuum motor housing. I am going to use some RTV to make sure its sealed tight against the axle housing. Now install the differential cover and refill the diff with the proper gear oil. The manual says to use 75 weight gear lube.
11. Now reverse Stu’s instructions to put back all of the components outboard of the steering knuckles.
The above was a copy and paste from my own previous attempt at typing up these directions from my experience of this install on my 1994 YJ for another Jeeper.
Some notes to add are:
– The brake caliper mounting bolts are only supposed to be torqued to 7ft-lbs. Be careful with that torque wrench and make sure that there is no metal shards in the threads to strip out the hole in the outer steering knuckle.
– The factory hub bearing units can pop in half if you try hard enough. I was using a two jawed puller to pull mine off the stub axles and POW it popped in half. I tapped it back together gently and now it works fine but in the end it took a chisel acting as a wedge between the knuckle and the hub to get it off.
– Make sure there is no contact between the dust shield and the rotor. There wasn’t any on mine at first but after a test drive it was scraping like crazy and I had to get the rotor turned. Apparently I bent the dust shield a little when I was wrestling with the other half of the hub.
– My diff carrier was stubbornly staying put so I took a three foot long pry bar and some sprayed some PB blaster on the bearings and it came out slowly. It turns out I was able to get it out without pulling off the tie rod by turning the carrier on its side. Getting it back in wasn’t too bad, I used a big rubber mallet to make sure I didn’t ding up the teeth of the ring gear at all.
– I removed the entire vacuum harness. It had 4 vacuum lines going to the transfer case and one going to the intake manifold. I used appropriately sized screws from my junk box to plug the holes. The switch unplugged neatly from the disconnect switch vacuum assembly and I taped that up and zip tied it up by the battery.
– It might help you out to borrow or buy a seal installing kit from someone. It is supposed to have die that make it much easier to seat the seals correctly. I had to make do with the washers and sockets I had around the garage and it sure took me longer.
– If you don’t have one already you need a 36mm socket to take off the big nuts that hold your axles to your hub.
– You may have to get your front driveshaft balanced. Mine was bent from when I was high centered before I got a suspension lift. This axle modification brought the damage to my attention as I was getting a new vibration because the front driveshaft now spins all the time like on a TJ.
That is about everything I can think of right now. Feel free to email me if you have any questions. Ty
Update: 02/02/2007
Here are some part numbers to the seal that fits in the passenger side of the axle tube right at the differential. Please bear in mind that I used the seal that Warn sent and haven’t ordered a seal using these numbers. They were kindly provided to me by other guys who have emailed me after they did the axle shaft swap.
Chicago Rawhide Part No: CR-11343
National Part No: 471763
Quadratec Part No: 52420.12