
Welcome to the JeepSpecs.com in-depth page on WJ Generation Jeep Grand Cherokee antenna removal. We have organized as much information as we could find into a helpful article below. Is something incorrect or missing? Please get in touch with us and we’ll fix it!
Antenna removal
1. Disconnect and isolate the battery negative cable.
2. Remove the scuff plate from the right front door sill. The sill trim molding is held in place with molded in snap retainers. Using a trim stick C-4755 or equivalent, carefully pry up one corner of the sill trim. Grasp the edge of the trim and pull up gently to release the snap retainers.
3. Remove the trim panel from the right inner cowl side by removing the screws attaching the cowl trim to the floor. Remove the plastic nut. Grasp cowl trim and pull outward to separate from clip.
4. Reach under the passenger side of the instrument panel near the right cowl side inner panel to disconnect the antenna coaxial cable connector by pulling it apart while twisting the metal connector halves. Do not pull on the cable.
5. Remove the lower rear half of the inner liner from the right front fender wheel house. This may require removing only one or two of the plastic rivets. The rivets can be cut off by sliding a knife under the head, or by drilling out through the center of the top with a drill. For more information on the plastic rivets see Grille and fascia removal.
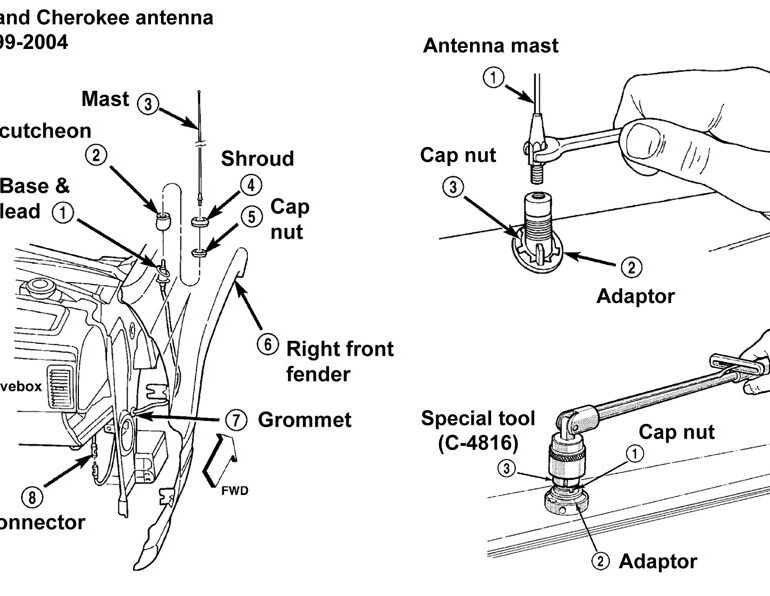
6. Reach through the rear of the right front fender wheel house opening to access and unseat the antenna lead grommet from the hole in the right cowl side outer panel.
7. Pull the antenna lead coaxial cable and connector out of the passenger compartment and into the right front fender wheel house through the hole in the right cowl side outer panel.
8. Unscrew the antenna mast from the antenna base.
9. Remove the plastic shroud from the antenna base cap nut.
10. Remove the antenna base cap nut using an antenna nut wrench (Special Tool C-4816).
11. Remove the antenna escutcheon from the antenna base on the top of the right front fender.
12. Lower the antenna base from the mounting hole in the top of the right front fender.
13. Remove the antenna base and lead from the rear of the right front fender wheel house opening.
Antenna installation
1. Position the antenna base and lead into the rear of the right front fender wheel house opening.
2. Insert the antenna base into the mounting hole in the top of the right front fender.
3. Install the antenna escutcheon onto the antenna base on the top of the right front fender.
4. Install and tighten the antenna base cap nut using an antenna nut wrench (Special Tool C-4816). Tighten the cap nut to 6.8 N·m (60 in. lbs.).
5. Install the plastic shroud onto the antenna base cap nut.
6. Using a wrench, install and tighten the antenna mast onto the antenna base. Tighten the antenna mast to 3.3 N·m (30 in. lbs.).Ensure that the antenna mast is fully seated on antenna base and that there is no gap between the mast and base.
7. Reach through the rear of the right front fender wheel house opening to access and insert the antenna lead coaxial cable and connector into the passenger compartment through the hole in the right cowl side outer panel.
8. From the right front fender wheel house, seat the antenna lead grommet into the hole in the right cowl side outer panel.
9. Install the lower rear half of the inner liner into the right front fender wheel house.
10.reconnect the antenna coaxial cable connector halves.
11. Install the trim panel onto the right inner cowl side.
12. Install the scuff plate onto the right front door sill.
13. Reconnect the battery negative cable.